background image

INSTRUCTION MANUAL

P O S I T I V E  P R E S S U R E

i n t e l l i g e n t  s o l u t i o n s

Summary of Contents for PlastPress POSITIVE PRESSURE+

Page 1: ...INSTRUCTION MANUAL P O S I T I V E P R E S S U R E i n t e l l i g e n t s o l u t i o n s ...

Page 2: ...rmation about its operation Please read it carefully to ensure the correct use of the machine and best performance Considering that the operational process of the product is similar for all applications we describe the laminating technique in chapter 8 and then present each application highlighting its particularities in chapter 9 Note that there are several types of plates of different materials ...

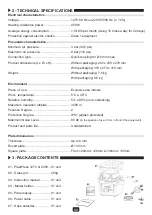
Page 3: ... With packaging 310 x 270 x 310 mm Without packaging 7 5 kg With packaging 8 5 kg Environment Place of use Work temperature Relative humidity Maximum operation altitude Pollution Degree Protection Degree Maximum Noise Level Product and parts life Exclusive use indoors 5 C a 40 C 5 a 90 non condensing 3500 m 2 IPX1 splash protected 80 db In the position of use 30 cm in front of the equipment Undete...

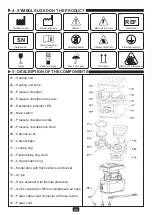
Page 4: ...g Watch out Compressed air 01 Heating unit 02 Heating unit knob 03 Pressure chamber 04 Pressure chamber rotary axis 05 Resistance indicator LED 06 Main switch 07 Pressure chamber handle 08 Pressure chamber lock knob 09 Cabinet cover 10 Cabinet base 11 Locking ring 12 Plate locking ring knob 13 Compensation ring 14 Model door with flat functions and bucket 15 Air pin 16 Hose extender with thermal p...

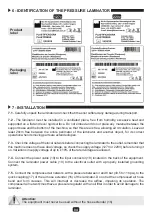
Page 5: ...ecting the laminator to the outlet remember that this machine does not have dual voltage so check the supply voltage 127V or 220V before turning it on Variations in supply voltage of up to 10 of the rated voltage are allowed 7 4 Connect the power cable 19 to the input connector 18 located on the back of the equipment Connect the laminator power cable 19 to the electrical outlet with a properly ins...

Page 6: ...t the electrical outlet where the laminator is connected thus allowing its quick disconnection if necessary 8 USE INSTRUCTIONS Attention If the machine is not used in accordance with the specifications described in this chapter the protections and functions of the product may be impaired For the operational process follow the instructions below orienting yourself by the numbers in the figures in c...

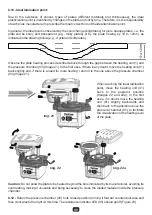
Page 7: ...can be positioned in two ways 8 3 1 Bucket position It allows easier removal of the plates especially when the model has retentions or when using rigid plates and or with thicknesses equal to or greater than 1 0 mm To use the model holder in this position place the model on the bucket side of the model holder 14 and fill with glass grit covering the retaining surface up to the height of the model ...

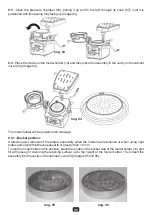
Page 8: ...der 14 position the model holder in the cavity on the cabinet cover 09 of the machine with the mouth facing downwards Then place the model on the model holder Images 08 09 and 10 Important Make sure that the cabinet cover 09 is clean and free of residues for the perfect accommodation of the model holder 8 4 To position the plate move the knob 12 of the locking ring 11 to the right counterclockwise...

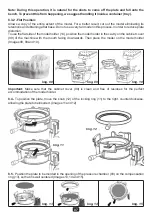
Page 9: ...firm when the plate is locked 8 8 Move the pressure chamber 03 backwards until it reaches its end of course and partially return the heating unit 01 aligning it on the pressure chamber 03 In this position it will be possible to feel a click Images 19 and 20 8 9 Turn on the main switch 06 thus starting the hob heating process The blue light of the main switch 06 and the red light of the resistance ...

Page 10: ...1 In the first uses if there is any doubt move the heating unit 01 back slightly and if there is a need for more heating return it to the one above the pressure chamber 03 Image 21 Img 22 Img 22a Caution Do not allow the plate to be heated beyond the time indicated by its manufacturer avoiding its overheating making it unusable and being necessary to clean the melted material inside the pressure c...

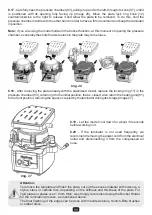
Page 11: ...d turn off the main switch 06 to depressurize the pressure chamber 03 At this moment the air valve will be closed with its characteristic click and the flow of compressed air will be interrupted After complete depressurization turn the pressure chamber lock knob 08 fully to the right counterclockwise to release the pressure chamber opening 03 Image 25 Attention Never force the pressure chamber loc...

Page 12: ...it to the initial position that is closed Also return the heating unit 01 to the front position reducing the space occupied by the laminator during its storage Image 27 Attention _____________________________________________________________ To remove the template and finish the plate cut out the excess material with scissors a stylus steel or carbide disc depending on the stiffness and thickness o...

Page 13: ...lat model door Cut out the plate with a knife scissors or scalpel The brackets must be positioned on the study model before lamination with glue that is not very adherent so that they can be easily removed together with the plate after lamination Next the patient s teeth are properly prepared and the plate is placed with the brackets thus fixing all the brackets at once Carefully remove the plaque...

Page 14: ...e correct relationship is established in the mouth and can be observed if all edges are well demarcated and flawless When the resin starts to heat up the resin tray assembly can be detached and reseated so that it does not polymerize on the preparations When the acrylic is fully polymerized the tray must be removed by bending or stripping it The acrylic obtained will be practically polished 9 5 MO...

Page 15: ... 12 TRAY FOR FLUORIDATION Indicated plates Indicated plates Indicated plates Ideal laminating point Ideal laminating point Ideal laminating point Finishing Finishing Finishing Considerations Considerations Crystal Plate 0 3 mm Crystal Plate 1 0 1 5 2 0 mm Crystal Plate 0 3 mm 1 0 mm soft Plate flow Plate flow Plate flow Use model bucket holder Trim the excess with scissors or a scalpel Use model b...

Page 16: ...oblem and must be replaced The other inside a plastic housing is the spare fuse that should be used to replace the faulty fuse 10 5 Insert the assembly back into the compartment and press it until it is completely seated Remember to buy another fuse of the same specification and fit it in the spare position so that if necessary it can be used on another occasion 10 6 Turn on the machine to check i...

Page 17: ...tor turn it off immediately 13 11 Do not use the laminator near solvents or other flammable materials 13 12 During installation and operation of the laminator check if there are no air leaks 13 13 Do not connect the laminator to compressed air lines with pressures greater than 8 bar 116 psi 13 14 Do not disconnect the air hose extender 16 that is connected to the laminator It has a silicone tube t...

Page 18: ... place free from vibrations and protected from sunlight Problem Possible Cause Solution The laminator does not turn on when the main switch is actuated main switch does not light up The main switch lights up but the heating is inoperative Normal heating however pressurization does not occur No power in the laminator Burnt heating resistor Pressure chamber out of position for plate heating Pressure...

Page 19: ...ing locked by the locking ring Compressed air network pressure too low Insufficient plate heating Air leakage Use of thick plates with low air network pressures Turn the plate lock ring fully to the left clockwise Increase plate warm up time Position heating unit correctly above the plate Check the power supply voltage level of the socket Connect the laminator to an outlet with voltage suitable fo...

Page 20: ... CNPJ 58 538 372 0001 56 I E 637 034 447 113 Website www bioart com br E mail assistenciatecnica bioart com br We remind you that this machine does not have dual voltage so check the voltage of your machine 127 or 220Volts before turning it on Warranty does not cover damage due to improper voltage connection Technical Assistance for the machine may only be carried out by specialized personnel Any ...

Reviews: