background image

Section 9
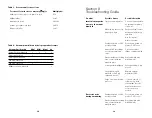
Troubleshooting Guide

Problem

Possible Cause

Possible Solution

Insufficient negative 

Open vacuum regulator

Close vacuum regulator

pressure in vacuum

by turning completely 

manifold

clockwise

Manifold top not seated

Ensure uniform contact

properly on base

between manifold top
and base

Use A stage for
waste collection

Purification plate or CAP

Press down gently on 

not fully seated

plate or CAP to seal

Unused CAP luer fittings

Close unused luer

not closed completely

fittings completely with 

caps

Gasket residue preventing Rinse manifold with
even contact between

distilled water

manifold parts

Lower gasket misaligned

Press gasket back into 
groove 

Physical damage to 

Replace vacuum 

manifold or CAP (e.g. 

manifold or CAP

chips and cracks)

Purge step in purification

If closure of wells or

protocol

columns (e.g. with 
sealing tape restores
negative pressure, no
corrective action
needed.

Excessive noise 

Purification plate or CAP

Press down gently on

during vacuuming

not fully seated

plate or CAP to seat

Gasket residue preventing Rinse manifold with
even contact between

distilled water

manifold parts

13

Table 1.  Pressure unit conversions

To convert from inches of mercury (

““

Hg) to

Multiply by:

millimeters of mercury or torr (mm Hg, torr)

25.4

millibar (mbar)

33.85

atmospheres (atm)

0.03342

pounds per square inch (psi)

0.4912

kilopascals (kPa)

3.385

Table 2.  Vacuum manifolds and their preparative formats

12

Vacuum Purification

Mini

Midi

Maxi

96

Aurum Vacuum Manifold

Promega Vac-Man

Promega Vac-Man 96 

QIAGEN QIAvac 96

QIAGEN QIAvac 24

Millipore vacuum manifold

Summary of Contents for Aurum

Page 1: ...Instruction Manual For technical service call your local Bio Rad office or in the US call 1 800 4BIORAD 1 800 424 6723 Bio Rad Laboratories 2000 Alfred Nobel Dr Hercules CA USA 94547 510 741 1000 1 800 424 6723 4110115 Rev A ...

Page 2: ...Section 4 The Aurum Vacuum Manifold 3 Section 5 Instrument Setup and Use for 96 well Plates 5 Section 6 The Column Adaptor Plate CAP 7 Section 7 Instrument Setup and Use for the Column Adaptor Plate 8 Section 8 The Vacuum Regulator 11 Section 9 Troubleshooting Guide 13 Section 10 Ordering Information 15 ...

Page 3: ...re fast high quality sample preparation in both formats while maintaining the simplicity of handling associated with vacuum processing The uniquely designed vacuum regulator allows for complete control of negative pressure within the Aurum vacuum manifold Section 2 Kit Components The Aurum vacuum manifold contains the following components Vacuum manifold consisting of manifold top manifold base Co...

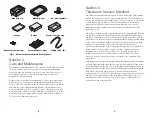
Page 4: ... base and top The top has an attached tubular silicone gasket allowing the manifold base and top to seal when a vacuum is introduced Attached to the opening in the manifold top is a flat silicone gasket enabling Aurum 96 well purification plates or the CAP to establish an airtight seal with the manifold top when a vacuum is applied Collectively these two gaskets facilitate self seating of all comp...

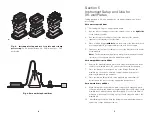
Page 5: ... manifold top and place the A stage in the depression in the center of the manifold base The etched letter A should be facing up 7 Place the waste collection tray on top of the A stage Replace the manifold top on the base ensuring complete and uniform contact between the manifold top and base 8 Place the desired 96 well plate on the manifold top and follow the instructions in the protocol for the ...

Page 6: ... us on the Web at www bio rad com aurum Vacuum manifold Vacuum filter flask Vacuum regulator Vacuum source Aurum Vacuum Manifold 96 Well Purification Protocol Overview For complete protocol consult instruction manual Tubing provided is 4 ft long and must be cut into appropriate pieces before proceeding Vacuum Setup Conditions Vacuum source to manifold 1 Use tubing to connect vacuum source to right...

Page 7: ...egative pressure within the manifold Vacuum purification conditions 6 Insert the CAP luer ends up into the depression in the vacuum manifold top Ensure that the CAP rests evenly on the gasket 7 Close the unused luer fittings with the caps provided Close caps by rotating clockwise until light resistance is encountered Excessive tightening of a cap may cause the luer fitting to dislodge when the cap...

Page 8: ... com aurum Neutralized lysate Vacuum manifold Vacuum filter flask Vacuum regulator Vacuum source Elution solution Fig 7 Vacuum regulator with clear representation of the gauge Aurum Vacuum Manifold Column Purification Protocol Overview For complete protocol consult instruction manual Tubing provided is 4 ft long and must be cut into appropriate pieces before proceeding Vacuum Setup Conditions Vacu...

Page 9: ...o Replace vacuum manifold or CAP e g manifold or CAP chips and cracks Purge step in purification If closure of wells or protocol columns e g with sealing tape restores negative pressure no corrective action needed Excessive noise Purification plate or CAP Press down gently on during vacuuming not fully seated plate or CAP to seat Gasket residue preventing Rinse manifold with even contact between d...

Page 10: ...Au ur ru um m p plla as sm miid d 9 96 6 k kiit t 2 x 96 well preps includes 2 grow blocks 2 grow membranes 2 binary units 2 lysate filtration plates and 2 plasmid binding plates 2 collection plates reagents protocol overview and instruction manual Problem Possible Cause Possible Solution Worn manifold gasket Replace gasket Incorrect negative Vacuum source connected Connect vacuum pressure from va...

Reviews: