


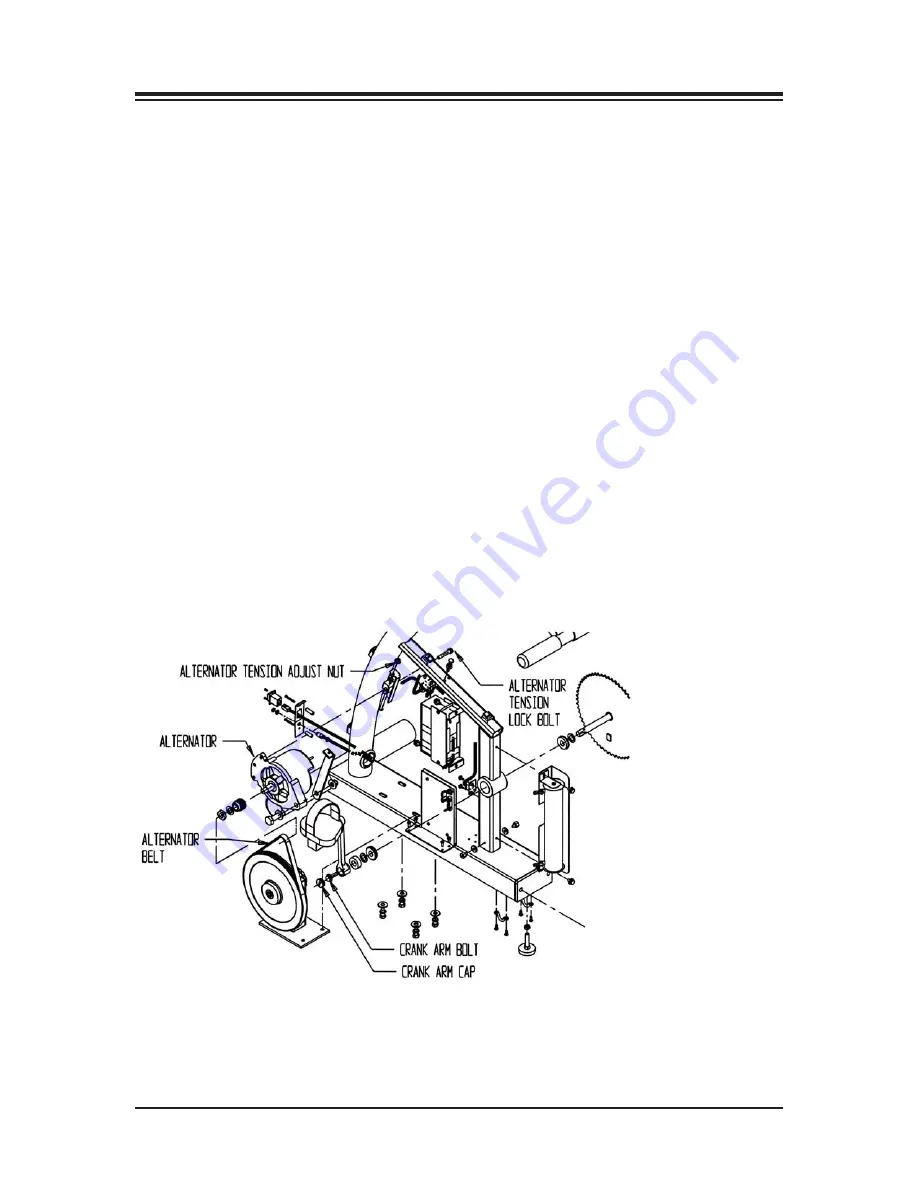
REPLACING THE ALTERNATOR BELT
(See Figure 4.)
NOTE:
Before proceeding turn power OFF and ensure power pack is unplugged from outlet.
1. Remove the twelve Phillips screws that secure covers. Carefully slide the left cover out of the
way. If you would like to remove the cover completely, remove the pedal crank*.
2. Loosen alternator tension lock bolt (refer to illustration). Now turn the alternator tension
adjust nut counter clockwise, until belt is loose enough to remove from pulleys.
3. Place belt around alternator pulley and large flywheel (refer to illustration).
4. Turn alternator tension adjustment nut clockwise to tighten belt. For proper tensioning turn
nut until belt deflects no more then .25", by pressing on the belt between the pulleys. The
location where to press on belt is marked by the belt identification arrow on illustration.
5. Once tension is adjusted, tighten alternator tension lock bolt.
6. Slide the covers into place and reinstall the twelve Phillips screws.
7. Test ergometer operation.
* Remove pedal crank arm caps by unscrewing with flat blade screw driver. Once the cap is
removed, remove .50" crank arm bolts (they are secured with Loctite). Next remove crank arms.
A pedal crank arm puller (available at most bicycle repair centers,) is recommended. To install
crank arms, slide crank arms onto shaft so that the cranks are 180 degrees apart. Next apply
Loctite Blue to the bolt threads. Tighten.
Figure 4. Changing the alternator belt.
11. SPECIFICATIONS
— 29 —
MAINTENANCE & SERVICE PROCEDURES
Summary of Contents for 950-120
Page 32: ...13 REPLACEMENT REPLACEMENT 32 ...
Page 33: ...13 REPLACEMENT PARTS 33 REPLACEMENT ...
Page 34: ...CONTENTS REPLACEMENT 34 ...
Page 35: ...CONTENTS 35 REPLACEMENT ...
Page 36: ...CONTENTS REPLACEMENT 36 ...
Page 37: ...CONTENTS 37 REPLACEMENT ...
Page 38: ...CONTENTS REPLACEMENT 38 ...


