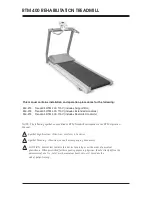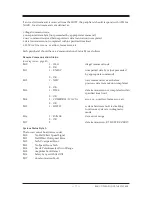
The Biodex RTM 400 with Numeric Display provides a simple-to-use, easy-to-read, no-nonsense
approach to treadmill exercise. Real time readings are displayed for Time, Distance, Calories and
MET values. At the touch of a key, users can select speed, elevation and belt direction, or set an end
time for exercise duration.
POWER-UP
To provide power to the treadmill, ensure the power plug is connected to an appropriate socket.
Press the ON/OFF switch, located on the base of the treadmill in the left corner at the front end,
to the “l” (ON) position. All display windows should illuminate to indicate that power to the
treadmill is ON and the display is active.
RTM 400 NUMERIC DISPLAY PANEL CONTROL KEYS AND FUNCTIONS
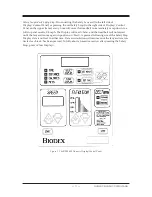
(See Figure 1.)
<Start>:
Pressing the <Start> key with the treadmill ON activates the treadbelt and clock, and
commands the system to begin gathering data with commencement of the exercise session.
Initial starting speed for treadbelt movement in either forward or reverse direction is 0 mph.
Speed can be increased or decreased in .1 mph increments.
<Stop>:
Press <Stop> at any time to ramp the treadmill to a complete stop. All data on the
screen will be retained. At this point, you can press <Clear Display> to end the session and
immediately clear all data, or press <Stop> to end the session but retain all data for 90 seconds
before it is cleared.
<Speed>:
Use the <Speed> <+> and <-> control keys on the left side of the display to adjust the
speed to the desired level. The speed will immediately respond to your input so be sure to
inform the patient that the treadbelt will begin to accelerate or decelerate. Gathering of data
begins immediately at the point from which the treadmill begins to move in either forward or
reverse direction.
<Elevation>:
If incline or decline is desired, use the <Elevation> <+> and <-> control keys in the
middle of the display panel to set the appropriate grade. Incline and decline can range from 0 to
15% grade. Note that there is a slight delay between movement of the Elevation display bar and
the actual movement of the treadmill.
<Belt Direction>:
Treadmill belt direction is selected via the <Forward> or <Reverse> keys. Belt
direction can be changed only when speed is set to 0 speed. If you try to change direction while
the treadbelt is moving, the system will automatically ramp down to 0 speed and wait for fur-
ther input. For reverse direction, a minus (-) sign precedes the speed value. An orange LED
denotes the selected belt direction.
<Select Display>:
The <Select Display> key, located at the center of the control panel’s top section, is
used to determine which parameter will be displayed as data is acquired. All parameters are listed
to the left of the <Select Display> key. An LED denotes the currently active parameter. Once you
press the <Start> key, the display will scroll through the parameters, showing each for a 15-second
interval before moving onto the next. An LED, to the left of the currently displayed parameter,
denotes the active selection. To constantly display a single parameter, use the <Select Display> to
rotate through the parameter list and make your selection
after
the treadbelt has begun to move.
3. THE NUMERIC DISPLAY/CONTROL PANEL
— 9 —
NUMERIC DISPLAY/CONTROL PANEL
Summary of Contents for 950-273
Page 4: ......
Page 6: ......
Page 12: ......
Page 18: ......
Page 26: ......
Page 28: ...CONTENTS OPTIONAL 28 Figure 12 Handrail installation...
Page 30: ......
Page 32: ......
Page 34: ......
Page 35: ...12 ASSEMBLY DRAWINGS SCHEMATICS 35 ASSEMBLY DIAGRAMS SCHEMATICS...
Page 36: ...CONTENTS ASSEMBLY DIAGRAMS SCHEMATICS 36...
Page 37: ...CONTENTS 37 ASSEMBLY DIAGRAMS SCHEMATICS...
Page 38: ...CONTENTS ASSEMBLY DIAGRAMS SCHEMATICS 38...
Page 39: ...CONTENTS 39 ASSEMBLY DIAGRAMS SCHEMATICS...
Page 40: ...CONTENTS ASSEMBLY DIAGRAMS SCHEMATICS 40...
Page 41: ...CONTENTS 41 ASSEMBLY DIAGRAMS SCHEMATICS...
Page 42: ......
Page 43: ......


