8
4. Problems that may occur
4.1. Odour
If odour problems occur:
•
check that there is no liquid on the bottom of the drum. If there
is some liquid, ensure that all users of the toilet have understood
the operation and purpose of the flap. Add bulking material to
absorb the excess liquid.
•
check that the ventilation of the toilet is operational. Natural ven-
tilation: make sure that the ventilation pipe routed from the toilet
unit to the roof, is straight and extends above the roof ridge. If
the ventilation pipe is not straight or does not extend above the
roof ridge, you can repair the installation or improve the ventila-
tion by installing a separate Exhaust Ventilator (see Accessories
on page 6). If the property is equipped with mechanical extract
ventilation, the Naturum is connected to this system (see point
1.2.3).
•
any devices that affect the pressure of the inside air, such as a
fireplace or a roof or stove extract fan, may impair the natural
ventilation by causing vacuum inside the Naturum. To avoid this,
ensure a sufficient supply of replacement air so that the replace
-
ment air is never routed via the Naturum.
4.2. Condensed water
If water leaks from the ventilation pipe to the toilet:
•
check that the ventilation pipe of the toilet is properly insulated
in the cold space. If the pipe is not insulated, insulate it later,
if necessary. Add dry bulking material into the unit, and mix it
using the service rake. Simultaneously, depress the pedal (part
31).
4.3. Mass is moist
Moist mass hinders the motion of the drum, and the mass may
slide.
•
check that the ventilation pipe of the toilet is properly insulated
in the cold space. If the pipe is not insulated, insulate it.
• ensure that there is nothing under the separating flap that might
prevent it from closing properly. Remove and wash the valve as
required.
•
ensure that all users of the toilet have understood the operation
and purpose of the flap. Add dry bulking material into the unit,
and mix it using the service rake. Simultaneously, depress the
pedal (part 31).
4.4. The mass slides, i.e. does not move with
the drum
If the mass slides inside the drum, it is too wet.
•
see point 4.3
4.5. The mass forms a heap inside the drum
Have you added too much bulking material at one time?
It is normal that, when bulking material is added, the mass heaps
up for a while inside the drum. As required, push the mass down
using the service rake (part 23), and depress the pedal (part 31).
4.6. The mass clods
If the mass clods or is difficult to turn around, it is too dry.
•
rake the entire compost drum using the service rake (part 23),
and add some moist bulking material.
4.7. The mass does not rise into the emptying
drum
If the mass does not rise into the emptying drum, it is too dry.
•
Moisten the mass either by adding water through the seat open-
ing or add some moist bulking material. As necessary, mix the
moist mass with the rest of the mass using the service rake, and
simultaneously depressing the pedal.
4.8 The pedal feels stiff
If the pedal appears stiffer than normally:
• check whether the emptying receptacle is full; if it is, then it
must be emptied
•
check that the mass is suitably moist (see point 4.3)
4.9 The pedal feels loose
If the pedal starts to feel loose, and the drum does not rotate:
•
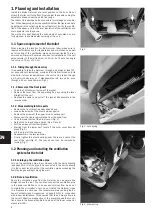
open the front jacket. Check whether the draw wire has come
loose from the pedal or is cut off. Reconnect or replace, as nec-
essary.
•
Check whether the draw spring on the wire has come loose or is
cut off. Reconnect or replace, as necessary.
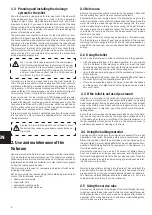
•
the draw wire is the one in the rear groove, which, viewed from
the front, is attached to the spring on the left-hand side (Fig. 4).
If the wires and the springs are in order, but the pedal does not rise,
or it rises too slowly, the wire has unwound.
•
turn the draw wire once around the rear way, clockwise viewed
from the side, and after that reconnect it to the pedal.
4.10 The wires slide
If the wire slides in its groove, and the drum does not rotate prop-
erly.
•
Clean the groove from dirt and grease. You can use acetone for
this. Be careful not to spill it on the glass-fibre parts.
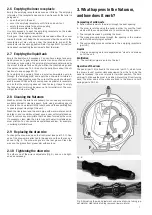
•
If cleaning does not help, remove the heat shrink from the end of
the wire, and tighten the wire (see Fig. 8). The other end of both
wires is adjustable.
4.11 Some liquid leaks on the floor
Any liquid ending up in the drum may leak onto the floor from under
the jacket at the front edge of the unit:
•
check that the drain trap is not blocked. As necessary, clean it
with crystallised sodium and warm water.
• check that all users of the unit have understood the significance
of the separating flap. Add bulking material to absorb the excess
liquid.
4.12 Insects
If the toilet unit is infested with, for example, flies:
•
empty the emptying receptacle into a compost and then wash it.
• do away with any flying insects in the toilet space using pyrethrin-
based spray. Repeat the treatment daily until flying insects no
longer can be spotted. Repeat the cure immediately, if insects
reappear in the space
•
aside from the spray, also use an insecticide that shall be mixed
with water Make a mixture of half a litre of the insecticide, and
mix it with the mass. The liquid pesticide can also be mixed with
the peat bedding. The treatment shall be repeated once a week
until the insects no longer appear.
•
consult your local garden centre to select a suitable pyrethrin-
based product.
•
start using granulated Naturum Bulking Material instead of Bio-
lan Peat,
•
check that when natural ventilation is applied, the ventilation
pipe is routed from the toilet unit straight to the roof, and that it
extends above the roof ridge. If the ventilation pipe is not straight
or does not extend above the roof ridge, you can repair the instal-
lation or improve the ventilation by installing a separate Exhaust
Ventilator (see Accessories on page EN-10).
Soil dwelling mites are the decomposers in the compost, They very
rarely want to leave the compost. If they run out of nutrition, they
may leave the compost, and appear as fine light dust on the floor.
Control with a pyrethrin-based spray insecticide and vacuum out.
The control must be performed several times in series within 2-3
weeks, at intervals of a few days.


