4
EN
1. Planning and installation
Install the Biolan Naturum at a level position on the floor. Do not
attach the toilet unit to the floor. Finely adjust the position using the
adjustable shoes under the unit's front edge.
The toilet unit is equipped with connectors for drainage and ventila-
tion. When designing, observe explicitly whether the liquid needs to
be gathered into a collecting tank or a treatment facility, the ventila-
tion of the sewer, and the thermal insulation of the ventilation and
drain systems in cold spaces.
The method for post-treating the solid waste should also be care-
fully planned, to enable easier servicing of the unit.
1.1 Space requirement of the toilet
When planning the location for the Naturum toilet, make sure to
reserve sufficient space for its operation and maintenance as well
as for routing of the ventilation pipe and drained liquids The rec-
ommended minimum floor area required for installation of the unit
perpendicular to the wall is 80 cm x 140 cm, but if set at an angle
in a corner, 130 cm x 130 cm.
1.1.1 Taking through the doorway
It is possible to take the Naturum through a doorway at least 67-
cm wide without dismantling, provided that it is first turned onto its
side. With its front jacket removed, the unit can be taken through
a 65-cm wide doorway or, if disassembled into two parts, even
through a 55-cm wide doorway (Fig.1).
1.1.2 Removal of the front jacket
•
Undo the 7 attachment screws of the jacket.
• Remove the lever from the separating flap by pulling the lever
straight off the unit.
•
Depress the pedal, and pull off the jacket. Reassemble in the
reverse order.
1.1.3 Disassembling into two parts
•
Remove the front jacket, as described above.
•
Loosen the screws of the drum's side supports.
•
Remove the screws of the upper drum cover support.
•
Disconnect the liquid removal pipe from the drain trap.
•
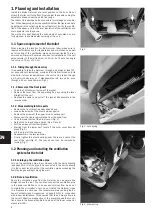
Undo the lower bolts of the drum cover (Fig. 2).
•
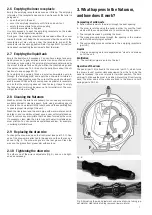
Detach the hold and draw springs (Figs. 3 and 4).
•
Pull the wires out from their groove.
•
Starting from the lower part, twist off the drum cover from its
place (Fig. 5).
•
Lift the drum off the bearing.
•
Reassemble in the reverse order.
•
Finally, tighten the drum bearing under the rear air vent at the
rear of the unit (Fig. 6). The rear air vent can be removed by
turning (Fig. 7).
1.2 Planning and installing the ventilation
system for the toilet
1.2.1 Joining up the ventilation pipe
Join up the ventilation pipe in accordance with the parts drawing
(see page EN-5). Cut the pipe to be connected to the unit by sawing
it to the correct length so that the ventilation pipe succeeding the
flexible pipe goes upright along the wall.
1.2.2 Natural ventilation
Route the ventilation pipe from the Naturum as a separate line
straight above the roof. You can also connect the ventilation pipe
to the sewer ventilation or to an unused chimney flue. So as not
to disturb the circulation of air, do not install the Naturum close
to a fireplace in active use. We recommend always using the Ex
-
haust Ventilator (see Accessories on page EN-10) in connection
with indoor installations. This ensures that the air always flows in
the correct direction irrespective of the prevailing weather condi-
tions. Locate the Exhaust Ventilator instead of the lower connector
sleeve (part 46).
Fig. 2
Fig. 3: hold spring
Fig. 4: draw spring


