background image

TG

RADIENT

 Manual ___________________________________________________________ 7

3.4

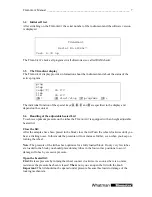
Initial self test

After switching on the TG

RADIENT

 the serial number of the instrument and the software version

is displayed.

                   TGradient

             Serial No 1234567

Vers. 4.00 op

The TG

RADIENT

 checks all programs in all directories (so called RAM check).

3.5

The TGradient display

The TG

RADIENT

 display provides information about the instrument and about the status of the

active program. 

prog
step
temp[°C]

25.2°C

time
lid

25.4°C

 A ?

 B start/stop

 C programs

 D +

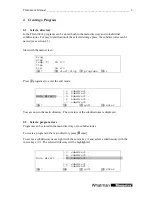
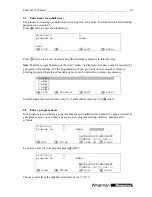
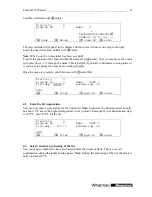
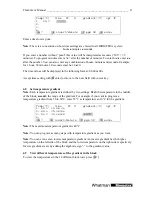
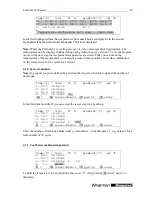
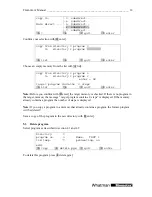
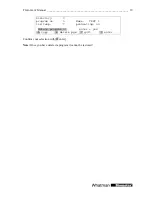
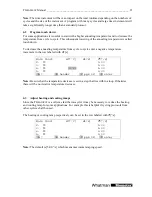
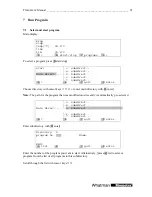
The individual function of the special keys A , B , C  and D are specified in the display and
depend on the context.

3.6

Handling of the adjustable heated Lid

To achieve optimum pressure on the tubes the TG

RADIENT

 is equipped with an height adjustable

heated lid. 

Close the lid:

After the samples have been placed in the block close the lid. Turn the wheel clockwise until you
hear a clicking noise. In this mode the pressure will not increase further, even when you keep on
turning the wheel. 

Note:

The pressure of the lid has been optimize for a fully loaded block. If only very few tubes

are loaded to the block you should place dummy tubes in the four corner positions to avoid
damage of tubes by excessive pressure.

Open the heated lid:
First: 

Release pressure by turning the wheel counter clockwise. As soon as there is no more

resistance the pressure has been released. 

Then: 

now you can open the lid with the knob.

Important:

 The lid should not be opened under pressure because this leads to damage of the

locking mechanism.

Summary of Contents for 050-800

Page 1: ...___________ 1 Manual Software Version 4 20 May 2003 Order No 050 800 TGradient 48 050 801 TGradient 96 Biometra biomedizinische Analytik GmbH Rudolf Wissell Str 30 D 37079 Goettingen Tel 0551 50 686 0 Fax 0551 50 686 66 email info biometra co uk http www biometra com ...

Page 2: ...ested within a single run A gradient with a maximum range of 40 C can be set at any program step We have taken strong efforts to create a gradient as linear as possible At the same time it was very important to ensure homogenous temperature distribution within each row The temperature data for each row of the block can be retrieved through the help menu The new TGRADIENT is an outstanding instrume...

Page 3: ... order to improve the heat transfer between the block and the sample tubes If you still decide to use oil do not use silicon oil Mineral oil may be used 2 2 Warning symbols The thermoblock and the heated lid will reach high temperatures during operation Both thermoblock and heated lid can burn you Rapid heating of the thermoblock can cause liquids to boil explosively Always wear safety goggles dur...

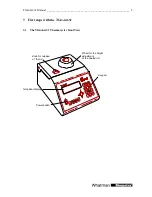
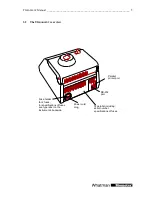
Page 4: ...__________________________________________ 4 3 First steps with the TGRADIENT 3 1 The TGRADIENT Thermocycler front View Wheel for the height adjustment of the heated lid Keypad Graphical display Power switch Knob for release of the lid ...

Page 5: ..._____________________ 5 3 2 The TGRADIENT rear view Parallel printer port RS 232 port Power cord plug Fuse holder for 2 fuses for specifications of fuses see type label on the instrument s backside Type label including serial number specifications of fuses ...

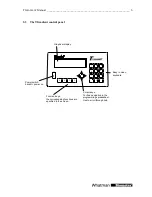
Page 6: ...TGradient control panel 7 9 8 1 2 3 4 5 6 0 A B C D Power Cursor keys For free navigation in the programming spreadsheet Use to scroll through lists Function keys the corresponding functions are specified in the screen Power switch backlit power on Easy to clean keyboard Graphical display ...

Page 7: ...heated Lid To achieve optimum pressure on the tubes the TGRADIENT is equipped with an height adjustable heated lid Close the lid After the samples have been placed in the block close the lid Turn the wheel clockwise until you hear a clicking noise In this mode the pressure will not increase further even when you keep on turning the wheel Note The pressure of the lid has been optimize for a fully l...

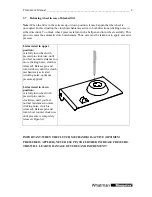
Page 8: ... pressure Lid arrested in upper position carefully turn wheel with pressed pin clockwise until you feel normal resistance no more clicking noise clutch is released Release pin and turn lid down until the clutch mechanism is activated clicking noise optimum pressure applied Lid arrested in down position carefully turn wheel with pressed pin counter clockwise until you feel normal resistance no more...

Page 9: ...ograms D Press C programs to enter the edit mode 3 subdirect 4 subdirect Main direct 5 Subdirect 6 subdirect 7 subdirect A B C quit D enter You are now in the main directory The structure of the subdirectories is displayed 4 2 Select a program store Programs can be stored in the main directory or in subdirectories To create a program in the main directory press D enter To access a subdirectory mov...

Page 10: ...s choose an empty memory Existing programs that are not needed any more can be deleted to provide new memory 0 empty 1 empty 2 empty 3 empty 4 empty A list B forward C quit D enter Scroll through the list with cursor keys ñò and confirm memory with D enter 4 4 Enter a program name Each program is specified by a program number and a subdirectory number To make retrieval of a program easier you can ...

Page 11: ...ou want to change the name of an existing program Once the name is complete confirm name with C name OK Directory 3 program no 0 Name TEST 1 lid temp C preheating on edit A B files C pgm OK D enter 4 5 Enter the lid temperature You can now enter a temperature for the heated lid Note In general the lid temperature should be about 10 C above the highest temperature in the protocol Example If your de...

Page 12: ...g rates or time increments For further details on these special parameters see section 5 1 Note You can navigate in the spreadsheet without limitations with the four cursor keys ïðñò Note Each setting is confirmed with D enter The cursor moves automatically to the next field Alternatively you can confirm a value by moving forward with the cursor keys Note At any time you can call up the help funct...

Page 13: ...with cursor key 4 8 Set temperature gradient Note Each temperature gradient is defined by two settings first the temperature in the middle of the block second the range of the gradient For example if you want to program a temperature gradient from 50 to 60 C enter 55 C as temperature an 10 C for the gradient Temp C time ß gradient C opt à 1 95 0 0h 5m 0s 2 95 0 0h 0m30s 3 55 0 0h 0m30s 10 C 4 A B ...

Page 14: ...ithout gradient For further information on the current status of the cycler see section 7 4 10 Set cycle number Note In general loops are defined by selecting the target for the back loop and the number of backloops Temp C time ß gradient C opt à 1 95 0 0h 5m 0s 2 95 0 0h 0m30s 3 55 0 0h 0m30s 4 72 0 0h 0m30s 2 A B insert delete C pgm OK D enter In the field labeled with ß you can select the targe...

Page 15: ...s 3 C 4 12 Save program Save program with C pgm OK The program data are stored in the permanent memory Directory 3 program no 0 Name TEST 1 number of steps 5 runtime 1h10m23s edit A B C D The runtime is calculated and displayed Note To view the current remaining runtime at any time of the run press A info in the main menu ...

Page 16: ...te insert program steps The programming spreadsheet Temp C time ß gradient C opt à 2 95 0 0h 0m30s 3 55 0 0h 0m30s 4 72 0 0h 0m30s 2 29 5 A B insert delete C pgm OK D enter To delete or insert a program step press B insert delete insert delete step 2 95 0 0h 0m30s 3 55 0 0h 0m30s 4 72 0 0h 0m30s 2 29 5 A B delete input C quit D enter Enter the number of the step that you want to insert delete Note...

Page 17: ...he insertion and deletion of steps may have an influence on existing cycles Be sure that all settings are updated to maintain a correct cycle 5 2 Copy program Select the program you want to copy as described in section 4 1 and 4 2 Directory 3 program no 0 Name TEST 1 lid temp 105 C preheating on A B files C pgm OK D enter Press B files Directory 3 program no 0 Name TEST 1 lid temp C preheating on ...

Page 18: ...list B C quit D enter Note Before you confirm with D enter the target memory is checked If there is no program in the target memory the message target program contains 0 steps is displayed If the memory already contains a program the number of steps is displayed Note If you copy a program to a memory that already contains a program the former program will be deleted Save a copy of the program in t...

Page 19: ...___________________________ 19 Directory 3 program no 0 Name TEST 1 lid temp C preheating on delete program 0 enter yes A copy B delete pgm C quit D enter Confirm your selection with D enter Note Once you have deleted a program it cannot be restored ...

Page 20: ...rs move the cursor to the left side of the display labeled with Main funct Alternatively you can move the cursor to the extreme right Temp C time ß gradient C opt à 1 95 0 0h 5m 0s 2 95 0 0h 0m30s 3 55 0 0h 0m30s 4 72 0 0h 0m30s 2 A B header C pgm OK D enter Note In the main screen you will find an information that a special parameter has been modified This is indicated by a in the row labeled wit...

Page 21: ...cycle to cycle enter a negative temperature increment in the row labeled with dT s Main funct dT C dt s ä s 2 ß 5 00 3 ß 5 00 4 ß 0 20 5 00 5 ß 5 00 A B header C pgm OK D enter Note Be sure that the temperature decrease is set in a step that lies within a loop Otherwise there will be no iterative temperature decrease 6 3 Adjust heating and cooling ramps Since the TGRADIENT is a extreme fast thermo...

Page 22: ...Choose directory with cursor keys ð ñ ò or enter main directory with D enter Note The path for the program that was modified most recently is automatically pre selected 3 subdirect 4 subdirect Main direct 5 Subdirect 6 subdirect 7 subdirect A B C quit D enter Enter subdirectory with D enter Directory 5 program no Name Edit A list B C quit D enter Enter the number of the program you want to start A...

Page 23: ...d Prog 0 TEST 1 dir 3 Step 1 temp C 25 0 C à 95 0 time lid preheating A info B start stop C programs D Note In the default setting preheating on the block is held constantly at 25 C The program starts as soon as the lid has reached the set temperature During the preheating phase the display of the lid temperature alternates between the current lid temperature and preheating Prog 0 TEST 1 dir 3 Ste...

Page 24: ... 0 55 0 60 0 time 0h 0m23s à0h 5m 0s lid 104 9 C A info B start stop C programs D Press A info to call up the current remaining time calculation Additional information about active pgm Status Step 2 Cycle 3 of 30 Remaining time 2h 57m Stop or pause key B in main menu A gradient B C quit D The current remaining run time id displayed in line 4 7 4 View current gradient temperatures While the TGRADIE...

Page 25: ...essage No gradient data available To leave the window press C quit 7 5 Pause stop program Main display during operation Prog 0 TEST 1 dir 3 Step 1 cycle 8 of 30 temp C 72 0 C à 72 0 time 0h 0m18s à0h 0m30s lid 104 8 C A info B start stop C programs D To pause or stop the active program press B start stop Stop pause directory 3 program no 0 test 1 A B pause C quit D stop Select B pause to pause pro...

Page 26: ... 1 graphic protocol 2 graphic protocols 3 print program 4 print all programs A B C quit D enter Scroll through the list with the cursor keys ñ ò Confirm the highlighted function with D enter 8 2 Switch beep on off There is an option for an audible signal whenever a program enters a pause and when the program is finished If this option is active the beep can be switched off by pressing any key of t...

Page 27: ...ed by Personal Computer The Tcontrol iT software is available with the order number 050 820 To acivate remote control the Tgradient has to be set to RS232 control mode For detailled information on controlling Tgradient with PC please refer to the Tcontrol iT manual 8 5 Block type Display and calculation of gradient temperatures depends on the block version used A temperature gradient can be run wi...

Page 28: ...s for cleaning 10 Exchange of modules For exchange of modules you need two hexagonal keys number 3 and number 5 These keys are included in the shipment of the module Remove module Ü Remove power plug Ü Place instrument upside down on a soft surface Ü Remove the 2 screws that close the shutter hexagonal key number 3 Ü Remove the 4 screws that hold the block hexagonal key number 4 Ü unplug connector...

Page 29: ...r placed under the cycler can be attached to the inlet as the fan is in operation Dirt can be removed easily from the inlet with a conventional vacuum cleaner 11 2 Adaptation of protocols from other cyclers Since the T1 THERMOCYCLER is an extremely fast thermocycler it may be necessary to reduce the heating and cooling ramps to run protocols from other cyclers For the setting of the heating and co...

Page 30: ...with a conventional vacuum cleaner 12 2 Restart due to unrecognized power failure High voltage fluctuation can lead to an automatic restart of the thermocycler In this case the cycler restarts at the step where there power failure has occurred To avoid voltage fluctuation do not connect the cycler to a socket shared by a strong power consumer like a refrigerator or a centrifuge 12 3 Adaptation of ...

Page 31: ...nics printer Port for in tube sensor memory Total capacity 1500 steps in 10 directories with maximum 100 programs each Dimensions WxDxH 25 x 34 x 16 5 cm Weight 8 8 kg Storage conditions Operating conditions 5 C 35 C 13 2 Ordering information TGRADIENT Thermocycler Order No TGRADIENT 48 for 48 x 0 5ml tubes 050 800 TGRADIENT 96 for 96 x 0 2ml tubes strips or 96 well microplates 050 801 TGRADIENT M...

Page 32: ...r of the repair order will be held liable for possible losses resulting from insufficient decontamination of the device Please prepare written confirmation that the device is free from biologically dangerous and radioactive contaminants The declaration of decontamination see 16 has to be attached to the outside of the packaging Use the original packing material If not available please use a compar...

Page 33: ...warranty is valid for 12 month from date of shipment to the customer from Biometra or an authorized distributor This warranty will not be extended to a third party without a written agreement of Biometra This warranty covers only the instrument and all original accessories delivered with the instrument This warranty is valid only if the instrument is operated as described in the manual Biometra wi...

Page 34: ... with this equipment _________________________________________________________________________________ _________________________________________________________________________________ _________________________________________________________________________________ Has the equipment been cleaned and decontaminated YES NO delete Method of cleaning Decontamination __________________________________...

Page 35: ...me settings 12 4 8 Set temperature gradient 13 4 9 View different temperatures of the gradient in the block 13 4 10 Set cycle number 14 4 11 Cool below ambient temperature 14 4 12 Save program 15 5 View edit program data 16 5 1 Delete insert program steps 16 5 2 Copy program 17 5 3 Delete program 18 6 Further programming options 20 6 1 Program time increments 20 6 2 Program touch down 21 6 3 Adjus...

Page 36: ...w heating and cooling 30 12 2 Restart due to unrecognized power failure 30 12 3 Adaptation of protocols from other cyclers 30 13 Appendix 31 13 1 Technical specification TGradient 96 31 13 2 Ordering information 31 14 Instructions for return shipment 32 15 Warranty 33 16 Equipment Decontamination Certificate 34 ...

Reviews: