P L E A S E R E A D A N D S AV E T H E S E
I M P O RTA N T S A F E T Y I N S T R U C T I O N S
A S S E M B LY I N S T R U C T I O N S
ASSEMBLY
The heater is packaged with the feet unattached. You must
attach them before operating the heater.
ASSEMBLY INSTRUCTIONS:
• Unpack the heater and remove all parts from the
packaging.
• For ease of assembly, place the heater upside down or
on its side on a soft surface which will not scratch the
unit. Use one hand to hold it in place.
• Place the bowlegged castor-mounting plate in the front
and put straight castor-mounting plate in the end.
• Screw off the wing nuts from the U-shaped bolt provided,
attach the U-shaped bolt to the U-facing flange between
first and second fins (near the front cover).
• To attach the castor mounting plate to the radiator body,
you should insert the ends of the U bolt in the holes on
the castor mounting plate.
• Screw the wing nuts back to the U bolt and fasten the
wing nut properly.
LOCATION OF THE HEATER:
1. Turn the heater upright. Ensure legs are correctly
installed and level.
2. Place heater on a flat and stable surface. Setting the
heater on an incline or decline may cause damage to the
unit and create a hazardous situation.
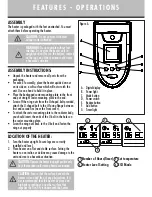
1
Number of Hours(Timer)
2
Set temperature
3
Heater Level Setting
4
ECO Mode
22.
WARNING:
This heater is not equipped with a device to
control the room temperature. Do not use this heater in
small rooms when they are occupied by persons not
capable of leaving the room on their own, unless
constant supervision is provided.
23. This heater is filled with a precise quantity of special oil.
Repairs requiring opening of the oil container are only to be
made by the manufacturer or service agent. In the event of
an oil leak contact the manufacturer or service agent.
TECHNICAL SPECIFICATIONS
• Amps: 12.5
• Wattage: 1500W (+5% –10%)
• Working voltage: 120V AC/60Hz
UNPACKING
Check immediately whether all parts and accessories are present
in the box. If anything is missing or broken, contact our Customer
Service.
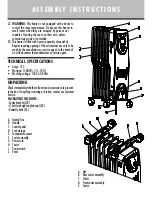
PACKAGING INCLUDES:
--Caster brackets (X2)
--U-bolt (with right angle bend) (X2)
--Butterfly bolts (X2)
A. Heated fins
B. Handle
C. Control panel
D. Cord storage
E. Temperature sensor
F. Castor assembly
G. Power cord
H. Castor
I. Power switch
J. Vents
When using electrical appliances, basic safety precautions should
always be followed to reduce the risk of fire, electric shock, and
injury to persons, including the following:
1.
Read all instructions before using the appliance.
2.
To avoid fire or shock hazard, plug the appliance directly
into a 120V AC electrical outlet.
3.
The heater is hot when in use. To avoid burns, DO NOT let
bare skin touch hot surfaces. If provided, use handles when
moving this heater. Keep combustible materials, such as
furniture, pillows, bedding, papers, clothes, and curtains at
least 3 ft (0.9 m) from the front of the heater and keep
them away from the sides and rear.
4. DO NOT run cord under carpeting. DO NOT cover cord
with throw rugs, runners, or the like. Arrange cord away
from traffic area and where it will not be tripped over.
5.
This heater is not intended for use in bathrooms, laundry
areas and similar indoor location. NEVER locate heater
where it may fall into a bathtub or other water
container.
6.
Extreme caution is necessary when any heater is used
by, or near children or invalids, and whenever the
heater is left operating and unattended.
7.
Always unplug the heater when not in use.
8.
When unplugging, be sure to pull by the plug and not
the cord.
9.
DO NOT insert or allow foreign objects to enter any
ventilation or exhaust opening as this may cause an
electric shock or fire, or damage the heater.
10. DO NOT operate heater with a damaged cord or plug, or
after the heater malfunctions, has been dropped or
damaged in any manner. Return appliance to
manufacturer for examination, electrical or mechanical
adjustment, or repair.
11. A heater has hot and arcing or sparking parts inside. DO
NOT use it in areas where gasoline, paint, or flammable
liquids are used or stored.
12. Use appliance only for intended household use as
described in this manual. Any other use not
recommended by the manufacturer may cause fire,
electric shock, or injury to persons. The use of
attachments not recommended or sold by the
manufacturer may cause hazards.
13. DO NOT use outdoors.
14. To prevent a possible fire, DO NOT block air intakes or
exhaust in any manner. DO NOT use on soft surfaces, like
a bed, where openings may become blocked.
15. To disconnect heater, turn controls to OFF, then remove
plug from outlet.
16. Avoid the use of an extension cord because the
extension cord may overheat and cause a risk of fire.
However, if you have to use an extension cord, the cord
shall be No. 14 AWG minimum size and rated not less
than 1875 watts.
17. DO NOT attempt to repair or adjust any electrical or
mechanical functions on this unit. Doing so will void your
warranty. The inside of the unit contains no user
serviceable parts. All servicing should be performed by
qualified personnel only.
18. Discontinue use if plug or outlet is hot. It is
recommended that the outlet be replaced if plug or
outlet is hot to touch.
19. The heater must not be located immediately below a
socket-outlet. Do not use this heater in the immediate
surroundings of a bath, a shower or a swimming pool.
20.
CAUTION:
In order to avoid a hazard due to inadvertent
resetting of the thermal cutout, this appliance must not be
supplied through an external switching device, such as a
timer, or connected to a circuit that is regularly switched on
and off by the utility.
21.
WARNING:
In order to avoid overheating, do not cover
the heater.
F E AT U R E S - O P E R AT I O N S
THIS APPLIANCE HAS A POLARIZED PLUG (one blade is wider than the
other). To reduce the risk of electric shock, this plug is intended to fit in a
polarized outlet only one way. If the plug does not fit fully in the outlet,
reverse the plug. If it still does not fit, contact a qualified electrician to
install the proper outlet.
DO NOT ATTEMPT TO MODIFY THIS PLUG OR DEFEAT THIS
SAFETY FEATURE IN ANY WAY.
WARNING:
Do not operate the product until fully
assembled; do not operate without the casters attached.
1.
Before using the heater make sure that it is on a flat
and stable surface. Damage may occur if it is placed on
an incline or decline.
WARNING: Operate the product in an upright position only.
2. Set all the power switch to OFF position, and plug the
Power Cord into a standard 120-volt AC electrical outlet.
3. Press the Power Switch Button (”I” in Parts description)
first, and then press the Power Button (
) once, and
the LCD will display the power of medium, temperature
is 25
°C
by default, timer does not display.
To shut off the heater, press the power button (
) again
until all LCD lights are off. The power light will remain light
while unit is plugged in and power switch is on.
WARNING:
Always unplug the product from the electrical
outlet when it will be left unattended or when it is not in use.
4. To set the required function, proceed as follows:
POWER SETTING:
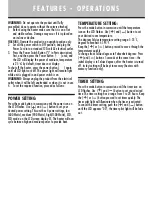
Press the mode button in succession until the power icon on
the LCD flashes. Use ( ) and ( ) button to set your
desired power setting. This unit has 4 power settings, low
(600 Watts), medium (900 Watts), high(1500 Watts), ECO.
ECO mode: on the LCD screen display EC, The heater will now
cycle between high and medium power to provide heat.
TEMPERATURE SETTING:
Press the mode button in succession until the temperature
icon on the LCD flashes. Use ( ) and ( ) button to set
your desired room temperature.
The degrees Celsius temperature setting range: 5-35
°
C,
degrees Fahrenheit: 41-95
°
F.
Keep the ( ) or ( ) button pressed to move through the
temperatures quickly.
To change from Celsius degrees to Fahrenheit degrees: Press
( ) and ( ) buttons 5 seconds at the same time – the
initial display is in Celsius degrees; after the heater is turned
off, its last setting will be kept in memory (heaters with
memory function only).
TIMER SETTING:
Press the mode button in succession until the timer icon on
LCD flashes. Use ( ) and ( ) button to set your desired
time. The timer setting has a range from 1 to 24 hours. Keep
the ( ) or ( ) button pressed to set timer quickly. The
timer pilot light will illuminate when the timer is activated.
To cancel the timer setting, push the ( ) and ( ) button
until the LCD appears “00”, the timer pilot light will be fade
out.
F E AT U R E S - O P E R AT I O N S
VEUILLEZ LIRE ET GARDER CES
CONSIGNES DE SÉCURITÉ IMPORTANTES
I N S T R U C T I O N S D ’ A S S E M B L A G E
Seul un personnel qualifié devrait effectuer le service
d'entretien requis.
18. Arrêtez l’appareil et ne l’utilisez plus si la fiche ou la
prise de courant est chaude. Nous recommandons de
faire remplacer la prise de courant si la fiche ou la prise
est chaude au toucher.
19. Ne placez pas ce radiateur directement sous une prise de
courant. Ne vous en servez pas non plus à proximité
d’une baignoire, d’une douche ou d’une piscine.
20.
ATTENTION:
Afin d’éviter tout danger dû au
réenclenchement du rupteur thermique, cet appareil ne
doit ni être alimenté par un dispositif de connexion
externe – un minuteur, par exemple – ni être branché
sur un circuit régulièrement mis sous et hors tension par
l’entreprise publique.
21.
AVERTISSEMENT:
Pour éviter la surchauffe, ne
couvrez pas le radiateur.
22.
AVERTISSEMENT:
Ce radiateur n’est pas équipé d’un
dispositif de contrôle de la température ambiante. Ne
l’employez pas dans des petites pièces occupées par des
personnes incapables de se déplacer seules, à moins
d’assurer une surveillance assidue.
23. Ce radiateur contient une quantité précise d’huile
spéciale. Les réparations nécessitant l’ouverture du
réservoir d’huile ne doivent être effectuées que par le
fabricant ou un agent gestionnaire. En cas de fuite,
avisez-en le fabricant ou un agent gestionnaire.
SPÉCIFICATIONS TECHNIQUES
• Intensité: 12,5 ampères
• Puissance: 1500 W (+5 % -10 %)
• Tension de service: 120 V CA/60 Hz
DÉBALLAGE
Assurez-vous sans délai que la boîte contient bien les pièces
et les accessoires requis. En cas de pièce(s) manquante(s) ou
brisée(s), communiquez avec le service à la clientèle.
SONT INCLUS DANS L’EMBALLAGE
– Étriers des roulettes (x2)
– Boulons (à angle droit) (x2)
– Écrous à oreilles (x2)
DÉSIGNATION DES PIÈCES
A. Éléments
B. Poignée
C. Tableau de commande
D. Enrouleur de cordon
E. Sonde de température
F. Ensemble des roulettes
G. Cordon d’alimentation
H. Roulette
I. Interrupteur
J. Prises d’air
Il faut toujours respecter les mesures de sécurité de base, y
compris celles stipulées ci-dessous, en utilisant un appareil
électrique afin de réduire le risque d'incendie, de chocs
électriques et de blessures corporelles:
1. Lisez toutes les instructions avant d'utiliser l'appareil.
2. Afin d'éviter le risque d'incendie ou de chocs électriques,
branchez l'appareil directement sur une prise de courant
alternatif de 120 volts.
3. Le radiateur est chaud lorsqu'il est en marche. Pour éviter le
risque de brûlures, NE touchez PAS aux surfaces chaudes
avec la peau nue. Si elles sont fournies, utilisez les poignées
pour déplacer ce radiateur. Gardez les articles
combustibles, tels que les meubles, oreillers, literies,
papiers, vêtements et rideaux, à une distance d'au moins
3 pi (0,9 m) de la partie avant du radiateur et gardez
également ces articles éloignés des côtés et de la partie
arrière du radiateur.
4. NE placez PAS le cordon sous un tapis. Évitez de placer
le cordon dans un endroit passant ou à un endroit où on
risque de trébucher dessus.
5.
Ce radiateur n’est pas conçu pour être utilisé dans une
salle de bain, une salle de lavage ou tout endroit
intérieur semblable. NE placez jamais le radiateur à un
endroit où il peut tomber dans une baignoire ou autre
contenant d’eau.
6. Observez les précautions supplémentaires d’usage si un
radiateur est utilisé par ou à proximité des enfants ou
par une personne handicapée et si le radiateur reste en
marche sans surveillance.
7. Débranchez toujours un radiateur qui ne sert pas.
8. Pour débrancher l’appareil, saisissez la fiche elle-même
et non le cordon.
9. N'insérez PAS d'objets étrangers dans les ouvertures
d'aération ou d'échappement puisque cela peut
endommager le radiateur et risque de causer des chocs
électriques ou un incendie.
10. N'utilisez PAS le radiateur si le cordon ou la fiche est
endommagé, si le radiateur ne fonctionne pas de
manière appropriée ou s'il a été endommagé de quelque
façon que ce soit. Retournez l'appareil au fabricant pour
une vérification, une réparation ou un réglage électrique
ou mécanique.
11. Un radiateur comporte des pièces internes chaudes,
parfois produisant des étincelles. NE l'utilisez PAS dans
un endroit où de l'essence, des peintures ou d'autres
liquides inflammables sont utilisés ou entreposés.
12. N'utilisez cet appareil que dans une résidence, pour le
but proposé, en suivant les directives de ce guide.
L'utilisation pour un but non recommandé par le
fabricant risque de causer un incendie, des chocs
électriques ou des blessures corporelles. L'utilisation
d'accessoires non recommandés ou non vendus par le
fabricant peut être dangereuse.
13. N'utilisez PAS cet appareil à l'extérieur.
14. Pour éviter un incendie, NE bloquez PAS les prises d'air
et les sorties d'air de quelque manière que ce soit. NE
placez PAS l'appareil sur une surface molle, telle qu'un
lit, où les ouvertures peuvent être bloquées.
15. Avant de débrancher l’appareil, réglez les commandes à
l’ARRÊT puis tirez la fiche hors de la prise de courant.
16. Évitez d’utiliser une rallonge puisque celle-ci peut
surchauffer et provoquer un incendie. Toutefois, si vous
devez utiliser une rallonge, celle-ci doit être de calibre
n° 14 AWG au minimum et supporter une puissance
nominale de 1 875 watts.
17. NE tentez PAS de réparer ou d'ajuster les fonctions
électriques ou mécaniques de cet appareil puisque cela
annulera la garantie. Il n'y a aucune pièce qui peut être
entretenue par l'utilisateur à l'intérieur de l'appareil.
C A R A C T É R I S T I Q U E S – U T I L I S AT I O N
CET APPAREIL COMPORTE UNE FICHE POLARISÉE (une lame est plus large
que l’autre). Pour réduire les risques de choc électrique, la fiche ne rentre
dans les prises de courant polarisées que dans un sens. Si la fiche n’enfonce
pas parfaitement dans la prise, inversez-la. Si elle ne pénètre toujours pas
bien, faites remplacer la prise par un électricien qualifié.
NE MODIFIEZ LA FICHE EN AUCUNE FAÇON ET N’ESSAYEZ PAS DE
NEUTRALISER CETTE CARACTÉRISTIQUE DE SÉCURITÉ.
MODE D’EMPLOI
Tableau de commande
A. Afficheur numérique
B. Voyant d’alimentation
C. Touche Mode
D. Interrupteur
E. Touche augmenter
F. Touche réduire
G. Voyant du minuteur
1
Nbre d’heures (minuteur)
2
Température réglée
3
Réglage du radiateur
4
Mode ÉCONO
AVERTISSEMENT:
ne faites fonctionner l’appareil que
totalement assemblé – jamais sans ses roulettes.
1. Avant de mettre le radiateur en marche, assurez-vous
qu’il soit posé sur une surface plane et stable. Toute
inclinaison entraînerait des dommages.
AVERTISSEMENT: n’employez le radiateur qu’à la verticale.
2. Réglez l’interrupteur en position d’ARRÊT et branchez le
cordon sur courant alternatif de 120 volts.
3. Commencez par appuyer sur l’interrupteur («I») puis
une fois sur le bouton de mise en marche (
) et
l’écran ACL affichera la température moyenne par
défaut, soit 25
°C
. Le minuteur ne s’affichera pas.
Pour éteindre le radiateur, appuyez de nouveau sur la touche
de mise en marche (
) jusqu’à l’extinction. Le voyant
d’alimentation restera allumé tant que l’appareil est branché
et que l’interrupteur est en fonction.
AVERTISSEMENT:
débranchez toujours le radiateur quand
vous vous absentez ainsi qu’entre utilisations.
4. Pour régler la fonction voulue, procédez comme suit:
RÉGLAGE DE PUISSANCE
Appuyez sur la touche mode coup sur coup jusqu’à ce que
l’icône de la puissance clignote à l’écran ACL.
Utilisez les touches ( ) et ( ) pour régler la puissance.
Cet appareil offre 4 réglages de puissance: bas (600 watts),
moyen (900 watts), haut (1500 watts) et ÉCONO.
Au mode ÉCONO, l’écran ACL affiche EC et le radiateur passe
tour à tour de haute à moyenne puissance pour chauffer.
RÉGLAGE DE TEMPÉRATURE
Appuyez sur la touche mode coup sur coup jusqu’à ce que
l’icône de la température clignote à l’écran ACL. Utilisez les
touches ( ) et ( ) pour régler le degré désiré.
La plage des températures Celsius s’étend de 5 à 35 °C, celle
des Fahrenheit, de 41 à 95 °F.
Pressez longuement les touches ( ) ou ( ) pour faire
défiler les températures rapidement.
Pour passer de l’échelle Celsius à l’échelle Fahrenheit, pressez
simultanément les touches ( ) et ( ) pendant 5 secondes.
La température initiale est donnée en degrés Celsius. À
l’extinction du radiateur, le dernier réglage affiché sera
gardé en mémoire (modèles à fonction mémoire seulement).
C A R A C T É R I S T I Q U E S – U T I L I S AT I O N
PDF !"#
"pdfFactory Pro" $#%&'(
www.fineprint.cn
PDF !"#
"pdfFactory Pro" $#%&'(
www.fineprint.cn
A. Digital display
B. Power light
C. Mode button
D. Power switch
E. Reduce button
F. Add button
G. Timer light
Figure A
PDF !"#
"pdfFactory Pro" $#%&'(
www.fineprint.cn
ASSEMBLAGE
Le radiateur vient avec les pieds démontés. Ceux-ci doivent
être fixés avant que le radiateur puisse être utilisé.
INSTRUCTIONS D’ASSEMBLAGE
• Déballez le radiateur ainsi que les pièces.
• Pour simplifier l’assemblage, mettez le radiateur sens
dessus-dessous ou couchez-le sur le côté, sur une surface
douce, qui ne l’égratignera pas. Stabilisez-le d’une main.
• Placez le support de montage des roulettes avec
prolongement à l’avant, le support droit à l’arrière.
• Dévissez l’écrou à oreilles du boulon fourni, attachez le
boulon à la bride située entre le premier et le deuxième
élément (près du capot avant).
• Passez le boulon dans le trou de la plaque de montage
des roulettes pour fixer celle-ci au corps du radiateur.
• Vissez les écrous à oreilles sur les boulons et
immobilisez-les convenablement.
EMPLACEMENT DU RADIATEUR
1. Remettez le radiateur d’aplomb. Assurez-vous que les
pieds soient correctement installés et de niveau.
2. Placez le radiateur sur une surface plane et stable.
Le faire fonctionner incliné peut l’endommager, voire
provoquer une situation dangereuse.
ATTENTION:
ne faites pas fonctionner ce
radiateur sans y fixer les roulettes.
AVERTISSEMENT:
ne l’employez pas sans
que les pieds ne soient fixés. Faites-le
toujours marcher d’aplomb (pieds en bas,
commandes en haut), toute autre position
pourrait causer une situation dangereuse.
ATTENTION:
employez-le uniquement d’aplomb. Toute
autre position pourrait causer une situation dangereuse.
ATTENTION:
veillez à ce que la surface située
sous le radiateur soit propre et exempte
d’obstructions. Il est déconseillé de placer l’appareil
sur un tapis épais ou sur toute surface qui
entraverait la circulation de l’air sous lui.
PDF !"#
"pdfFactory Pro" $#%&'(
www.fineprint.cn
Figure A
CAUTION:
Do not operate this heater
without casters attached.
WARNING:
Do not operate without feet
attached. Do operate the heater only in
upright position (feet on the bottom, controls
on the top), any other position could create
a hazardous situation.
CAUTION:
Operate the heater in upright position only.
Any other position could create a hazardous situation.
CAUTION:
Ensure that the surface beneath the
heater is clean and free of any obstructions. It is
not recommended that this heater be placed on
high pile carpeting or any other surface that
impedes the flow of air underneath the heater.
A. Nut
B. Rear castor assembly
C. U-bolt
D. Front castor assembly
E. Castor
PDF 文件使用 "pdfFactory Pro" 试用版本创建
www.fineprint.cn
A. Écrou à oreilles
B. Ens. des roulettes AR
C. Boulon
D. Ens. des roulettes AV
E. Roulette
PDF 文件使用 "pdfFactory Pro" 试用版本创建
www.fineprint.cn
1
2
4
3
1
2
4
3


