PRODUCT SHEET
info@biopac.com
www.biopac.com
BIOPAC Hardware |
BioNomadix Series
| Page 21 - 26
Updated: 8.18.2020
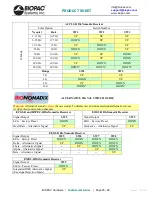
BN-GON, BN-TOR GONIOMETER CALIBRATION
This is general calibration information for all BIOPAC Goniometers and Torsiometers:
When using all goniometers and torsiometers, the minimum value of bend radius must be observed at all
times, particularly when attaching and removing the sensors from the subject. Failure to do this will result in
reduced unit life or failure.
The sensors have been designed to be as light as possible and the operating force to be a minimum. This
permits free movement of the joint without influence by the sensors. The sensors measure the angle subtended
between the endblocks. Use the software calibration features (under Setup Channels) to calibrate any of the
BIOPAC series goniometers.
Each goniometer requires a DA100C amplifier, BN-GONIO, or MP3X/45 analog input per rotational axis.
Accordingly, the twin axis goniometers will need two DA100C amplifiers, one BN-GONIO or two MP3X/45
analog channels to simultaneously measure both rotational axes.
Excitation voltages are factory preset for the various data acquisition platforms, however excitation voltages
are user-adjustable on the DA100C. Recommended excitation is +5VDC.
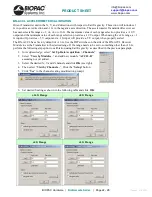
1.
Place goniometer with care to verify that limb/joint/torso attachment will not result in over stretch at
the limits of limb/joint/torso movement
2.
Put body in the first position, which brackets one end of range of movement. Press CAL 1.
3.
Put body in the second position, which brackets The other end of range of movement. Press CAL 2.
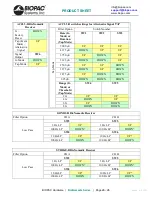
BN-STRIKE HEEL-TOE STRIKE CALIBRATION
BN-Strike requires no calibration.
BN-DYNEMG CALIBRATION
The BN-DYNEMG needs consideration for calibration on pressure bulb.
The pressure bulb transducer measures applied hand grip strength, via pressure changes manifesting in the
bulb, during squeezing. The units of pressure are force per unit area. The pressure bulb transducer
configuration determines the factory preset scaling, typically in units of kg/m*m or kg/cm*cm. If another or
different calibration required, the following method can be used.
To calibrate:
1.
Place bulb on flat, stable, drawing surface
2.
Press CAL 1 - enter 0 kg/unit area
3.
Place known weight on bulb (X- kg)
4.
Use pencil to outline flattened portion of bulb on table, use ruler to measure the flattened area outline
from side to side, and record this value as area "A"
5.
Press CAL 2 - enter X/A kg/unit area


