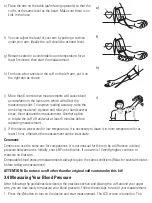
e) Place the arm on the table (palm facing upwards) so that the
cuff is at the same level as the heart. Make sure there is no
kink in the hose.
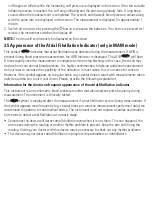
f) You can adjust the level of your arm by putting a cushion
under your arm. Ideally the cuff should be at heart level.
g) Remain seated in a comfortable room temperature for at
least 5 minutes, then start the measurement.
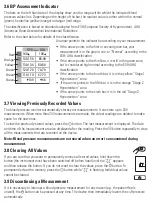
h) For those who cannot put the cuff on the left arm, put it on
the right arm as shown.
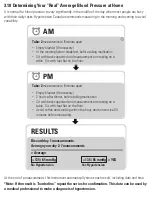
i) More than 6 consecutive measurements will cause blood
accumulation in the lower arm which will affect the
measuring results. To improve reading accuracy, raise the
arm being measured, squeeze and relax your hand several
times, then take another measurement. Another option
is to take the cuff off and wait at least 5 minutes before
repeating measurement.
j) If this device was stored in low temperature, it is necessary to leave it in room temperature for at
least 1 hour, otherwise the measurement can be inaccurate.
Comment:
Continue to use the same arm for comparisons. It is not unusual for there to be a difference in blood
pressure between arms. Initially, check BP on both arms. If one arm is 10mmHg higher, continue to
measure on that arm.
Comparable blood pressure measurements always require the same conditions (Relax for several minutes
before taking a measurement).
ATTENTION: Do not use a cuff other than the original cuff contained in this kit!
3.4 Measuring Your Blood Pressure
After following the guidelines described in the previous section and placing the cuff around your upper
arm, you are now ready to measure your blood pressure. Follow these steps to record your measurement.
1. Press the button to turn on the device and start measurement. The LCD screen is turned on. The
e)
f)
h)
i)


