background image

(8)  Keep your hands away from the folding mechanism to prevent any risk of pinching 

(9)  Seek the advice / recommendations of a medical professional to determine if  


the rollator is suitable for your needs 

(10) Use caution when lifting and carrying the rollator

DO NOT:


(1)  Use the rollator as an aid to transport a person, it is not designed as a  


complete wheelchair 

(2)  Sit on the rollator if the brakes are not locked, this could cause the rollator to  


move resulting in injury to the user or bystanders 

(3)  Sit on the rollator when it is on an incline 

(4)  “Drop” into the seat of the rollator, always sit into the rollator in a smooth,  


controlled motion. Seek assistance if necessary 

(5)  Hang objects on the brake levers or hand grips. This could affect brake  


operation and/or stability of the rollator 

(6)  Stand on the rollator or use it as a step

ASSEMBLY INSTRUCTIONS

Please examine the rollator for any shipping damage. Do not use the rollator if there 

is apparent damage. Contact your place of purchase for repair and/or return. 


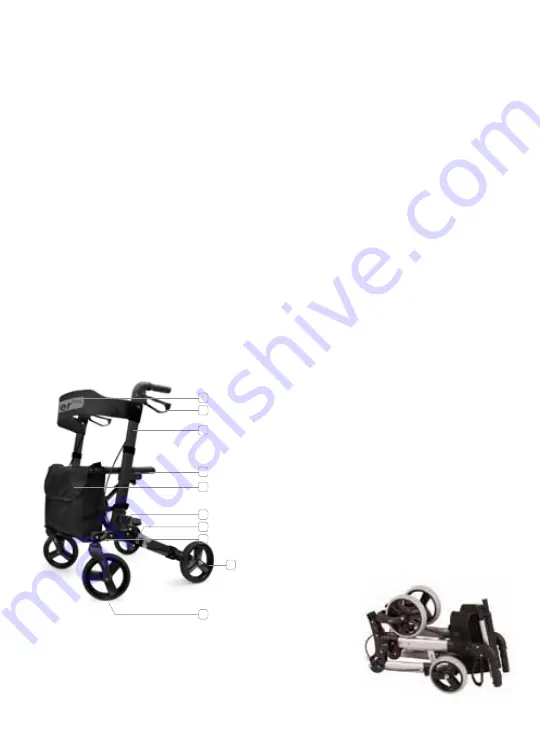
A

B

C

D

F

E

H

I

G

J

A -

 Backrest 

B -

 Locking Handle Brakes 

C -

 Height Adjustable Handles 

D -

 Seat 

E -

 Shoulder Bag 

F - 

Cane Holder 

G - 

Rear Folding Pins (2) 

H -

 Fastening Knobs (2) 

I


Rear 8” Wheels 

J -

 Front 8” Wheels


1 .   Remove all packaging. The rollator will be folded  


as shown in 

Figure 1

.


Figure 1

Summary of Contents for Glider Plus

Page 1: ...www biosmedical com ROLLATOR INSTRUCTIONS 56092 Plus Plus...

Page 2: ...he rollator safely If you have any doubt please consult your dealer prescriber It is important that the user reads and understands the safety advice given within this manual before attempting to opera...

Page 3: ...Drop into the seat of the rollator always sit into the rollator in a smooth controlled motion Seek assistance if necessary 5 Hang objects on the brake levers or hand grips This could affect brake oper...

Page 4: ...r legs as shown below and secure the legs in place with the rear folding pins as shown in Figure 3 Figure 3 Step 1 Step 2 Step 3 Step 4 4 Open the rollator push down on either side of the seat as show...

Page 5: ...up to reach the rollator adjust the legs to find the best height 4 Simply press the spring button and set to the desired height Repeat for the opposite side and make sure that both handles are secure...

Page 6: ...the locked position CANE HOLDER You can place a cane in the cane holder for easy transportation See Figure 7 SAFETY LIGHT 7 white LED lights Visible up to 600 metres Water resistant Made from flexible...

Page 7: ...r worn items immediately CLEANING The rollator can be cleaned with a damp cloth or sponge and warm soapy water Domestic anti bacterial surface cleaners may be used if required Care should be taken not...

Page 8: ...Thermor Ltd Repair Department 16975 Leslie Street Newmarket ON L3Y 9A1 www biosmedical com...

Reviews: