bioslighting.com
(321) 260-2467
info@bioslighting.com
Page 1 of 2
Rev6 [2020 12/15]
Specifications and dimensions subject to change without notice.
Contact BIOS for questions and the most current information.
ICES-005 (A)
Installation Guide
Icarus
™
LLi
EASY-TO-CLEAN
INSTALL IN SECONDS
OPTIMUM UNIFORMIT Y
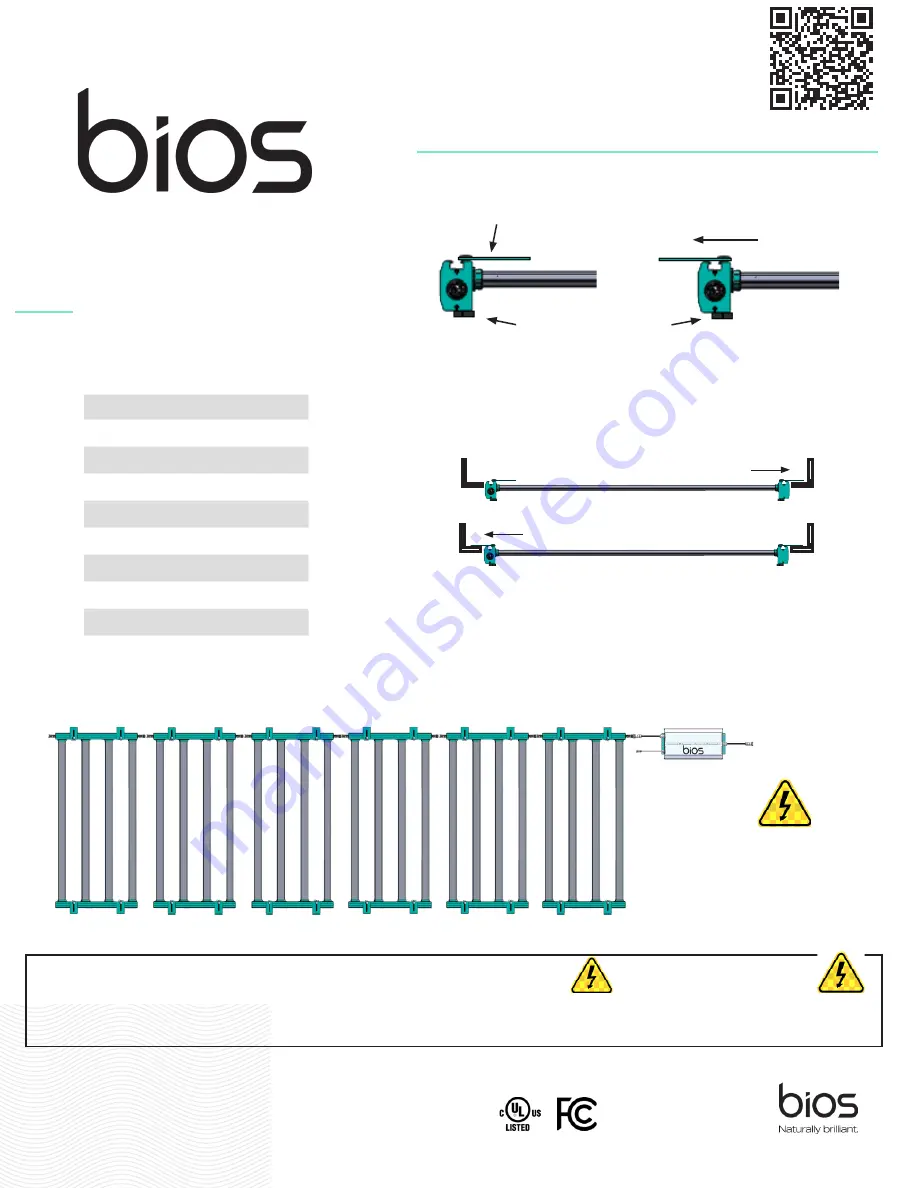
1. Loosen RapidRack
™
thumb screw enough to slide RapidRack
™
plate.
2. Slide RapidRack
™
plate into desired rack mount position.
3. Tighten RapidRack
™
thumb screw to secure RapidRack
™
plate into place.
RapidRack™ Mounting Plate
RapidRack™ Thumb Screw
Extend & rest on ledge
Extend & secure
1. Extend RapidRack™ plates on one end and rest on rack ledge.
2. Extend RapidRack™ on opposite side to complete secure mounting solution.
Tip:
FIXTURES
600W
780W
1 TO 2
N/A
N/A
3
228W x 3
N/A
4
150W x 4* 195W x 4
5
120W x 5
156W x 5
6
100W x 6
130W x 6
7
86W x 7
111W x 7
8
75W x 8
+
97W x 8
+
9
67W x 9
87W x 9
10
60W x 10
+
78W x 10
For more info, documents and videos reqarding your BIOS Icarus LLi fixtures: Please log onto www.bioslighting.com/product/icarus-lli/
BIOS Programmable Power Supply
BIOS Icarus LLi 6 Fixture Configuration Example - (one of many LLi configurations)
*Recommended for cannabis veg. (See cannabis application guide for more details)
+
See leafy greens application guide for more details
IMPORTANT:
To avoid risk of damage to the fixture and
their LEDs, make all wiring connections
before plugging in power supply.
Easy Rack Mount Solution with RapidRack
™
BP-0LLi-000-000001-1 & BP-0LLi-000-000002-1
Read all instructions prior to performing installation. All facility wiring to be performed only by licensed electricians in accordance with National Electric
Code and local code specifications. Failure to do so voids warranty and may result in serious injury or death. Supplied Connectors on all power cables have
breaking capacity and can be installed by non-licensed individuals. Disconnect main power prior to installation, maintenance or service.
ELECTRICAL SHOCK HAZARD
CAUTION!


