12 |
Chapter 2: Hardware installation
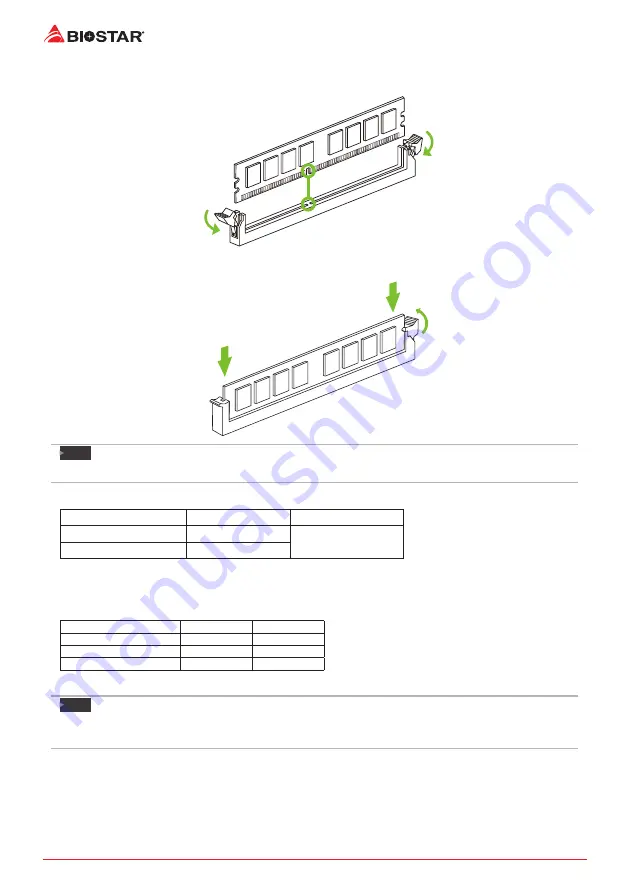
Step 1: Unlock a DIMM slot by pressing the retaining clips outward. Align a DIMM on the slot
such that the notch on the DIMM matches the break on the slot.
Step 2: Insert the DIMM vertically and firmly into the slot until the retaining clips snap back in
place and the DIMM is properly seated.
Note
»
If the DIMM does not go in smoothly, do not force it. Pull it all the way out and try again.
Memory Capacity
DIMM Socket Location DDR4 Module
Total Memory Size
DIMMA1
8GB/16GB/32GB
Max is 64GB.
DIMMB1
8GB/16GB/32GB
Dual Channel Memory Installation
Please refer to the following requirements to activate Dual Channel function:
Install memory module of the same density in pairs, shown in the table.
Dual Channel Status
DIMMA1
DIMMB1
Disabled
O
X
Disabled
X
O
Enabled
O
O
(O means memory installed, X means memory not installed.)
Note
»
When installing more than one memory module, we recommend to use the same brand and
capacity memory on this motherboard.
Summary of Contents for B450NH
Page 6: ...6 Chapter 1 Introduction 1 5 Motherboard Layout Top View Note represents the 1st pin ...
Page 7: ...Chapter 1 Introduction 7 B450NH Back View ...
Page 36: ...36 APPENDIX I Specifications in Other Languages this page intentionally left blank ...
Page 43: ...챕터 1 들어가는 글 7 B450NH 1 5 마더보드 레이아웃 평면도 는 첫번째 핀을 표시합니다 ...
Page 44: ...8 챕터 1 들어가는 글 평면도 는 첫번째 핀을 표시합니다 ...
Page 68: ...32 챕터 4 유용한 도움말 이 페이지는 의도적으로 비워 둔 것입니다 ...
Page 74: ...6 第一章 主板介绍 1 5 主板結構圖 正面 標示為針腳1 ...
Page 75: ...第一章 主板介绍 7 B450NH 背面 ...


