User manual
Agrilaser
®
Lite
8
User manual
Agrilaser
®
Lite
account the safety precautions as described in this
document.
•
The Agrilaser Lite is not suited for continuous use.
Use for short repelling actions only.
Perform the following steps to prepare the Agrilaser
Lite for active bird repelling:
1. Remove the lens cap (figure 2.1)
.
2. Point the Agrilaser Lite towards the ground
(figure 2.
2).
3. Switch on the Agrilaser Lite by pushing the ON/OFF
button (figure 2.
3).
4. Project the laser dot on the ground in front of you
and slowly move the dot towards the birds. Make
sure no reflective objects, vehicles or people are
between you and the birds. The Agrilaser Lite
should not be used like a gun, i.e. point and shoot.
Weather conditions:
The Agrilaser Lite is most
effective during sunrise, sunset and overcast, rainy
or foggy weather conditions. During bright weather
conditions, make sure that the birds are positioned
between the user and the sun. If not, bright sunlight
could inhibit the repelling action.
Rain:
Make sure the Agrilaser Lite is kept out of the
rain. Remove any moisture with a dry cloth.
Protected species:
Local regulations may prohibit
the deterrence of certain (protected) bird species.
Always consult local legislation before using the
Agrilaser Lite.
Adjusting the beam diameter
CAUTION
: Do not stare into laser beam while
adjusting the beam diameter.
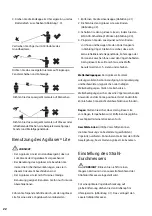
For optimal deterrence of birds at a large distance,
turn the rotating knob clockwise (figure
3.1). This will
decrease the diameter of the laser beam.
Turn the rotating knob counter clockwise to increase
the beam diameter (figure
3.2). This setting is suitable
for repelling on short distances.
Accessories
Battery charger
Use the included battery charger to recharge the
batteries:
1. Plug one end of the power cable or car charger
adapter to the charger’s power input. Plug the
other end of the cord into a wall outlet or the
cigarette lighter socket in your vehicle. All yellow
status indicators (‘Z’
in figure 4.1) blink once as the
charger runs a quick self-test.
2. Insert the batteries in the charger slots and make
sure the positive battery pole corresponds with the
(+) symbol on the charger (figure
4.1). Make sure
that solid contact is made between battery poles
and metal contact points. Once inserted, the yellow
status indicators (‘Z’
in figure
4.1) start blinking.
This indicates that the batteries are charging.
Charging is completed when all status indicators
are continuously illuminated. It takes 2 to 3 hours
to fully charge the set of two empty Agrilaser Lite
batteries.
The charger individually monitors the charging status
of each battery and will stop charging when the
batteries are fully charged. To ensure safe operation,
the battery charger is equipped with overcharge
protection and reverse polarity protection. If a battery
is inserted in reverse or if a defective battery is
inserted, all three yellow status indicators will keep
blinking.


