background image


Vendor: S000238 

Page 

1

 of 

7


ASSEMBLY INSTRUCTIONS 

SANTIAGO 3 DRAWER BEDSIDE


IMPORTANT: READ THESE INSTRUCTIONS CAREFULLY BEFORE ASSEMBLING OR USING YOUR SANTIAGO 3 
DRAWER BEDSIDE. 


PLEASE KEEP THESE INSTRUCTIONS FOR FUTURE REFERENCE. 


HEALTH & SAFETY: 

DO NOT use this item if any parts are missing, damaged or worn. 
DO NOT use this item unless all fixings are secured. 
Please keep small parts out of reach of children. 
Always use on a level, even surface. 
It is recommended that two people handle and assemble the item


CARE & MAINTENANCE: 

Assemble in the room of use. 
To avoid damages assemble the item on a soft, clean surface 
Periodically check all screws & fixings to ensure they are secure. 
DO NOT push the item as this will damage the base. 
Always lift the item with two people to reposition. 
Keep any sharp objects away from the item. 
This product is manufactured in pine which is a wood with natural characteristics including knots, grains, 
clusters or indentations 
On unpacking the item you may notice an odour due to production processes but this will disappear after a 
period of time. 
DO NOT place the item next to a radiator or direct sunlight – this item is susceptible to temperature change. 
It is recommended an even room temperature be maintained with no sudden fluctuations. 
DO NOT place hot or cold items directly onto the surface of the item as marking will occur 
For general cleaning use a duster or damp cloth (almost dry) not wet – do not use soap and water, 
detergents, aerosol sprays or any polish as use of these materials would invalidate any claims. 
DO NOT place the item onto wet or damp flooring as staining may occur to the floor 


www.birlea.com 


Summary of Contents for SANTIAGO 3

Page 1: ... base Always lift the item with two people to reposition Keep any sharp objects away from the item This product is manufactured in pine which is a wood with natural characteristics including knots grains clusters or indentations On unpacking the item you may notice an odour due to production processes but this will disappear after a period of time DO NOT place the item next to a radiator or direct...

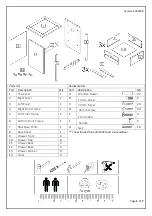
Page 2: ...14 mm Screw 2 3 Left Panel 1 C 30 mm Screw 24 4 Right Front Frame 1 D 35 mm Screw 34 5 Left Front Frame 1 E 19 mm Bolt 3 6 Bottom Front Frame 1 F Handle 3 7 Rear Base Plinth 1 G Nail 16 8 Back Panel 1 You will need a small mallet and a screwdriver 9 Drawer Front 3 10 Drawer Side 6 11 Drawer Back 3 12 Drawer Base 3 13 Drawer Runner 6 14 Cleat 4 ...

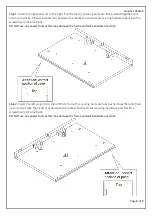
Page 3: ...th a screwdriver not provided DO NOT use any power tools as this may damage the frame and will invalidate any claim Step 2 Insert the left panel 3 to the left front frame 5 ensuring parts are fully pushed together and lined up correctly Place the cleats 14 between the marks shown and secure using hardware part D with a screwdriver not provided DO NOT use any power tools as this may damage the fram...

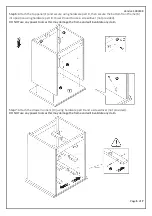
Page 4: ... Attach the bottom front frame 6 and rear base plinth 7 to the left panel 3 using hardware part D and a screwdriver not provided DO NOT use any power tools as this may damage the frame and will invalidate any claim Step 5 Attach the right panel 2 using hardware part D and a screwdriver not provided DO NOT use any power tools as this may damage the frame and will invalidate any claim ...

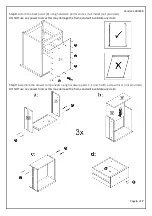
Page 5: ...ition using hardware part B You will need to use a screwdriver not provided DO NOT use any power tools as this may damage the frame and will invalidate any claim Step 7 Attach the drawer runners 13 using hardware part D and a screwdriver not provided DO NOT use any power tools as this may damage the frame and will invalidate any claim ...

Page 6: ... mallet not provided DO NOT use any power tools as this may damage the frame and will invalidate any claim Step 9 Assemble the drawer components using hardware parts C E and F with a screwdriver not provided DO NOT use any power tools as this may damage the frame and will invalidate any claim ...

Page 7: ...date any claim Additional Information For complete product information images and dimension diagrams please visit the website www birlea com If you have any issues with your item please contact the retailer directly you purchased it from who will be able to resolve any issues with Birlea Why don t you send us photos of your assembled furniture to info birlea com to be shared in our birleahome feat...

Reviews: