background image

NOTICE TO OWNERS AND OPERATORS


This Manual contains a number of safe practices in the SAFETY TIP section. Additional warnings are 

placed throughout the Manual. Warnings related to your personal safety are indicated by:


Warnings related to possible damage are indicated by:

The descriptions and illustrations contained in this manual are not binding. 

The manufacturer reserves the right to introduce any modification without 

updating the manual.

OR


BIRO’s products are designed to process food products safely and efficiently. Unless the operator is 

properly trained and supervised, there is the possibility of a serious injury. It is the responsibility of the owner 

to assure that this machine is used properly and safely, strictly following the instructions contained in this 

Manual and any requirements of local law.


BIRO also has provided a wall chart to be posted near the equipment. If any warning label, wall chart, or 

Manual becomes misplaced, damaged, or illegible, please contact your nearest Distributor or BIRO directly for 

a replacement.


Remember, however, this Manual or the warning labels do not replace the need to be alert and to use 

your common sense when using this equipment. 

- NOTE -

A copy of this manual is included with each Model 11 Saw.


No one should use or service this machine without proper training and supervision. All operators should 

be thoroughly familiar with the procedures contained in this Manual. Even so BIRO cannot anticipate every 

circumstance or environment in which its products will be used. You, the owner and operator, must remain alert 

to the hazards posed by the function of this equipment, particularly the SHARP MOVING BAND TYPE SAW 

BLADE. No one under eighteen (18) years of age should operate this equipment. If you are uncertain about a 

particular task, ask your supervisor. 

1


This Manual applies to machines with serial number 6753 and higher, except where noted.

Summary of Contents for 11

Page 1: ...PTCT 11 001 2 18 24 B IMPORTANT NOTICE This Manual contains important safety instructions which must be strictly followed when using this equipment MODEL 11 POWER MEAT SAW OPERATING AND SERVICE MANUAL ...

Page 2: ...8 CLEANING PROCEDURE 9 MAINTENANCE 10 GENERAL 10 LUBRICATION 11 WALL CHART Item No 671 3 PARTS DIAGRAM 12 19 WIRING DIAGRAMS 21 WARNING LABELS ON MACHINE 6 WEARABLE SAW PARTS 24 PARTS LIST ORDERING PARTS ASSEMBLIES LIST ORDERING 23 OPERATOR S SIGNATURE PAGE 25 LIMITED WARRANTY 26 SWITCH ASSEMBLIES AND SERVICE PARTS 20 22 ...

Page 3: ...chart to be posted near the equipment If any warning label wall chart or Manual becomes misplaced damaged or illegible please contact your nearest Distributor or BIRO directly for a replacement Remember however this Manual or the warning labels do not replace the need to be alert and to use your common sense when using this equipment NOTE A copy of this manual is included with each Model 11 Saw No...

Page 4: ...in any Way From its Original Form This Machine in its Original Form Meets the Intent of O S H A Applicable Standards NEVER Operate with Saw Guide Bar with Saw Guard in the Raised Position or the Saw Guard Removed from the Saw Guide Bar ALWAYS Adjust the Saw Guide Bar with Saw Guard to Within of Product to be Cut ALWAYS Use Safety End Cut Pusher Plate for Smaller Products or The Last Cuts of Produc...

Page 5: ...3 ITEM NUMBER 671 WALL CHART BAND SAW SAFETY GUIDELINES ATTACH TO WALL IN VICINITY OF MACHINE IN EASY VIEW OF OPERATOR ...

Page 6: ...t your local Distributor or BIRO first 2 Install machine on a level solid non skid surface in a well lighted work area away from children and visitors 3 To assemble meat gauge plate Item No AS10275 to the machine Loosen the lock knob Item No 272 7 1 on the right side meat gauge bracket Raise the meat gauge gear rack Item No S10272 and slip the meat gauge plate over the gear rack Lower the gear rac...

Page 7: ...ructure and held in place by two push pull hold down rods Item No 10212W located at the rear of the base 8 The sliding meat carriage assembly Item No A10155 is installed by turning the movable stop assembly Item No A200 clockwise After the carriage assembly is in the channel for operation turn the movable stop counterclockwise to lock 6 Placing blade on cutter Hang upper wheel assembly Item No A10...

Page 8: ... your local Distributor or BIRO directly if you have any questions or problems with the installation or operation of this machine 14 Check placement of all warning labels wall chart and Manual Machine is ready for trained operators to process product WARNING LABELS FOR BIRO POWER MEAT SAWS Item No 653PC SP Item No 653PC E Item No 708 NOT TO SCALE Item No 710 12 Push the toggle switch to start or p...

Page 9: ...ety End Cut Pusher Plate for Smaller Products or The Last Cuts of Product DO NOT Wear Gloves While Operating Machine ALWAYS Turn Off Unplug from Power Source and Perform Lockout Tag Out Procedures Before Cleaning Servicing or When Not in Use NEVER Leave Machine Unattended While the Saw is Running NEVER Operate Without All Warning Labels Properly Affixed to Machine and Wall Chart Posted A TO PROCES...

Page 10: ... in right hand with product face flush against the meat gauge plate Move the meat carriage from right to left at a steady rate until fully past the saw blade Use left hand to remove and stack cut product NEVER REACH IN FRONT OF BAND TYPE SAW BLADE On the return stroke pull the product slightly toward you to clear the blade NEVER REACH OR GRAB FOR PRODUCT IN FRONT OF MOVING BAND TYPE SAW BLADE 6 AL...

Page 11: ...ect electrical power to the machine before cleaning Parts to be removed have been made accessible and can be removed without tools Notice in the drawing below that all parts are numbered Each part should be removed for cleaning in the numbered sequence shown To ensure cleaner cuts keep the parts on the cleaning system in good condition Parts on the cleaning system which should be checked weekly an...

Page 12: ...Should be 1 32 between back of blade and saw guide carbide NEVER USE THIS MACHINE WITHOUT PROPERLY INSTALLED AND FUNCTIONING SAW GUIDE BAR AND SAW GUARD ALWAYS Turn Off Unplug From Power Source and Perform Lockout Tagout Procedure to This Machine BEFORE Cleaning or Servicing 1 Remove the finger lift fastener knob and the finger lift assembly 2 Remove the finger lift fastener stud 3 Push the saw gu...

Page 13: ...y over time not suddenly The lubricating ability of a grease over time depends primarily on the type of grease the size of the bearing the speed at which the bearing operates and the severity of the operating conditions Good results can be obtained if the following recommendations are used in your maintenance program A high grade ball or roller bearing grease should be used Recommended grease for ...

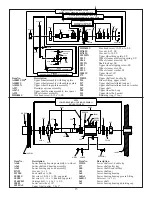
Page 14: ...HEN ORDERING PARTS 10006 S10335X 10005 10003U A14U A14L A112 179 S229 S244 S295 S325 211Q 175 175 1 S 175 2 S 267 S262 S265 S270 272 7 1 S264 1 264G 271AL S10272 10273 S242R S249 HNNL25S AS249R 10003 10217R SEE MOTOR LIST 324 324A HN20S HHS065S LW15S FW10S 324 324A HN25S HHS080S LW20S FW08S OR 10232 7PC A200 TOGGLE SWITCH SEE PAGE 20 ...

Page 15: ... SEE A19 1 NOT SHOWN LEFT SIDE 10217PD BASE PANEL DOOR SEE A116 13 211MS 601 602B 12662 AL 10302HT 256P 10155 10120 A220 A10163 1 A415D 10251AL SEE V BELTS 221 XX SEE MOTOR PULLEYS 4 XXAL 239C31 239C30 FROM S N 7405 7554 HN20S LW20S HHS055S 239 B32 AR 239 B31 2 NOT SHOWN AS239 B30 B S239 B30 B WARNING NSF BIRO MODEL 11 WARNING NSF BIRO MODEL 11 ...

Page 16: ... Hex head screw 5 16 18 x SS A116 13 Saw guide bar assembly A10005 Head door assembly LW15S Lock washer 5 16 SS A112 Head door handle assembly A14L Head door hinge assembly lower A71 Upper wheel hinge bracket assembly A14U Head door hinge assembly upper HHS025S Hex head screw 20 x SS HHS035S Hex head screw 20 x SS A196 Tension spring assembly 143 Head door catch 10006 Head door use A10006 10005 He...

Page 17: ...S Hex nut 8 32 SS HN35S Hex nut 16 SS S10335X Upper wheel hinge plate SS Description Item No A10003U335 Upper wheel assembly with hinge plate A10003U Upper wheel assembly without hinge plate A247 1 Upper shaft bearing assembly less spacer A10335X A227 Bearing cup cone assembly A295 Wheel cleaner assembly Upper wheel hinge plate assembly Description Item No A360 Lower bearing housing assembly w o w...

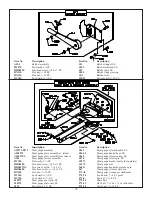
Page 18: ...embly Item No 264G Meat gauge hand wheel groove pin S264 1 Meat gauge hand wheel SS 14275 Meat gauge arm S10275 Meat gauge plate only SS LW10S Lock washer SS S235 Taper pin 4 x SS LW15S Lock washer 5 16 SS S262 Meat gauge release handle SS HHS040S Hex head screw 20 x SS 272 8 Cap nut 5 16 18 SS 267 Meat gauge release cotter pin 272 7 1 Lock knob 5 16 18 3 point 271AL Meat gauge worm gear Aluminum ...

Page 19: ...shim 022 HHS065S Hex head screw 16 x 1 SS RHS10S Round head screw 10 32 x SS HN10S Hex nut 10 32 SS RHS25S Round head screw 20 x SS LW10S Lock washer SS LW05S Lock washer 10 SS 211MS Finger lift bracket 602BFSC Upper saw guide narrow fish 211Q Fastener knob 4 point 708 Decal DANGER EXPOSED BLADE 602B Upper saw guide with carbide 601 Upper saw guide bracket A116 13 Saw guide bar assembly 13 AL head...

Page 20: ...adless screw Lock washer SS Saw guide in stationary bar SS Nylon filler Stationary bar SS Item No Description A196 LW10S S118 196 197 111AL HHS040S Hex head screw 20 x SS Tension spring assembly Tension spring pin Aluminum Lock washer SS Tension spring plate Saw tension spring Tension spring gauge Item No 198 Cap for tension pin A196 TENSION SPRING ASSEMBLY ...

Page 21: ...riage guide 155 3 Meat carriage guide spacer 025 155 4 Meat carriage guide spacer 040 Description A10120 Channel assembly 27 A200 Channel stop assembly movable Channel stop assembly fixed FW10S Flat washer 5 16 SS HHS050S Hex head screw 5 16 18 x SS HHS055S Hex head screw 5 16 18 x SS HN15S Hex nut 20 SS HN20S Hex nut 5 16 18 SS Lock washer SS LW15S Lock washer 5 16 SS A220 LW10S Item No 10120 Cha...

Page 22: ... nut 10 32 SS Lock washer SS 150 Conduit SS LW10S Item No 225 Conduit connector 90 241WH Wire white 12 gauge Toggle switch bracket 297 1 Wire terminal eyelet 340 Star lock washer 296 6808 G Toggle switch 1 phase 226 28 Washer conduit connector 241BL Wire black 12 gauge 7810 G Toggle switch 3 phase HHS010S Hex head screw 10 32 x SS NOTE SERIAL NO REQUIRED ...

Page 23: ...2 T1 T3 T4 LINE 1 LINE 2 6808 G TOGGLE SWITCH MOTOR JUNCTION BOX 110 115 VOLTS 220 230 VOLTS 7810 G TOGGLE SWITCH MOTOR JUNCTION BOX 3 PHASE 230 VOLTS 50 60 HZ ELECTRICAL SUPPLY L1 L2 L3 1 2 3 4 5 6 7 9 7810 G TOGGLE SWITCH MOTOR JUNCTION BOX 3 PHASE 440 VOLTS 50 60 HZ ELECTRICAL SUPPLY 4 5 6 7 8 9 8 L1 L2 L3 1 2 3 ...

Page 24: ...5S Set screw 5 16 18 x 5 16 cup point SS S71 0 Upper wheel hinge bracket 10006 Head door use A10006 163A Platter rod clip S11 Ratchet trigger SS 19CB Carriage bolt 20 SS S189 Ratchet arm stud SS S240 Ratchet trigger spring 10 1 Ratchet arm S19 Ratchet base SS 10273 Meat gauge bracket use A10273 S264 1 Meat gauge hand wheel SS 14275 Meat gauge arm S270 Meat gauge release pin SS S265 Meat gauge rele...

Page 25: ... 375 Drive screw for name plate 603 Lower guide bracket 603 1 Pan head screw adjusting guide 6808 G Toggle switch 1 phase 7PC Channel bracket powder coated 7810 G Toggle switch 3 phase COMPLETE ASSEMBLIES FOR MODEL 11 AS415D Stationary bar assembly SS A415D Stationary bar assembly use AS415D A196 Tension spring assembly A10155 Meat carriage assembly complete A10120 Channel assembly 27 A200 Channel...

Page 26: ...KET WS Item No 602B UPPER SAW GUIDE W BEVELED CARBIDE ALL SAWS Item No S265 MEAT GAUGE SPRING ALL SAWS Item No S608 LOWER BLADE BACKUP W CARBIDE 22 after S N 35301 1433 55 A UIDE Item No 177 NYLON FILLER ALL SAWS Item No 604 LOWER BLADE BACKUP W CARBIDE 11 22 before S N 35300 Item No 605 LOWER BLADE BACKUP W CARBIDE 34 3334 44 4436 95 ER ARM S 8 STUD Item No 179 WHEEL CLEANER ALL SAWS Item No S244...

Page 27: ...AVE COMPLETELY READ AND UNDERSTAND THIS MANUAL I REALIZE THAT THIS MACHINE IF OPERATED CARELESSLY CAN CAUSE SERIOUS INJURY TO MYSELF AND OTHERS NAME PRINT SIGNATURE SUPERVISOR S INITIALS DATE WARNING READ AND UNDERSTAND THIS ENTIRE MANUAL BEFORE SIGNING BELOW ...

Page 28: ... adjustments to switch controls or any other electrical requirements which must be performed only by a certified electrician BIRO is not responsible for service charges or labor required to replace any part covered by this limited warranty or for any damages resulting from misuse abuse lack of proper or recommended service EXCLUSION OF WARRANTIES AND LIMITATION OF REMEDIES BIRO gives no warranties...

Reviews: