background image

w w w. b i s s e l l . c o m  

O

perations

6

Power switch

The Power Switch is located on the left 

side of the vacuum. Push the rocker 

switch “ON” (I) to vacuum, and “OFF” 

(O) when cleaning is complete.

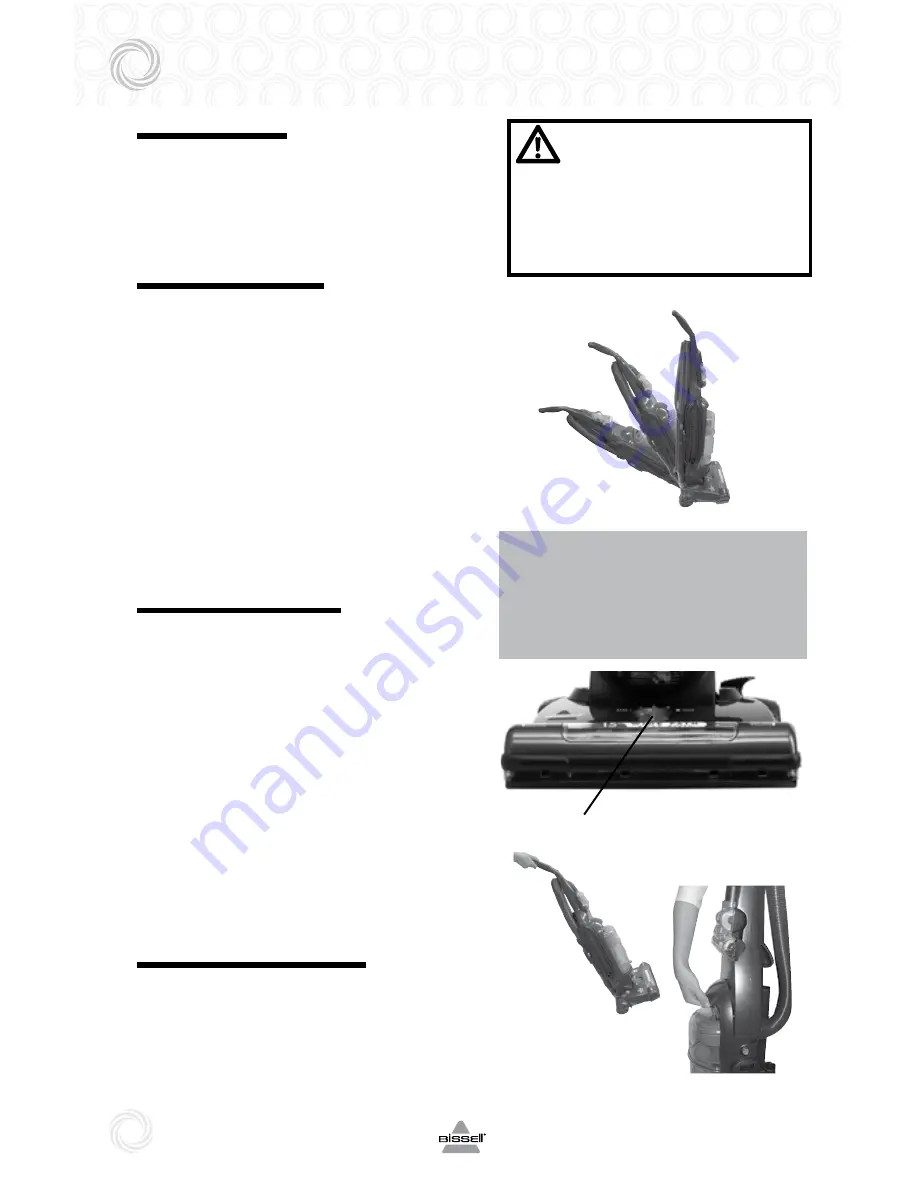
Handle positions

Press the handle release pedal, located 

on the lower left side of the vacuum, with 

your foot to place your vacuum into one 

of three cleaning positions. 
1.  Upright – 

For storage and above floor  

cleaning with tools.

2.  Normal Cleaning –

 Press handle 

release pedal once. Position used for  

most household floor cleaning tasks. 

3.  Low Cleaning –

 With the vacuum in 

normal cleaning position, press handle 

release pedal again. Use for reaching 

under low furniture such as tables,  

chairs or beds.

Height adjustment

The powerfoot/rotating floor brush on 

your vacuum can be adjusted to clean 

several floor surfaces.

NOTE: For optimal cleaning  

performance, adjust to the lowest 

practical setting. If your cleaner is 

difficult to push, adjust to the next 

higher setting. 

1. 

Turn height adjustment knob to desired setting. 


Bare Floor


For non-carpeted,  


indoor surfaces


Lowest Setting

  For short pile carpets


Medium Setting

  For short and medium  


     pile carpets


Highest Setting

  For plush pile carpet

Transporting cleaner

1. 

To move your cleaner from room to room, 

put the handle in the upright position, tilt 

the cleaner back on its rear wheels and 

push forward.

2. 

The cleaner can also be moved by using 

the carry handle.

CAUTION:


To avoid personal injury 

and to prevent the cleaner 

from falling when cleaning 

stairs, always place it at 

the bottom of the stairs.

Tip:

Before cleaning under low furniture, 

check area first for objects that might 

harm the unit or block the vacuum hose.

1.

2.

3.

1.

Height Adjustment Knob

Correct way to 

carry

1.

Summary of Contents for Pet Hair Eraser 10N6-F SERIES

Page 1: ...SER S GUIDE 10N6 F SERIES 220 240V Safety Instructions Product View Assembly Operations Maintenance and Care Troubleshooting Replacement Parts 3 4 5 6 8 8 13 13 14 14 Accessories Warranty Consumer Services 14 15 16 ...

Page 2: ... made and we back it with a limited one year warranty We also stand behind it with a knowledgeable dedicated Consumer Services department so should you ever have a problem you ll receive fast considerate assistance My great grandfather invented the floor sweeper in 1876 Today BISSELL is a global leader in the design manufacture and service of high quality homecare products like your BISSELL vacuum...

Page 3: ...rvision or instruction concerning use of the appliance by a person responsible for their safety Young children should be supervised to ensure that they do not play with the appliance Remove plug from electrical outlet before cleaning or maintaining the appliance If the supply cord is damaged it must be replaced by the manufacturer or its service agent in order to avoid a hazard Do not pick up toxi...

Page 4: ...oot Foot Window Washable Pre Motor Filter Carry Handle Lock n Seal Lever Post Motor HEPA Media Filter Upper Tank Inner Cyclone Power Cord Crevice Tool Dusting Brush Upholstery Tool Twist n Snap Hose Handle Release Pedal Hose Wand Hose Wand Base Extension Wand Hose Clip Stretch Hose Quick Release Cord Wrap Quick Release Cord Wrap Pet TurboBrush Tool The filter media not the vacuum as a whole compli...

Page 5: ...3 Grasping the Quick Reach Handle slide the end of the Hose Wand onto the Hose Wand Base Snap the Hose into the Hose Clip NOTE The vacuum will not operate effectively unless the hose wand is firmly attached 4 Slide the extension wand and crevice tool into the storage clip on back of vacuum 5 Slide the dusting brush upholstery tool into the storage clip on back of vacuum 6 Store the Pet TurboBrush ...

Page 6: ...can be adjusted to clean several floor surfaces NOTE For optimal cleaning performance adjust to the lowest practical setting If your cleaner is difficult to push adjust to the next higher setting 1 Turn height adjustment knob to desired setting Bare Floor For non carpeted indoor surfaces Lowest Setting For short pile carpets Medium Setting For short and medium pile carpets Highest Setting For plus...

Page 7: ...Use with desired attachment for a longer reach or for cleaning hard to reach places Pet TurboBrush Tool Use rotating brush action for small flat areas such as cushions and beds NOTE Press gently down and pull towards you in a raking motion Too much pressure will cause the brush to stop rotating caution The rotating floor brush continues to rotate while tools are in use To reduce the risk of injury...

Page 8: ...lean your filters frequently Perform the following maintenance steps 1 Empty the dirt container when the dirt reaches the Full line on the container or more frequently to prevent overfills For best performance empty after each use 2 Check the pre motor filter and post motor HEPA Media Filter at least once a month clean or replace as needed 3 Replace the post motor HEPA Media Filter every three to ...

Page 9: ...E The pre motor filter may be hand washed in cold water with mild detergent Rinse well and air dry thoroughly before replacing 3 The post motor HEPA media filter assists in the filtration process to return clean air to the room It is located behind the door on the side of the vacuum If the filter becomes dirty remove the door remove the filter and replace NOTE The post motor filter is a white plea...

Page 10: ...oor brush at both ends and lift 5 Clean strings hair and other debris from rotating floor brush paying particular attention to brush ends 6 Clean strings hair and other debris from motor pulley and drive belt areas 7 Check drive belt carefully for wear cuts or stressed areas 8 Check air passageway for obstructions Remove debris from this area 9 Insert front edge of the brush cover and rotate into ...

Page 11: ...rotating floor brush by hand several times in the direction of motor pulley If properly installed drive belt will center itself on rotating brush crown 6 Insert front edge of brush cover and rotate into place Snap the three latches and replace the two screws Replacing lightbulb 1 Unplug the vacuum from electrical outlet 2 Using a screwdriver first remove 2 screws on either side of lens and pull ou...

Page 12: ...d separate it from the hose wand base Check for a clog in the base the wand or in the hose 6 Remove the Twist n Snap hose from the vacuum by turning to the left Straighten the hose and unclog with a long narrow object such as a broom handle 7 If the clog persists follow the instructions for Checking the rotating floor brush and drive belt on page 10 and inspect the air passageway for obstructions ...

Page 13: ...nd lock in place 11 Filters are dirty 11 Check pre motor and post motor filters 12 Pet TurboBrush Tool is clogged or 12 Seepages11 12forMaintaining debris is wrapped aroundthebrushroll PetTurboBrush Tool Vacuum cleaner is difficult to push Possible causes Remedies 1 Incorrect height setting 1 Adjust powerfoot to correct height setting WARNING To reduce the risk of electric shock turn power OFF and...

Page 14: ...5 203 1216 Twist n Snap Vacuum Hose clear 1 2 3 4 5 1 2 3 4 5 Visible dirt escaping from cleaner Possible causes Remedies 1 Dirt container full 1 Empty dirt container 2 Filters missing or installed incorrectly 2 Check pre motor and post motor filters for correct installation 3 Dirt container installed incorrectly 3 Pull out and re insert dirt container correctly Other maintenance or service not in...

Page 15: ...D WARRANTIES WHICH MAY ARISE BY OPERATION OF LAW INCLUDING THE IMPLIED WARRANTIES OF MERCHANTABILITY AND FITNESS FOR A PARTICULAR PURPOSE ARE LIMITED TO THE one YEAR DURATION FROM THE DATE OF PURCHASE AS described above FOR AUSTRALIAN CONSUMERS ONLY Our goods come with guarantees that cannot be excluded under the Australian Consumer Law You are entitled to a replacement or refund for a major failu...

Page 16: ...g BISSELL have model number of cleaner available Please record your Model Number ___________________ Please record your Purchase Date ___________________ NOTE Please keep your original sales receipt It provides proof of purchase date in the event of a warranty claim See Warranty on page 15 for details For Australian inquiries Monday Friday 9 am 5 pm BISSELL Australia PTY LTD 42 Rocco Drive Scoresb...

Reviews: