background image

10

www.BISSELL.com


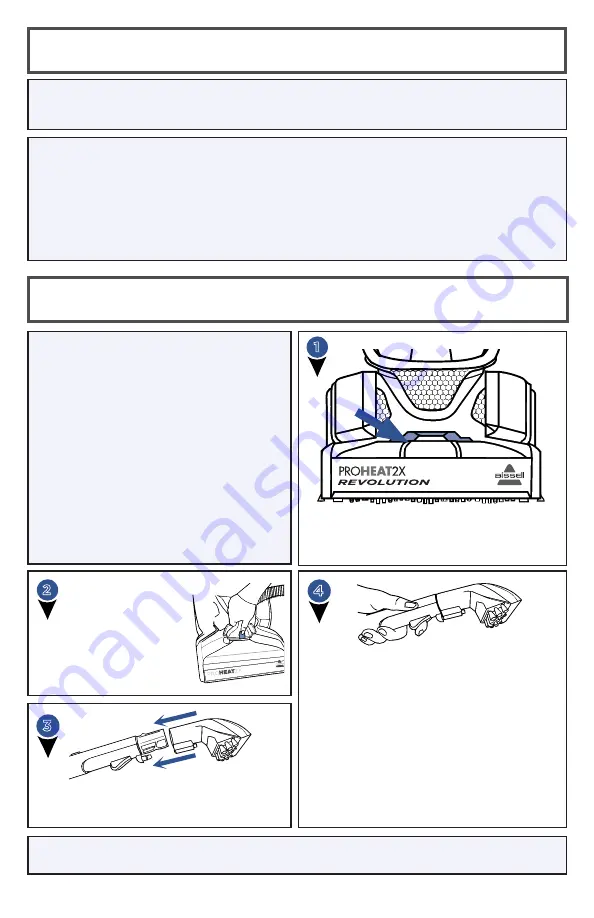
Cleaning with Hose and Tool

IMPORTANT: 

Please check manufacturer’s tag before cleaning area rugs for any 

specialized cleaning instructions. We do not recommend deep cleaning delicate, silk, 

wool, antique, or area rugs without a manufacturer’s tag.

Cleaning Area Rugs

2

Insert the hose and 

snap into place.  

Be sure the colored 

hose release clip 

is facing out, away 

from machine.

Press the Spray Trigger button to spray  

the soiled area, then slowly move tool 

back and forth over the area. 
Release the trigger to suck up the dirty 

solution. Work in small sections until the 

area is clean.
When finished cleaning, turn the machine 

ON to suction up warm clean water to 

rinse the inside of the hose and tool. 

Detach the hose and tool and close the 

Accessory Hose Door. Let the hose and 

tool air dry before storing.

Attach the tool to the end of the hose. 

(Tools may vary by model.) Press the 

Power Button to turn machine ON.

3

4

1

Lift the Accessory Hose Door on top of 

Foot on the front of the machine. The  

door flips toward the machine to open.

NOTE: 

If using the 

Mini Deep Reach Tool

, be sure the needles of the tool are pressed 

down into the carpet so the spray gets into the carpet fibers.

Regularly clean your high-traffic area rugs in Express Clean Mode:


»

Check the manufacturer’s tag.


»

Select Express Clean Mode.


»

When cleaning area rugs, place the rug on a sealed surface to test for colorfastness in 

an inconspicuous area. Your cleaner should not be used on unsealed surfaces.


»

Important: Keep the foot of the deep cleaner perpendicular to the rug’s edge with 

each cleaning pass to prevent damage.


»

Keep hair, loose clothing, fingers, and all 

parts of body away from openings and 

moving parts. The Brush Roll continues 

to rotate when in the upright position. 


»

The Brush Roll continues to turn while 

product is turned ON and handle is in 

upright position. To avoid damage to 

carpet, rugs, furniture, and flooring, 

avoid tipping cleaner or setting it on 

furniture, fringed area rugs or carpeted 

stairs during tool use. 


»

With Brush Roll on, do not allow cleaner 

to sit in one location for an extended 

period of time, as damage to floor can 

result. 

Summary of Contents for PROHEAT 2X REVOLUTION 15484

Page 1: ...PROHEAT 2X REVOLUTION Deep Cleaner _______________ USER GUIDE MODELS 15484 1551 15503 More of a video person Look for this icon and go online for an instructional how to video at www BISSELL com...

Page 2: ...ilters in place Use only BISSELL cleaning formulas intended for use with this appliance to prevent internal component damage See the Cleaning Formulas section of this guide Do not immerse Use only on...

Page 3: ...ndle 3 Base with Dirty Water Tank 4 Clean Water Tank 5 Carry Handle 6 2 BISSELL Trial Size Formulas 7 Accessory Bag Hose 8 Attachments Accessories vary by model 9 Nozzle Clean Out Tool Thanks for buyi...

Page 4: ...ter Tank 1 Gallon Capacity 4 Power Button 5 Float Stack 6 Dirty Water Tank 7 Belt Access Door 8 Foot 9 Spray Trigger 10 In Use Cord Clip 11 Cleaning Mode Switch 12 Accessory Hose Door 13 Belt Brush Ac...

Page 5: ...ng a Phillips head screwdriver secure the Carry Handle and the Upper Handle with the screw that s taped to the Upper Handle Wrap the cord around the Carry Handle and Quick Release hook At the bottom o...

Page 6: ...Stain Odor Removes tough pet stains Includes StainProtect to protect against future stains PRO MAX Clean Protect Our most powerful formula for tough ground in dirt stains Includes StainProtect to pro...

Page 7: ...rmula to achieve antibacterial benefits 2 ATTENTION Do not overwet carpet Be careful not to run over loose objects or edges of area rugs Stalling the brush may result in premature belt failure 3 After...

Page 8: ...to add to the tank Twist cap back into place 4 3 1 Lift the Clean Water Tank straight up to remove from the machine The Clean Water Tank is at the top of the machine Clean Water Tank 1 Gallon Dirty Wa...

Page 9: ...e Dirty Water Tank will not get as full as when cleaning with Deep or Max Clean Mode It is common to refill the Clean Water Tank and empty the Dirty Water Tank multiple times during the cleaning proce...

Page 10: ...p of Foot on the front of the machine The door flips toward the machine to open NOTE If using the Mini Deep Reach Tool be sure the needles of the tool are pressed down into the carpet so the spray get...

Page 11: ...the Float Stack rinse and clean Once clean return Float Stack into the tank by lining up the arrows so they point at each other This is the only way the Float Stack will fit into the tank With the ar...

Page 12: ...3 4 If pet hair or debris become clogged in the nozzle it can be cleaned out of the nozzle with the Nozzle Clean Out Tool Turn OFF and unplug the machine from the grounded outlet Remove the nozzle fro...

Page 13: ...remove it from the machine We will replace this belt in Step 5 Remove the Brush Cover by lifting straight up Remove the cogged large pump belt The Brush Rolls can be replaced or cleaned at this time...

Page 14: ...etch and wrap around the nearest brush gear Return the Belt Brush Access Plate to the end of the Brush Rolls by securing with the 3 screws Return the brush cover Make sure that the brushes are aligned...

Page 15: ...the Dirty Water Tank and press firmly on all edges to secure it tightly see step 4 on page 11 for details Accessory Hose Door may not be closed tightly in place Check the Accessory Hose Door and make...

Page 16: ...be valid if the product is used in the same country in which it was sold BISSELL is not liable for incidental or consequential damages of any nature associated with the use of this product BISSELL s l...

Page 17: ...17 www BISSELL com Notes...

Page 18: ...ing on future purchases Faster Service Supplying your information now saves you time should you need to contact us with questions regarding your product Product Support Reminders and Alerts We ll cont...

Page 19: ...LIMPIADORA PROFUNDA PROHEAT 2X REVOLUTION _______________ GU A DEL USUARIO MODELOS 15484 1551 15503 Prefiere ver videos Busque este cono y con ctese para ver un video instructivo en www BISSELL com...

Page 20: ...iltros no est n en su lugar Utilice solo las f rmulas de limpieza BISSELL destinadas para usarse con este electrodom stico con el fin de evitar el da o de los componentes internos Consulte la secci n...

Page 21: ...ia 5 Manija de transporte 6 2 f rmulas BISSELL de tama o de muestra 7 Bolsa de accesorios y manguera 8 Aditamentos accesorios var an seg n el modelo 9 Accesorio para limpiar la boquillal Gracias por c...

Page 22: ...5 Flotante 6 Tanque de agua sucia 7 Puerta de acceso a la correa 8 Patas 9 Gatillo del rociador 10 Sujetador para cable durante el uso 11 Interruptor de modo de limpieza 12 Puerta de manguera accesor...

Page 23: ...llador Phillips asegure la manija de transporte y la manija de transporte con el tornillo que est fijado a la manija superior Enrolle el cable alrededor de la manija de transporte y el gancho Quick Re...

Page 24: ...Odor Elimina manchas rebeldes de mascotas Incluye StainProtect para proteger contra manchas futuras PRO MAX Clean Protect Nuestraf rmulam s poderosaparamanchas ysuciedadesrebeldese incrustadas Incluye...

Page 25: ...lograr beneficios antibacteria nos 2 ATENCI N No humedezca demasiado la alfombra Tenga cuidado de no pasar por encima de objetos sueltos o los bordes de los tapetes de interiores El estancamiento del...

Page 26: ...tanque Gire la tapa de vuelta en su sitio 4 3 1 Levante el tanque de agua limpia en posici n vertical para retirarlo de la m quina El tanque de agua limpia est en la parte superior de la m quina Tanqu...

Page 27: ...o limpia con el modo de limpieza profunda o m xima Es normal volver a llenar el tanque de agua limpia y vaciar el tanque de agua sucia varias veces durante el proceso de limpieza El tama o de la habit...

Page 28: ...arte superior del pie en la parte frontal de la m quina La puerta se voltea hacia la m qui na para abrirla NOTA si utiliza el accesorio Deep Reach Mini aseg rese de que las agujas del accesorio se pre...

Page 29: ...enjuague y limpie Una vez limpio vuelva a colocar el ca n flotante en el tanque alineando las flechas para que se apunten entre s Esta es la nica forma de que el ca n flotante se inserte en el tanque...

Page 30: ...se atasca con pelos de mascotas o desechos puede limpi arla con el accesorio de limpieza de la boquilla Apague la m quina y descon ctela del toma corriente con puesta a tierra Retire la boquilla del...

Page 31: ...mplazaremos esta correa en el paso 5 Retire la cubierta del cepillo levant ndola hacia arriba Retire la correa grande dentada de la bomba Los cepillos giratorios se pueden reemplazar o limpiar en ese...

Page 32: ...el engranaje del cepillo m s cercano Vuelva a colocar la placa de acceso del cepillo correa en el extremo de los cepillos giratorios y f jela con los 3 tornillos Vuelva a colocar la cubierta del cepil...

Page 33: ...leng eta de goma en el tanque de agua sucia y presione firmemente en todos los bordes para asegurarla firmemente consulte el paso 4 en la p gina 11 para obtener m s detalles La puerta de la manguera...

Page 34: ...si el producto se usa en el mismo pa s en el que se vendi BISSELL no es responsable por da os incidentales o consecuentes de cualquier naturaleza relacionados con el uso de este producto La responsab...

Page 35: ...17 www BISSELL com Notas...

Page 36: ...a su informaci n ahora le ahorrar tiempo en caso de que necesite comunicarse con nosotros con preguntas sobre su producto Recordatorios y alertas de apoyo para su producto Nos comunicaremos con usted...

Reviews: