background image

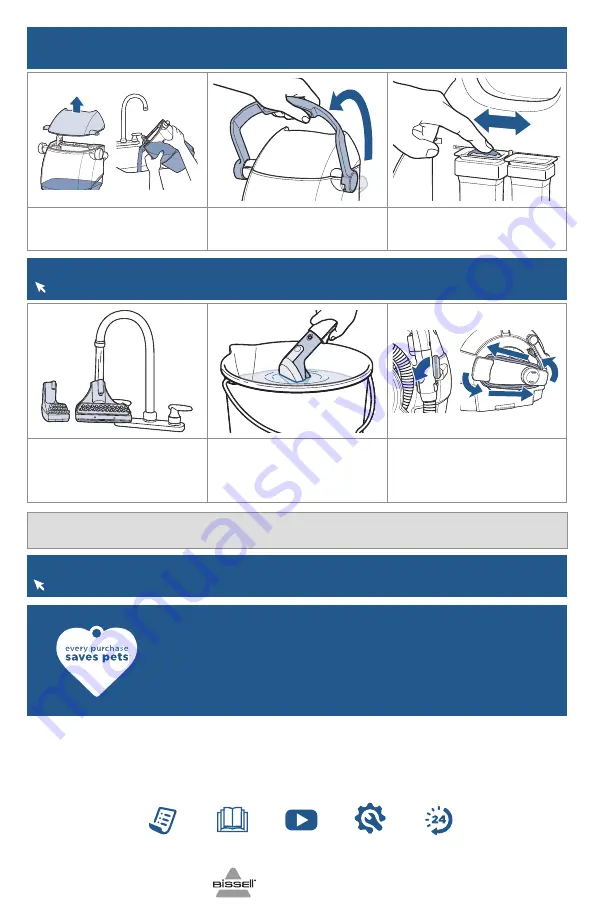
Cleaning & Storing Your Machine

 For more helpful maintenance tips, check out 

support.BISSELL.ca

.

1. 

Remove and rinse the tools 

under clean, running water. Allow 

tools to dry.

2. 

It is recommended that you 

suction clean water from a bowl 

(or bucket) to rinse out the hose. 

Lift end of hose and stretch out to 

ensure all water is cleared.

3. 

Wrap and secure the Flex Hose 

and Power Cord.

NOTICE

 To reduce the risk of a leaking condition, do not store where freezing may occur. Damage to internal components may result.

Warranty

 2-Year limited warranty. Visit

 support.BISSELL.ca

 or call 1-800-263-2535 for complete warranty information.

But wait, there’s more!

Join us online for a complete guide to your new product, including 

troubleshooting, product registration, parts, and more.  

Go to support.BISSELL.ca.

VIDEOS

INFO

REGISTER

PARTS

SUPPORT

We’re Waggin’ Our Tails!

BISSELL proudly supports BISSELL Pet Foundation® and its mission to 

help save homeless pets. When you buy a BISSELL product, you help 

save pets, too. We’re proud to design products that help make pet 

messes, odours and pet homelessness disappear.  

Visit 

BISSELLsavespets.ca

 to learn more.

©2022 BISSELL Inc. All rights reserved.  

Part Number 1630484 11/21

4. 

Remove lid and pour out dirty 

water. Rinse out tank to remove 

any debris.

5. 

Replace the tank lid and rotate 

the handle forward to lock back 

into place.

6. 

Before placing tank back into 

the machine, remove any debris 

from the red filter.

Emptying the Dirty Water Tank

(continued)

Summary of Contents for SPOTCLEAN PROFESSIONAL LITTLE GREEN PRO 2505 Series

Page 1: ...hrough of your new purchase This guide has everything you need to get ready for first use including setting up using and maintaining your machine but online you ll find additional resources like tips...

Page 2: ...ancewhileinuse Donotimmerse Useonlyonsurfacesmoistenedbythecleaningprocess Plasticfilmcanbedangerous Toavoiddangerofsuffocation keepaway fromchildren SAVE THESE INSTRUCTIONS THIS MODEL IS FOR HOUSEHOL...

Page 3: ...k with hot tap water 140 F 60 C MAX to the water fill line 4 Add 60 mL 2oz of BISSELL formula to the tank 5 Place bottle insert back into tank and tighten the black cap 6 Place the tank back onto the...

Page 4: ...o sit for at least 3 minutes 4 Clean following instructions below Choose Your Desired Tool Tools vary by model 3 and 4 Tools Great for carpet stains furniture and other hard to reach surfaces 6 Tool G...

Page 5: ...gether are pointed toward the brush Turn the tank to lock it into place Using the HydroRinseTM Tool Emptying the Dirty Water Tank We have additional tips for maintaining your machine at support BISSEL...

Page 6: ...ore Join us online for a complete guide to your new product including troubleshooting product registration parts and more Go to support BISSELL ca VIDEOS INFO REGISTER PARTS SUPPORT We re Waggin Our T...

Page 7: ...uvel achat Ce guide contient tout ce dont vous avez besoin pour vous pr parer la premi re utilisation y compris l installation l utilisation et l entretien de votre appareil mais en ligne vous trouver...

Page 8: ...esoudescendreschaudes UtiliserseulementdesproduitsnettoyantsBISSELL con ussp cialementpourcet appareilafind viterd endommagerlespi cessetrouvant l int rieur Consulterla sectiondesproduitsnettoyantsdan...

Page 9: ...e avec de l eau chaude du robinet 60 C ou 140 F maximum 4 Ajoutez 60 mL 2 oz de solution nettoyante BISSELL dans le r servoir 5 Replacez la pi ce interne l int rieur du r servoir et serrez le capuchon...

Page 10: ...ions ci dessous Fixation et utilisation des accessoires REMARQUE Lorsque vous utilisez l accessoire Deep Stain gardez le toujours directement en contact avec le tapis pour viter la vaporisation excess...

Page 11: ...nez le r servoir pour le verrouiller en place Utilisation de l accessoire HydroRinseTM Vidange du r servoir d eau sale Nous avons d autres astuces pour l entretien de votre appareil au support BISSELL...

Page 12: ...tez nous en ligne pour consulter le guide complet de votre nouveau produit qui comprend les diagnostics de panne l enregistrement du produit les pi ces et plus Allez au support BISSELL ca VID OS INFO...

Reviews: