background image

Product View

WARNING

Plastic film can be dangerous. To avoid 

danger of suffocation, keep away from 

babies and children.

www.BISSELL.com   


4

Assembly

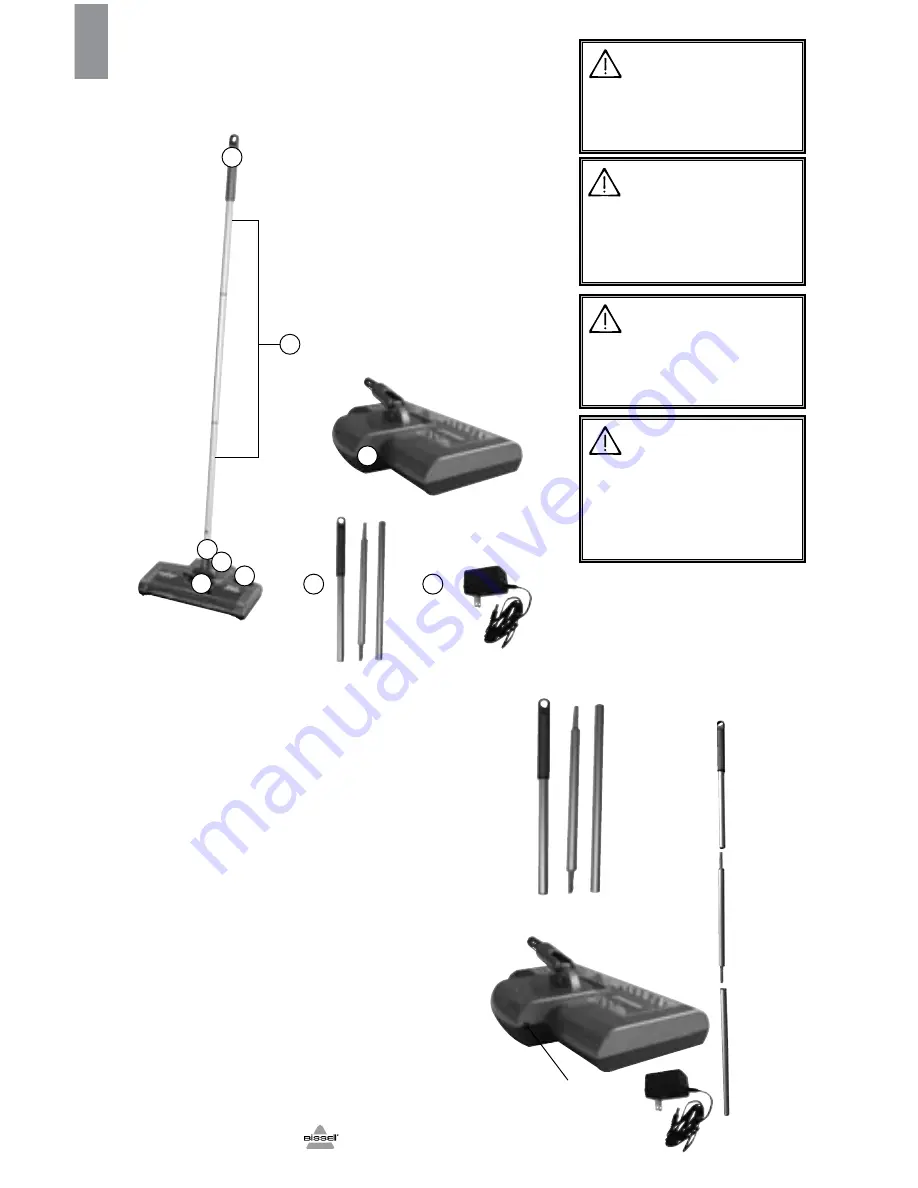
Your sweeper requires very little assembly. 

Remove it from the box and check it against  

the illustration to familiarize yourself with the 

components listed. The exploded view diagram 

with part names will also be helpful if you  

should need to order a part at a later time.

1. 

Assemble the handle by taking the section 

with the non-slip grip (1) and the middle section 

which has grey connector pieces on each end 

(2). Insert the middle section (2) into the grip 

section (1) and twist to tighten into place. Next, 

take this assembled section and insert into the 

bottom section with a hole (3). Twist to tighten 

into place.     

2. 

Take the assembled handle and line up the 

bottom hole with the button on the swivel  

connector on top of the sweeper. Push the  

button on the swivel connector down while 

pushing the assembled handle over the button,  

locking the handle into place.

1  Non-Slip Handle Grip

2   Metal Extension Handle

3  Swivel Connector 

4   Charging Indicator Light

5  Power Switch

6  Dirt Container Release

7  Charging Port

8  Handle Assembly

9  DC Adapter

WARNING

Do not plug in your sweeper until you  

are familiar with all instructions and  

operating procedures.

WARNING

Electric/electronic appliances should not be 

subjected to extreme temperatures or high 

humidity. Do not store the EasySweep in 

bathing areas or close to stoves, furnaces 

or radiators.

WARNING

To reduce the risk of electric shock, turn 

power switch off and disconnect polarized 

plug from electrical outlet before performing 

maintenance or troubleshooting checks.

Charging Port

Handle Assembly

 1

 1  2  3

 2

 3

7

8

9

1

3

4

6

5

2

4

EN

Summary of Contents for SUPREME SWEEP 15D1

Page 1: ...SUPREME SWEEP COMPACT 15D1 ...

Page 2: ...n an enclosed space filled with vapors given off by oil base paint paint thinner some moth proofing substances flam mable dust or other explosive or toxic vapors Do not pick up hard or sharp objects such as glass nails screws coins etc Do not pick up anything that is burning or smoking such as ciga rettes matches or hot ashes Use only on dry indoor surfaces This product contains rechargeable Nicke...

Page 3: ...and service of high quality homecare products like your BISSELL sweeper Thanks again from all of us at BISSELL Mark J Bissell Chairman CEO Safety Instructions 2 Product View 4 Assembly 4 5 Operations 5 Maintenance Care 6 Guarantee 7 Consumer Care 7 EN FR RU CZ ES NL SK DA DE FI HU IT NO PL SE PT 1 7 8 13 14 19 20 25 26 31 32 37 38 43 44 49 50 55 56 61 62 67 68 73 74 79 80 85 86 91 92 97 WARNING AN...

Page 4: ...en into place 2 Take the assembled handle and line up the bottom hole with the button on the swivel connector on top of the sweeper Push the button on the swivel connector down while pushing the assembled handle over the button locking the handle into place 1 Non Slip Handle Grip 2 Metal Extension Handle 3 Swivel Connector 4 Charging Indicator Light 5 Power Switch 6 Dirt Container Release 7 Chargi...

Page 5: ...3 Decreased operating time may indicate the battery has built up a resistance To recharge first completely exhaust the battery recharge it and then exhaust it again before recharging a second time This procedure may be required more than once 4 When charging is complete be sure to unplug from the charger Using your sweeper Your sweeper is a quick and easy way to clean your bare floors low pile rug...

Page 6: ...arger 2 Remove handle dirt cup and then pry four wheels from bottom of sweeper 3 Remove 6 Phillips head screws on the bottom cover as shown in picture 4 Separate top and bottom cover 5 Remove wire connectors from the battery pack 6 Keep battery pack together DO NOT separate individual batteries For specific disposal instructions please contact your local authorities for requirements and regulation...

Page 7: ...ablecomponentssuchas filters beltsandmoppads whichmustbereplacedorservicedbythe userfromtimetotime arenotcoveredbythisGuarantee This Guarantee does not apply to any defect arising from fair wear and tear Damage or malfunction caused by the user or any third party whether as a result of accident negligence abuse neglect or any other use not in accordance with the User Guide is not covered by this G...

Reviews: