background image

Electrodermal Activity (EDA)  

User Manual  


 8 of 18 


2.


Application Notes 

 
The 

BITalino

  EDA  sensor  is  designed  to  acquire the  change  of  skin  activity  such  as  sweat with  two 

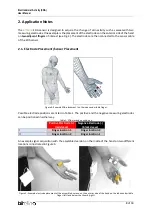
measuring electrodes. One example is the placement of the electrodes on the anterior side of the hand 
on 

two adjacent fingers

 of interest (see Fig. 4). The electrodes are then connected to the sensor cable 

of the EDA sensor.  
 

2.1.


Electrode Placement/Sensor Placement 


Figure 4: Example EDA placement I on the index and middle finger. 

 
Possible electrode positions are listed in Table 1. The positive and the negative measuring electrodes 
can be positioned in either way. 

Table 3: EDA electrode positioning.  


Positive Electrode (+) 

(red sleeve)  

Negative Electrode (-) 

(black sleeve) 

Finger location 1 

Finger location 2 

II 

Finger location 2 

Finger location 1 

 
An example signal acquisition with the assembled version on the inside of the hand on two different 
locations is illustrated in Figure5. 


Figure 5: Example electrode placement of the assembled version on the anterior side of the hand on the index and middle 

finger (left) and below the thumb (right). 


Summary of Contents for 810121207

Page 1: ...Electrodermal Activity EDA Sensor User Manual ...

Page 2: ...f advised of the possibility of such damages ATTENTION Please read this datasheet before using your BITalino sensor The information contained in this document has been carefully checked and were made every effort to ensure its quality PLUX reserves the right to make changes and improvements to this manual and products referenced at any time without notice The word Bluetooth and its logo are tradem...

Page 3: ...gnals 9 3 1 Connecting the sensor to BITalino Systems BT 9 3 1 1 BITalino r evolution Board 9 3 1 2 BITalino r evolution Plugged 9 3 1 3 BITalino r evolution Freestyle 10 3 1 4 BITalino r evolution Core assembled 10 3 2 Configuring the Sensor in OpenSignals 11 3 2 1 OpenSignals r evolution Windows macOS Linux 11 4 Scientific Publications Using the EDA Sensor 13 5 Safety Maintenance 14 5 1 Safety I...

Page 4: ...can easily extract overall statistics basic spectral analysis and extract typical event related phasic features from the acquired sensor data Figure 1 BITalino EDA sensor standard version 1 2 Typical Unfiltered Sensor Output Figure 2 shows a typical unfiltered EDA sensor output acquired while being in a relaxed state The raw digital sensor values received from the BITalino device ranged between 0 ...

Page 5: ...uired with BITalino devices are converted into digital values ranged between 0 and 2n 1 n sampling resolution usually 6 bit or 10 bit and streamed in the raw digital format In most applications the original physical unit of the acquired EDA signal is preferred or required The raw digital sensor samples can be converted back into microsiemens mV using the following formulas 𝐸𝐷𝐴 µ𝑆 𝐴𝐷𝐶 2𝑛 𝑉𝐶𝐶 0 12 1...

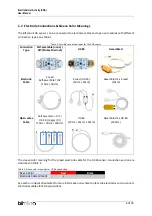
Page 6: ...elf assemble DiY 10cm 30cm 2 lead UC E6 10cm 30cm Assembled 2 x 1 lead 10cm Open wires Cable Self assemble DiY UC E6 legacy RJ 10cm 30cm 100cm UC E6 10cm 30cm 100cm Assembled 1 x UC E6 100cm The sleeve color meaning for the 2 lead electrode cable for the UC E6 sensor connection version are described in Table 2 Table 2 Sleeve color meanings for UC E6 connection See section 2 Application Notes for m...

Page 7: ...Electrodermal Activity EDA User Manual 7 of 18 1 8 Physical Characteristics The BITalino EDA sensor comes in a size of 12mm x 27mm see Fig 4 Figure 3 Physical characteristics of the standard EDA sensor ...

Page 8: ...DA placement I on the index and middle finger Possible electrode positions are listed in Table 1 The positive and the negative measuring electrodes can be positioned in either way Table 3 EDA electrode positioning Positive Electrode red sleeve Negative Electrode black sleeve I Finger location 1 Finger location 2 II Finger location 2 Finger location 1 An example signal acquisition with the assemble...

Page 9: ...alino r evolution Board The BITalino EDA sensor comes already connected to the BITalino r evolution Board Figure 6 EDA compatible BITalino r evolution Board pre connected to an EMG sensor with UC_E6 connector on one side 3 1 2 BITalino r evolution Plugged The BITalino EMG sensor UC E6 sockets is compatible with all 6 analog input channels of the BITalino r evolution Plugged with a sensor cable wit...

Page 10: ...ible connection ports marked in green for the EDA sensor without connections using the Molex Sherlock plugs and sockets or self mounted cables 3 1 4 BITalino r evolution Core assembled Figure 9 BITalino r evolution Core assembled and the connection ports for the EDA sensor assembled marked in green The BITalino EDA sensor assembled is compatible with all 6 analog input channels of the BITalino r e...

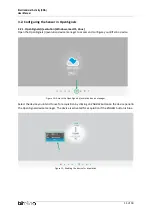
Page 11: ...on device manager to access and configure your BITalino device Figure 10 Access the OpenSignals r evolution device manager Select the device you intend to use for acquisition by clicking on ENABLE button on the device panel in the OpenSignals device manager The device is activated for acquisition if the ENABLE button is blue Figure 11 Enabling the device for acquisition ...

Page 12: ...connected to to EDA Activate the channel for acquisition by clicking on the circle next to the channel type must be blue If not done before follow the instruction available in section 2 Application Notes to learn how to apply the sensors and 3 1 Connecting the sensor to BITalino Systems to learn how to connect your device to your BITalino device Click on the record button in the OpenSignals main i...

Page 13: ...ng Systems and Technologies BIOSTEC pp 275 279 2019 Anastasija Rastovic Maud Pélissier and Emmanuel Ferragne The perception of swear words by French learners of English an experiment involving electrodermal activity in Anglophonia no 27 2019 Joana Pinto Ana Fred and Hugo Plácido da Silva Biosignal Based Multimodal Emotion Recognition in a Valence Arousal Affective Framework Applied to Immersive Vi...

Page 14: ...ces or other approved accessories purchased from PLUX or by a PLUX agent The user should inspect the sensors on a regular basis to ensure that they remain in good working order The user should stop using the BITalino device if experience any kind of discomfort or skin irritation Do not use the system on persons with allergies to silver The user should dispose detection surfaces after using the BIT...

Page 15: ...to 30 C Atmospheric pressure between 500hPa and 1060hPa Whenever the equipment needs to be transported it should be placed in the original box since this was designed and tested to ensure the equipment and accessories are securely stored Take care while handling the transportation of the system and avoid dropping it since the device is not shock proof and should not be placed under stress or sudde...

Page 16: ...r the same specification Repairs will be carried out at PLUX s premises after the equipment has been received 6 3 Warranty Voidance Usage of the device that is not in accordance with the handling instructions indicated in the manual or use with accessories other than those manufactured by PLUX will invalidate the warranty of your devices Be careful when connecting your BITalino devices sensors and...

Page 17: ...ch applications they are not medical devices nor are they intended for medical diagnosis cure mitigation treatment or prevention of disease we expressly disclaim any liability whatsoever for any direct indirect consequential incidental or special damages including without limitation lost revenues lost profits losses resulting from business interruption or loss of data regardless of the form of act...

Page 18: ...A email plux plux info web http www plux info Headquarters Zona Industrial das Corredouras Lt 14 1 2630 369 Arruda dos Vinhos Portugal tel 351 263 978 572 fax 351 263 978 902 Lisbon Office Av 5 de Outubro n 79 2 1050 059 Lisboa Portugal tel 351 211 956 542 fax 351 211 956 546 ...

Reviews: