background image


Rev. 1.01 

- 11 - 

SRP-275III


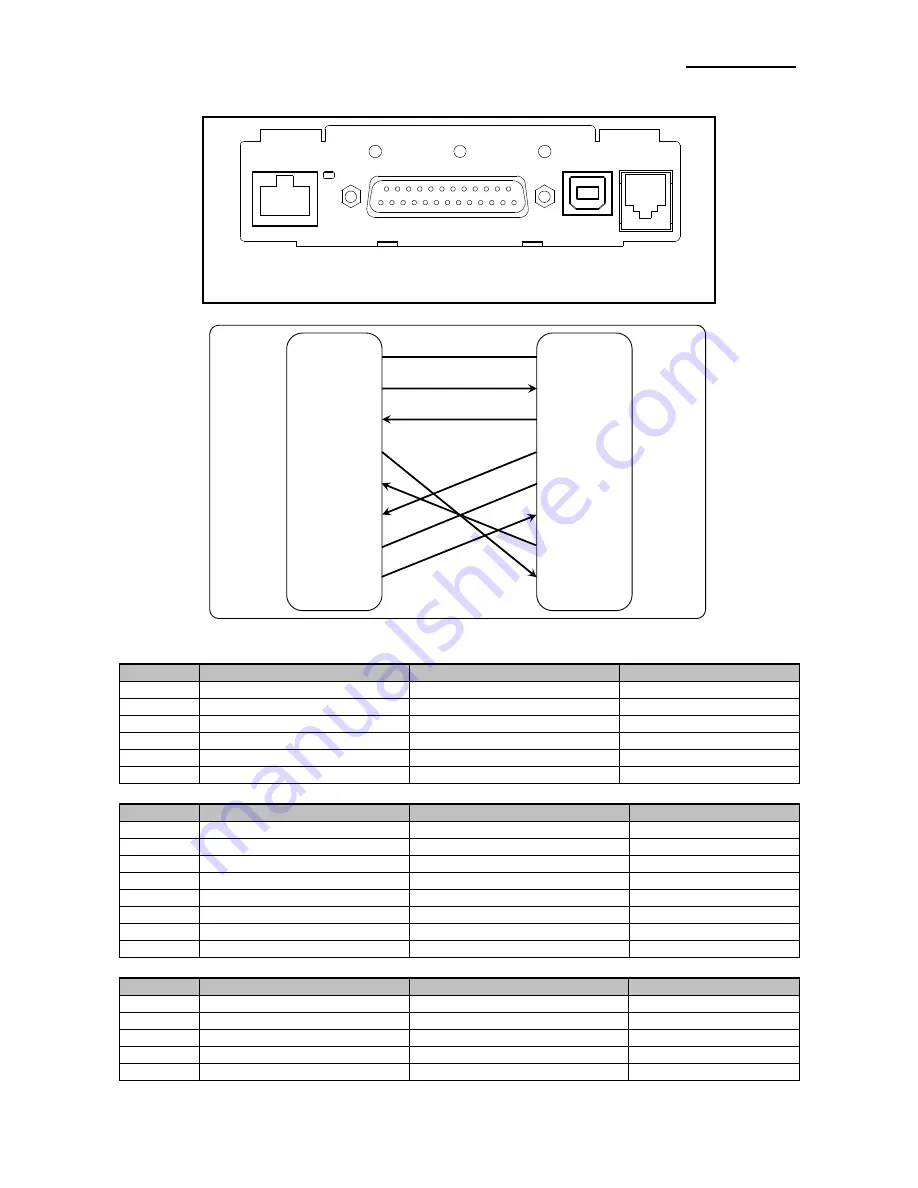
2-2-1 Serial Interface (RS-232C) + Et USB : OES Model 


        Ethernet 

Interface connector 

USB 

Drawer kick-
out 
Connector 


(F.G)   1

(TXD)   2

(RXD)   3

(RTS)   4

(CTS)   5

(DSR)   6

(S.G)   7

(DTR)   20

1  (F.G)

2  (RXD)

3  (TXD)

4  (DTR)

5  (S.G)

6  (DSR)

7  (RTS)

8  (CTS)

PRINTER

SIDE

(25Pin)

HOST

SIDE

(9Pin)


• Serial 

Pin 

No

Signal name 

Direction 

Function 

FG 

Frame Ground 

TxD 

Output 

Transmit Data 

RxD 

Input 

Receive Data 

DSR 

Input 

Data Set Ready 

SG 

Signal Ground 

20 

DTR 

Output 

Data Terminal Ready 

• Ethernet 

Pin No. 

Signal name 

Assignment (Color) 

Function 

TxD+ 

White with orange stripe 

Tr 

TxD- 

Solid orange 

Transmit - 

RxD+ 

White with green stripe 

NC 

Solid blue 

NC 

White with blue stripe 

RxD- 

Solid green 

Receive - 

NC 

White with brown stripe 

NC 

Solid brown 

• USB 

Pin No. 

Signal name 

Assignment (Color) 

Function 

Shell 

Shield 

Drain wire 

Frame ground 

VBUS 

Red 

NC 

D- 

White 

Differential data line 

D+ 

Green 

Differential data line 

GND 

Black 

Signal ground 


Summary of Contents for Srp-275III

Page 1: ...User s Manual SRP 275III Impact Printer Rev 1 01 http www bixolon com ...

Page 2: ...stic bag out of children s reach If not a child may put the bag on his head Do not pull the cable to unplug This can damage the cable which is the origin of a fire or a breakdown of the printer You must use only the supplied adapter It is dangerous to use other adapters Do not plug several products in one multi outlet This can provoke over heating and a fire If the plug is wet or dirty dry or wipe...

Page 3: ...le repair or remodel it for yourself Call your dealer when you need these services Do not touch the blade of auto cutter Install the printer on the stable surface If the printer falls down it can be broken and you can hurt yourself Keep the desiccant out of children s reach If not they may eat it If you observe a strange smoke odor or noise from the printer unplug it before taking following measur...

Page 4: ...BIXOLON nor its affiliates shall be liable to the purchaser of this product or third parties for damages losses costs or expenses incurred by purchaser or third parties as a result of accident misuse or abuse of this product or unauthorized modifications repairs or alterations to this product or excluding the U S failure to strictly comply with BIXOLON s operating and maintenance instructions BIXO...

Page 5: ...fe To prevent possible harm to the environment or human health from uncontrolled waste disposal please separate this from other types of wastes and recycle it responsibly to promote the sustainable reuse of material resources Household users should contact either the retailer where they purchased this product or their local government office for details of where and how they can take this item for...

Page 6: ...can be driven due to the internal drawer interface Character font 7ⅹ9 9ⅹ9 is selectable The auto cutter uses a circular method with a high quality blade and a long life Approximately 1 500 000 cuts Default application of paper out sensor not included with wall mount option Black mark sensor function front or rear option A internal AC adaptor NOTES Please be sure to read the instructions in this ma...

Page 7: ...witch setting for Star SP500 mode 17 3 1 3 Changing the DIP Switch setting 18 3 2 Setting the Memory Switches 19 3 2 1 Memory Switch setting for Star mode 21 4 Ribbon Cassette Installation 27 5 Roll Paper Installation 28 6 Installing the wall mount Option 29 7 Self Test 30 8 Hexadecimal Dumping 31 9 Specification 32 9 1 Printing specification 32 9 2 Paper specifications 32 9 3 Ribbon cassette spec...

Page 8: ...cations that are subject to direct sunlight or excessive heat Avoid using or storing the printer in a place subject to excessive temperature or moisture Do not use or store the printer in a dirty location When setting up the printer choose a stable horizontal location Intense vibration or shock may damage the printer Ensure the printer has enough space to be used easily SRP 275IIIA C AC adaptor Po...

Page 9: ...linking pattern in Chapter 11 If you see this light blinking turn off the printer for a few seconds and then turn it back on If the light is still blinking call your supervisor or a service person PAPER OUT LED Red Color not included with wall mount option When this indicator light is on it means that the paper near end Replace the new paper roll When ERROR and PAPER OUT indicator lights are on it...

Page 10: ...f the printer Cables are provided by your dealer or system installer Connect the AC adapter according to the following procedure 1 Make sure the printer is turned off 2 Before inserting the AC adaptor connect the power cord 3 Insert the AC adaptor as shown 4 Plug the AC adapter cable into the printer s power connector 5 Plug the power cord into the outlet and turn on the power AC adaptor Power con...

Page 11: ...nput Receive Data 6 DSR Input Data Set Ready 7 SG Signal Ground 20 DTR Output Data Terminal Ready Ethernet Pin No Signal name Assignment Color Function 1 TxD White with orange stripe Transmit 2 TxD Solid orange Transmit 3 RxD White with green stripe Receive 4 NC Solid blue 5 NC White with blue stripe 6 RxD Solid green Receive 7 NC White with brown stripe 8 NC Solid brown USB Pin No Signal name Ass...

Page 12: ...MSB Data 7 MSB 10 Printer nAck PtrClk PtrClk 11 Printer Busy PtrBusy Data3 7 PtrBusy 12 Printer Perror AckDataReq Data2 6 AckDataReq 13 Printer Select Xflag Data1 5 Xflag 14 Host nAutoFd HostBusy HostBusy 15 NC ND ND 16 GND GND GND 17 GND FG FG 18 Printer Logic H Logic H Logic H 19 30 GND GND GND 31 Host nInit nInit nInit 32 Printer nFault nDataAbail nDataAvail 33 NC ND ND 34 Printer NC ND ND 35 P...

Page 13: ...INTER SIDE 25Pin HOST SIDE 9Pin Serial Pin No Signal name Direction Function 1 FG Frame Ground 2 TxD Output Transmit Data 3 RxD Input Receive Data 6 DSR Input Data Set Ready 7 SG Signal Ground 20 DTR Output Data Terminal Ready USB Pin No Signal name Assignment Color Function Shell Shield Drain wire Frame ground 1 VBUS Red NC 2 D White Differential data line 3 D Green Differential data line 4 GND B...

Page 14: ... SRP 275III 2 2 4 Drawer kick out 1 6 Pin No Description Direction 1 Signal GND 2 Drawer kick out driver signal 1 Output 3 Drawer Open Close signal Input 4 24V 5 Drawer kick out driver signal 2 Output 6 Signal GND ...

Page 15: ...tch 2 RS232C serial interface model Switch Function ON OFF Default 2 1 Data receive error Ignore Print OFF 2 2 Black Mark Sensor Enable Disable OFF 2 3 Hand shaking XON XOFF DTR DSR OFF 2 4 Word length 7 bits 8 bits OFF 2 5 Parity check Enable Disable OFF 2 6 Parity selection EVEN ODD OFF 2 7 Baud rate selection 2 Refer to the following table OFF 2 8 OFF DIP Switch 2 Parallel interface model Switc...

Page 16: ...ection 3 Refer to the following table OFF 2 6 2 7 Near end switch Enable Disable OFF 2 8 Mechanism type Graphic Character OFF NOTES 1 Emulation Selection DSW 1 1 and 1 2 Emulation 1 1 1 2 BXL POS OFF OFF BXL POS KP ON ON STAR OFF ON CITIZEN ON OFF BXL POS KP Kitchen Printer mode A alarm is generated by printer after auto cutting and in paper end error 2 International Character Selection No Country...

Page 17: ... Baud rate selection 2 Refer to the following table OFF 2 8 OFF NOTES 1 Emulation Selection DSW 1 1 and 1 2 Emulation 1 1 1 2 BXL POS OFF OFF BXL POS KP ON ON STAR OFF ON CITIZEN ON OFF BXL POS KP Kitchen Printer mode A alarm is generated by printer after auto cutting and in paper end error 2 Baud rate selection Transmission speed Transmission 2 7 2 8 2400 baud ON ON 4800 baud OFF ON 9600 baud OFF...

Page 18: ...prevent an electric short which can damage the printer 1 Make sure the printer is turned off 2 Remove the screw from the DIP Switch cover Then take off the DIP Switch cover which is shown in the illustration below 3 Set the switches using a pointed tool such as tweezers or a small 4 Replace the DIP Switch cover Then secure it with the screw NOTES The new settings take effect when you turn on the p...

Page 19: ...ting as following 1 Code page selection MSW 2 8 MSW 2 7 MSW 2 6 MSW 2 5 MSW 2 4 Character Table 0 0 0 0 0 Page 0 PC437 U S A 0 0 0 0 1 Page 1 Katakana 0 0 0 1 0 Page 2 PC850 Multilingual 0 0 0 1 1 Page 3 PC860 Portuguese 0 0 1 0 0 Page 4 PC863 Canadian French 0 0 1 0 1 Page 5 PC865 Nordic 0 0 1 1 0 Page 16 WPC1252 Latin1 0 0 1 1 1 Page 17 PC866 Russian 0 1 0 0 0 Page 18 PC852 Latin2 0 1 0 0 1 Page...

Page 20: ...ation rate 2400 bps 4800 bps 9600 bps 19200 bps Parity None Odd Even Handshake DSR DTR XON XOFF Data length 7 bit 8 bit NOTES There are two methods DIP Switch and Memory Switch to adjust the serial communication conditions DIP Switch 1 5 selects which is effective DIP Switch or Memory Switch To enable the Serial communication setting you have to adjust the Serial interface selection function of DI...

Page 21: ...n1 n2 n3 0n4 0 n1 n2 n3 n4 8 Data definition clear specified bit Definition n1 n2 n3 0n4 0 n1 n2 n3 n4 8 Data Definition clear all data Definition Fixed at 0000 Definition data write and reset Write W Fixed at 0000 Definition data write and reset and test print Write T Fixed at 0000 Ex Memory Switch 1 8 0 Memory Switch 2 7 1 Memory Switch 2 A 1 for a test print PRINT 1 CHR H1B CHR H1D CHR H23 CHR ...

Page 22: ...ountries Chinese character specifications DBCS Standard Specifications SBCS Memory Switch Number Ex factory Settings n1 n2 n3 n4 MSW 0 0000 MSW 1 0000 MSW 2 0000 MSW 3 0000 MSW 4 0000 MSW 5 0000 MSW 6 0000 MSW 7 0000 MSW 8 0000 Chinese character specifications DBCS For China Memory Switch Number Ex factory Settings n1 n2 n3 n4 MSW 0 0010 MSW 1 0000 MSW 2 0000 MSW 3 0000 MSW 4 0000 MSW 5 0000 MSW 6...

Page 23: ... and white Commands MSW 0 B MSW 0 A ESC 4 ESC 5 Command Functions 0 0 White black inverted printing 1 Pass 0 1 Option 1 White black inversion 7 9 font print enhancing 2 passes 1 0 Option 2 Upper line Underline enhancing 2 passes 1 1 Option 3 Upper line Underline double tall expanded enhancing 4 passes This setting functions to specify adornments when the subsequent red white black inversion print ...

Page 24: ...erved Fixed to Off 3 Contextual auto cut function 1 Disabled Enabled 2 1 0 Near end switch function 2 Refer to the following table NOTES 1 Contextual Auto cut Function This function auto cuts paper when a paper feed command that feeds continuously over 7 6 inch Hosts that cannot send an escape sequence such as ESC d 0 can cut paper if a 1 6 inch line feed code LF is sent seven times 2 Near end swi...

Page 25: ...ese 0 0 1 0 0 Page 4 PC863 Canadian French 0 0 1 0 1 Page 5 PC865 Nordic 0 0 1 1 0 Page 16 WPC1252 Latin1 0 0 1 1 1 Page 17 PC866 Russian 0 1 0 0 0 Page 18 PC852 Latin2 0 1 0 0 1 Page 19 PC858 Euro 0 1 0 1 0 Page 21 PC862 Israel 0 1 0 1 1 Page 22 PC864 Arabic 0 1 1 0 0 Page 23 Thai character code 42 0 1 1 0 1 Page 24 WPC1253 Greek 0 1 1 1 0 Page 25 WPC1254 Turkish 0 1 1 1 1 Page 26 WPC1257 Baltic ...

Page 26: ... 0 1 F 1 Reserved Fixed to Off 0 Data reception error serial Prints Ignored Memory Switch 5 Bit Function 0 1 F 0 Reserved Fixed to Off Memory Switch 6 Bit Function 0 1 F 0 Reserved Fixed to Off Memory Switch 7 Bit Function 0 1 F 0 Reserved Fixed to Off ...

Page 27: ...ridges 1 Before inserting the ribbon cassette turn the knob clockwise to prevent twisting the ribbon 2 Open the front cover of printer 3 Take out the old ribbon cassette if there is one 4 Insert the new ribbon cassette as shown and pay particular attention to the placement of the ribbon behind the Printer Head 5 During inserting the ribbon cassette turn the knob clockwise again to make sure the ri...

Page 28: ...ver by pushing the open button 2 Remove the used paper roll core if there is one 3 Insert the paper roll as shown 4 Be sure to note the correct direction that the paper should come off the paper roll 5 Pull out small amount of paper as shown Then close the cover and tear off the extra paper by pulling it toward the front of the printer ...

Page 29: ...formation on wall mount installation Bracket hanger Screw 3x5 4pieces Bracket mount Screw 4x10 8pieces 1 Turn the Set over and attach the Bracket hanger to the Frame base then tighten four screws 2 Attach the Bracket mount to the wall firmly with the eight screws Be sure that the Bracket attached properly to match the direction of arrow as shown And the Bracket mount should be always fixed vertica...

Page 30: ...equipment or the software not the printer Running the self test 1 Make sure the printer is turned off and the printer cover is closed properly 2 Turn on the power while pressing the Feed button and release the button then the paper will feed Self diagnostics will begin and printer settings will be printed Paper will be cut upon completion of the test and printing will stop ERROR lamp will be on 3 ...

Page 31: ...r cover of the printer 2 Hold down the FEED button while you turn on the printer 3 Close the rear cover 4 Run any software program that sends data to the printer The printer prints Hexadecimal dump and then all the codes are received in a two column format The first column contains the hexadecimal codes and the second column gives the ASCII characters that correspond to the codes Hexadecimal Dump ...

Page 32: ...Character sets Alphanumeric characters 95 International characters 48 Extended graphics 128 x 27 pages 9 2 Paper specifications Item Description Remark Paper type Paper roll Paper roll width 76 0 5 mm Paper roll diameter Max ø83 mm 3 27 Normal paper Thickness 1 sheet 0 06 0 085 mm 0 0024 0 0034 Weight 52 3 64g m 2 0 115 0 1411 lb Paper core outside diameter Max ø19mm 0 75 9 3 Ribbon cassette speci...

Page 33: ...ion Remark Life firing frequency Mechanism Approx 18 million lines Auto cutter Approx 1 5 million cuts End of life is defined as the point at which the printer reaches the beginning of the Wear out Period Head Approx 300 million dots wire 9 6 Environment conditions Item Description Remark Temperature Operating 0 40 32 104 Storage 20 60 4 140 Relative humidity Operating 10 80 RH Non condensing Stor...

Page 34: ...Rev 1 01 34 SRP 275III 9 7 Dimensions weight Dimensions Weight Approx Wt 2 5 kg Shipping Wt 4 0 kg 157 239 160 Dimension mm H D W Item ...

Page 35: ...t be selected when the printer is ordered Auto cutter SRP 275IIIA Exclude auto cutter SRP 275IIIC Including auto cutter Interface OES USB Serial Ethernet OS USB Serial OP USB Parallel Cabinet color Ivory Dark gray Black mark sensor front rear The specifications of print density for the black mark DensiEye 700 used Density print of the black mark 1 0 or more Density of the non black mark 0 1 or les...

Page 36: ...r end error instead If MSW8 8 is off this error is handled as an automatically recoverable error 2 Print head temperature error is not abnormal Recoverable errors When a recoverable error occurs after the cause of the error is removed the printer can recover from the error by receiving an error recovery command without turning off the power Error Description ERROR LED blinking pattern Recovery Rea...

Page 37: ...nking turn off the printer for a few seconds and then turn it back on If the light is still blinking call your supervisor or a service person 10 2 The printer does not start printing Are any of the operation panel lights on If no operation panel lights are on check the following Make sure that the printer is turned on Make sure that the power supply cable is correctly plugged into the printer and ...

Page 38: ...e self test to check that the printer works properly See the self test instructions in Chapter 8 to run the self test If the self test does not work contact your supervisor or a service person If the self test works properly check the following 1 Check the connection at both ends of the interface cable between the printer and the computer Also make sure that this cable meets the specifications for...

Reviews: