background image

Electric Pressure Fryer 


Notes 


59 

Notes 


Summary of Contents for FKM-TC Series

Page 1: ...Series FKM TC with Training Central Operation Manual Extra Large Electric Pressure Fryer Series ...

Page 2: ...comes first WARRANTY COVERAGE This warranty covers on site labor parts and reasonable travel time and travel expenses of the authorized service representative up to 100 miles round trip and 2 hours travel time and performed during regular weekday business hours EXCEPTIONS Any exceptions must be pre approved in advance and in writing by BKI The extended door warranty on convection ovens years 3 thr...

Page 3: ...12 Care of the Shortening 13 Operation 14 Start Up FKM TC with Training Central 14 Cooking FKM TC with Training Central 17 Product Programming 20 Set Oil Temp 24 Set Clock 25 Settings 26 Frying Log 27 Machine Log 28 Import Export 29 Change Code 32 Touchscreen 33 Maintenance 34 Scheduled Maintenance 34 Safety Pop Valve Procedure 35 Filtering Procedure 36 Basic Filter 38 Filter with Rinse Hose 43 Bo...

Page 4: ...our questions contact the BKI Technical Service Department toll free 1 800 927 6887 Outside the U S call 1 864 963 3471 Safety Precautions Always follow recommended safety precautions listed in this manual Below is the safety alert symbol When you see this symbol on your equipment be alert to the potential for personal injury or property damage Safety Signs and Messages The following Safety signs ...

Page 5: ...ding effects of surge boiling of over wet foods and proper load size Equipotential ground plane When a high current flows through a conductor differences in potential appear between the conductor and nearby metallic surfaces near the appliance As a result sparks may be produced between the appliance and surrounding metal surfaces These sparks could cause serious injury damage or fire BKI provides ...

Page 6: ...er or by falling against the hot metal of the fryer Keep The Floor Around Your Fryer Clean Of Shortening Make sure to keep the floor around your fryer clean of shortening and other liquids Serious injury can occur if you slip near your fryer You could be burned by hot shortening that splashes out of the fryer or by falling against the hot metal of the fryer Keep The Lid Closed When The Fryer Is No...

Page 7: ... Latched When Closing The Fryer To make sure the lid hook is latched properly press down the lid until the hook snaps shut Hot shortening and steam can escape if the lid hook is not latched properly You could be burned Keep Away From The Vent Hot steam escapes from the vent continuously when you are using your fryer You could be burned if you get too close to the vent Seal The Safety Valve Properl...

Page 8: ...o guard against possible injury from hot cleaning solution Never Loosen The Spin Handle Until The Pressure Gauge Is At Zero Steam may escape suddenly if you loosen the spin handle before the gauge is at zero If steam escapes suddenly you could be burned After the pressure gauge is at zero wait 5 seconds Then loosen the spin handle slowly to open the lid of the fryer By doing this the steam will es...

Page 9: ... Emergencies Be prepared for fires injuries or other emergencies Keep a first aid kit and a fire extinguisher near the equipment You must use a 40 pound Type BC fire extinguisher and keep it within 25 feet of your equipment Keep emergency numbers for doctors ambulance services hospitals and the fire department near your telephone Know your responsibilities as an Employer Make certain your employee...

Page 10: ...Electric Pressure Fryer Introduction 8 Safety Labels ...

Page 11: ...Electric Pressure Fryer Introduction 9 ...

Page 12: ... Packaging material MUST be retained to show the inspector from the truck line Installation Procedure Ensure that an authorized BKI service agent installs the fryer An authorized BKI service agent should be a qualified gas service technician and a licensed electrician 1 Remove the shipping packing materials from the interior and exterior of the fryer 2 Remove the shipping packing clip from underne...

Page 13: ...age could result if an unlicensed electrician performs the electrical installation Ensure that a licensed electrician performs the electrical installation in accordance with local codes or in the absence of local codes with the National Electrical Code ANSI NFPA 70 20XX This unit when installed by an authorized BKI service agent must be wired for use in accordance with all applicable local state a...

Page 14: ...l shortening Overfilling the fryer pot with shortening could lead to serious injury Ensure that the fryer pot is filled with shortening only to the fill mark when shortening is hot Do not use any shortening other than what is specified in this manual and do not overfill the fryer pot The fryer has a maximum temperature setting 375º F 191º C Do not use oil shortening with a flashpoint less than 554...

Page 15: ...due or crust formations from the sides and bottom of the pot each time you filter the shortening 5 Add fresh shortening as needed to maintain the proper shortening level TO THE FILL MARK ON THE POT WALL 6 DO NOT HOLD SHORTENING AT HIGH TEMPERATURE when the fryer is not in use If you expect an elapsed time of one hour or more between cooking close the lid and let the fryer go into setback The idle ...

Page 16: ...yer Operation 14 Operation Start Up FKM TC with Training Central 1 Turn fryer on by touching the ON button for 3 seconds 2 Make sure the main drain valve is closed 3 Fill pot with shortening to above the MIN OIL LEVEL mark ...

Page 17: ...ing is hot Do not use any shortening other than what is specified in this manual and do not overfill the fryer pot The fryer has a maximum temperature setting of 375º F 191º C Do not use oil shortening with a flashpoint less than 554º F 290º C Use only high quality shortening that has low moisture content a high smoke point and no additives 4 Once the fryer is filled with shortening press the FRY ...

Page 18: ...s heating to provide a balanced shortening temperature for excellent results with the first cooking Failure to do this can result in a crusty skin on the product surface with an undercooked product internally In addition in some cases failure to stir the shortening while it is initially heating may cause the HI LIMIT safety device to disable the power due to a false overtemperature condition ...

Page 19: ...e starting with thighs and breasts The fryer is designed to accommodate 48 50 pieces of chicken Failure to use the insulated mitts will result in severe injury Always use the insulated mitts when handling the hot fry basket 5 Lift the basket and shake it This keeps the food from sticking together and causing white spots on the cooked food Hot shortening may splash out of the pot causing severe inj...

Page 20: ...r will begin the count down and indicator bar will advance To cancel the recipe press and hold the back button for 3 seconds 10 At the end of the frying cycle the digital timer beeper will sound and the fryer will automatically release pressure into the baffle box Press the green check mark button ...

Page 21: ...the lid 12 Slowly open the lid Failure to use the insulated mitts will result in injury Always use the insulated mitts when handling the hot fry basket 13 Lift the basket and hang it on the front of the fryer pot to drain 14 Empty the basket 15 Remember to filter the shortening at least every third frying cycle load Refer to the procedure in this manual Also filter the shortening and clean the fry...

Page 22: ...Electric Pressure Fryer Operation 20 Product Programming 1 Press the Key button to get into the settings menus 2 Enter code 1234 and then pres the green check mark 3 Select the Edit Recipe button ...

Page 23: ...ryer Operation 21 4 Select the Recipe that needs edited 5 In the Edit Recipe screen the name cook time temperarture timing type picture can be edited 6 Select Name to change the name and press the green check mark to save ...

Page 24: ... the recipe Press the green check mark to save 8 Pressing the Next button will bring you to the second page where the shake stir alarm if the program is active and the filter weight can be edited 9 Press the Shake Stir time to edit the time numer of beeps Press the green check mark to save ...

Page 25: ...he program is active and set the filter weight 1 0 12 0 by 0 5 increments if using global filtering 12 When done press the SAVE button to save the program 13 If you want to cancel the recipe or accidently press the back button the message above will display You can save by pressing the SAVE or cancel by pressing the back arrow ...

Page 26: ...er Operation 24 Set Oil Temp 1 Get into the supervisor menu and select the Set Oil Temp button 2 Set the oil temperature to the desired ready to cook temperature between 250 F and 375 F 3 Press the green check mark to save ...

Page 27: ...Electric Pressure Fryer Operation 25 Set Clock 1 Get into the supervisor menu and select the Set Clock button 2 Set the date time 3 Press the green check mark to save ...

Page 28: ...and the Temperature Units can be set C or F The filter lockout is a global counter used to determine when to force filter Set the total filter value in settings and then in the recipes the weight of each recipe can be set i e Fresh breaded product can have a value of 3 and french fries a value of 1 When the values of the recipes cooked adds up to the global value or over the control will require a...

Page 29: ...he frying log will record the following events Recipe Cooked with elapsed time and average temperature Basic Filter with filtering time refill time and number of pump lockouts Filter With Rinse Hose with filtering time refill time and number of pump lockouts Boil Out with heating time 3 Press the back button to exit ...

Page 30: ...le Memory read write or data errors Factory Reset Touchscreen Calibration Configuration Change Password Error Password Reset Password Change Recipe Saved Recipes Imported Recipes Exported Configuration Import Configuration Export Frying Log Export Machine Log Export USB Drive read write and file open errors Touch Configuration Change Fryer Options Changed Firmware Update 6 Press the back button to...

Page 31: ...ure Fryer Operation 29 Import Export 1 Get into the supervisor menu and select the Import Export button 2 Insert a USB drive 3 Press the import export recipes button to save the recipes to a USB or copy to the fryer ...

Page 32: ...Files button The 8 locations to the right will now be available locations which already have an icon stored in them will display the stored image Use the up and down arrows to scroll through all the files the controller found until the file wanted is displayed 4 Select the location in which they want to store the icon they can choose any of the eight locations including those which are already in ...

Page 33: ...exported just by touching the icon buttons Touch once to select touch again to deselect The Select All button can be used tol select all imported icons 3 Touch the green check button to export all of the selected icons with their original file names and data to the USB drive NOTE Files already on the flash drive which have the same name as the original files will be overwritten with the stored ima...

Page 34: ... Operation 32 Change Code 1 Get into the supervisor menu and select the Change Code button 2 Enter the new 4 digit access code We recommend an easy to remember number like the store number 3 Press the green check mark to save ...

Page 35: ...the supervisor menu and select the Touchscreen button 2 Press the or buttons to adjuste the screen sensitivity Press the TEST button to verify the senitivity level 3 Press the Calibrate button to re calibrate the touchscreen 4 Press the green check mark to save ...

Page 36: ...service agent if adjustment or replacement is required User Lid Gasket Check for unusual wear such as cracks and deformation and pressure leaks Contact authorized BKI service agent if adjustment or replacement is required Daily User Dead Weight Assembly Clean weight and orifices daily and check for wear User Filter Pad Replace filter pad Refer to the procedure in this manual User Condensation Pan ...

Page 37: ...pop valve should be blown under pressure periodically to prevent the seat from sticking Failure to use the insulated mitts will result in injury Always use the insulated mitts when handling the arm on the safety valve 1 After the pressure is up during a cooking cycle use the insulated glove to lift the arm on the edge of the safety valve and let some steam escape This will clean the valve 2 Releas...

Page 38: ... If the filer pump overheats and you get a Pump Too Hot see the Filter Pump Reset instructions in the Troubleshooting section If Filter Lockout is ON then once the value has been reached the following screen will appear and filtering will be required Always wear appropriate personal protection equipment during the filtering process to guard against possible injury from hot oil Do not open the drai...

Page 39: ...on to get the Filter Menu 5 Press the FILTER or TUTORIALS button 6 If you press the TUTORIALS button you can go through how to assemble the filter how to do basic filter and how to filter with the rinse hose None of the pump fuctions will operate in the tutorials ...

Page 40: ...Electric Pressure Fryer Maintenance 38 Basic Filter 7 If you press the FILTER button you can do a basic filter or a filter with rinse hose Below we will go through a basic filter Pot Pan ...

Page 41: ...Electric Pressure Fryer Maintenance 39 Oil Over 250 F Pot Pan No Yes ...

Page 42: ... starts to flow evenly This is to prevent excessive splashing of hot shortening 9 Clean the pot elements drain with the supplied brushes as the oil drains 10 If polishing the shortening is desired make sure the fill handle is THRU POT and press the On button otherwise press the right arrow ...

Page 43: ...the polishing When done press the Off button to stop the pump and press the right arrow button 12 To refill the pot close the pot drain and make sure the fill handle is THRU POT Hot shortening may splash out of the pot causing severe injury when filling the pot 13 Press the On button to start the pump and refill the pot ...

Page 44: ... on to indicate the duration of refilling of the pot Let the filter continue to pump the shortening until air starts bubbling through the shortening When done press the Off button to stop the pump and press the right arrow button 15 Add new shortening if the fill mark has not been reached ...

Page 45: ...ectric Pressure Fryer Maintenance 43 Filter with Rinse Hose 1 If you press the FILTER button you can do a basic filter or a filter with rinse hose Below we will go through a filter with rinse hose Pot Pan ...

Page 46: ...Electric Pressure Fryer Maintenance 44 Oil Over 250 F Pot Pan No Yes ...

Page 47: ...rtening starts to flow evenly This is to prevent excessive splashing of hot shortening 3 Clean the pot elements drain with the supplied brushes as the oil drains 4 Make certain that the rinse hose is connected to rinse hose connector and the valve is turned to the THRU HOSE position ...

Page 48: ...y the handle place hose nozzle inside the pot and press the ON button to start the pump 6 Rinse the inside of the pot with the hose press Off button when done 7 To refill the pot disconnect the hose close the pot drain and make sure the fill handle is THRU POT ...

Page 49: ...ump and refill the pot 9 The display will count up the time the pump is on to indicate the duration of refilling of the pot Let the filter continue to pump the shortening until air starts bubbling through the shortening When done press the Off button to stop the pump and press the right arrow button 10 Add new shortening if the fill mark has not been reached ...

Page 50: ...and shortening breakdown boil outs should be done once a week on each fryer following these procedures BKI recommends BKI Cleaner P N LC0006 or equivalent Always wear appropriate personal protection equipment during the boil out process to guard against possible injury from hot cleaning solution 1 Press the BOIL OUT button to get the Boil Out Menu 2 Press the BOIL OUT or TUTORIAL button ...

Page 51: ...drain slowly so that the shortening starts to flow evenly This is to prevent excessive splashing of hot shortening 4 Close the pot drain fill the pot with water to the fill line add the cleaning product 5 Confirm the water level and press the START button ...

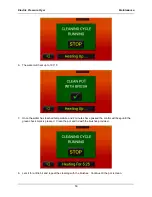
Page 52: ... 7 Once the water has reached temperature and 2 minutes have passed the control will beep until the green check mark is pressed Clean the pot and lid with the brushes provided 8 Let sit for a little bit and repeat the cleaning with the brushes Continue till the pot is clean ...

Page 53: ...oximately 4 to 6 ounces of distilled white vinegar to develop a neutralizing solution Stir the solution briefly Leave in the pot for three to five minutes and discard NOTE Foaming of shortening after boil outs is caused by failure to follow proper neutralizing procedures 14 Repeat steps 11 through 13 as needed to remove all traces of cleaning solution 15 Rinse the pot again with Cool water drain a...

Page 54: ...Electric Pressure Fryer Maintenance 52 18 Confirm the oil level ...

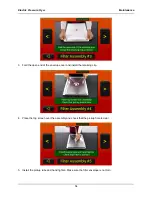
Page 55: ...lter pad should be replaced immediately If the filter pad is not properly closed breading crumbs will get through the pad opening and clog the pump Ensure that the filter pad is properly closed upon replacement 1 Clean all the filter screens and tubing and get a new filter envelope 2 Slide the filter into the filter envelope Be careful to not tear or puncture the envelope ...

Page 56: ...4 3 Fold the open end of the envelope over and install the retaining clip 4 Place the top screen over the assembly and check that the pickup hole is clear 5 Install the pickup tube and hand tighten Make sure the filter envelope is not torn ...

Page 57: ...Electric Pressure Fryer Maintenance 55 6 Install the filter assembly into the filter vat Place the filter vat lid on and slide the filter vat back into fryer ...

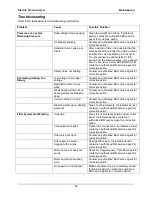
Page 58: ...on Weak heating elements or heating elements breaking down Contact an authorized BKI service agent for corrective action Coil on contactor is bad Contact an authorized BKI service agent for corrective action Breading build up on heating elements Clean heating elements If problems persist contact an authorized BKI service agent for corrective action Filter System Not Working Uncertain Press the hi ...

Page 59: ...Pressure Fryer Maintenance 57 Problem Cause Possible Solution Computer Hangs Computer malfunction Turn the power OFF then back ON If problems persist contact an authorized BKI service agent for corrective action ...

Page 60: ...Filter Pump Reset If the filter pump overheats a PUMP TOO HOT alert will pop up and a timer will start to count up Once the pump has cooled the screen will indicate that the pump is ready Press the green Check Mark to start the pump back up ...

Page 61: ...Electric Pressure Fryer Notes 59 Notes ...

Page 62: ...Electric Pressure Fryer Notes 60 ...

Page 63: ...SS OM 059 03 Revised 09 18 2018 2812 Grandview Dr Simpsonville S C 29680 USA http www bkideas com Made and printed in the U S A ...

Reviews: