15
Case Joining Trim
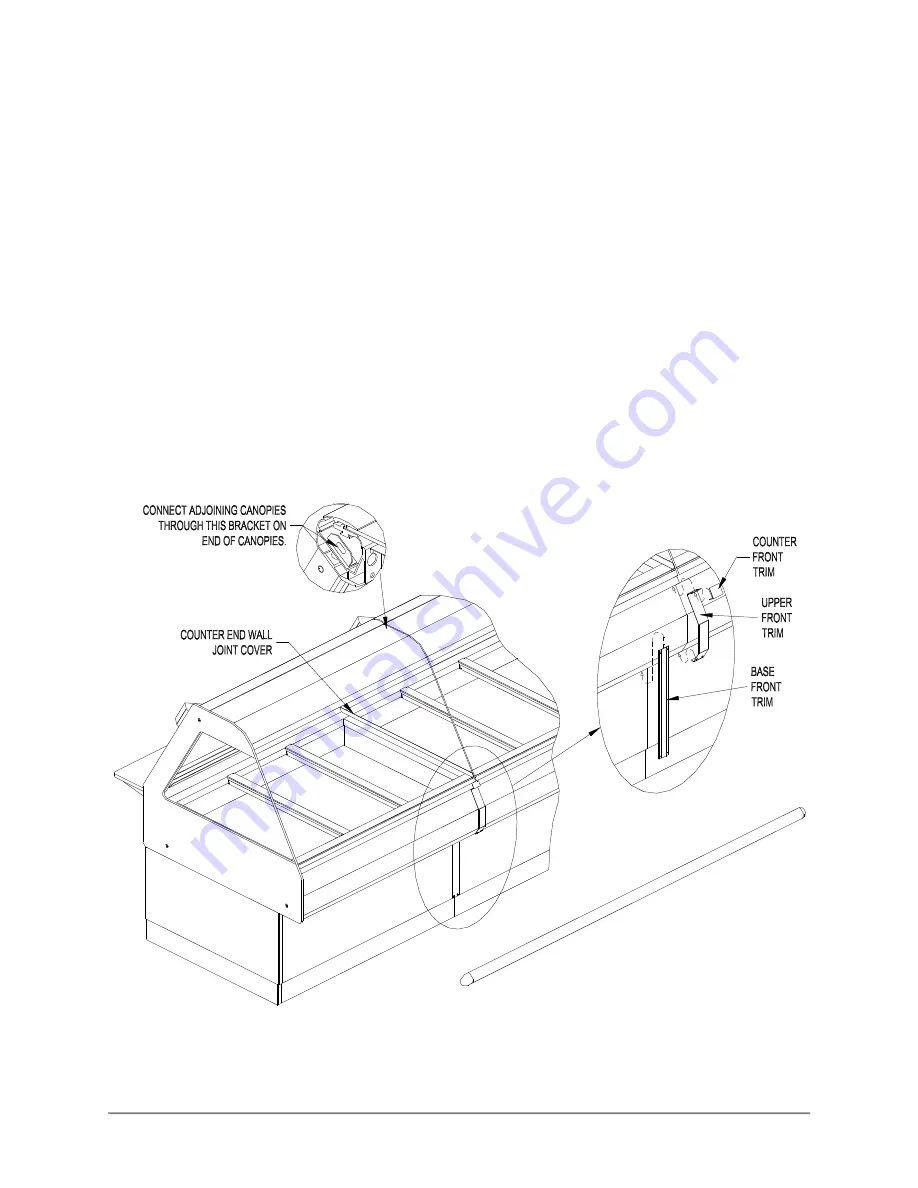
1. After leveling the cases and bolting the bases together, bolt the canopies together as shown in
Fig. 6 with a ¼”-20 x ¾” Hex Head Screw and Keps Nut.
2. Mount the Upper Front & Base Front Joint Trims by holding them in place and marking the hole
locations on the case.
3. Make certain the joint covers are centered on the joint and that they align vertically with each
other.
4. Drill the case holes 5/32” and attach joint covers with screws provided. Before tightening the top
screws of the Upper Front Trim, slide the Counter Front Trim in place between the screw head
and the Upper Front Trim.
5. Apply a bead of silicone sealant inside the Counter End Joint Cover and slide the cover over both
counter end walls. Apply a bead of silicone sealant to seal the open front of the Counter End
Joint Cover.
6. Attach Bumper Ends and Bumper Mounting Base to the front of the cases, centered on the
vertical surface of the upper front of the case. Cut the Bumper Top to length to fit between the
Bumper Ends and snap into place.
Figure 5.
Joining Cases
Summary of Contents for WDCG Series
Page 1: ...Series WDCG Operation Manual Hot Case Series ...
Page 22: ...20 Wiring Diagrams ...
Page 23: ...21 ...
Page 24: ...22 ...
Page 25: ...23 ...
Page 26: ...24 ...
Page 27: ...25 ...
Page 28: ...26 ...
Page 29: ...27 ...
Page 30: ...28 ...
Page 31: ...29 ...
Page 32: ...30 ...
Page 33: ...31 ...
Page 34: ...32 ...
Page 35: ...33 ...
Page 36: ...34 ...


