background image

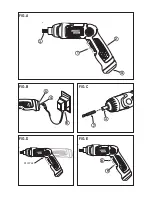
FEATURES (Fig. A and B)

1.

ON/OFF switch with Forward/Reverse function

2.

Handle

3.

Bit Holder

4.

Charger Connector

5.

Charge Indicator

6.

Wall Charger

7.

Screwdriver Bit

CHARGING THE SCREWDRIVER (Fig. B)

Before attempting to charge your screwdriver, thoroughly
read all of the safety instructions.

To charge your screwdriver, follow the steps below.

1.

Plug the output cord of the charger 

(6)

into the socket 

in the back half of the screwdriver handle 

(4)

as shown 

in 

Fig. B.

2.

Plug the charger into any standard electrical outlet.

3.

The red charge indicator light next to the socket in the 
back half of the handle 

(5) 

will come 

ON

indicating that 

the battery is charging.  This light will remain on as long
as the the screwdriver is connected to the charger.

Charging Notes

The tool was sent from the factory in an uncharged condition.
Before attempting to use it, it must be charged for 12 hours.

1.

Charger will work best at normal room temperature.

2.

The charger plug and the tool handle may become 
warm while charging. This is normal and does not 
indicate a problem.

3. 

The tool can be left on charge as long as you desire. 
A minimum charge time of 8 hours is required to 
recharge a completely discharged tool.

4. 

For most fix up jobs a charge of 3 to 4 hours adequate.

5.

For long periods that the screwdriver will not be used, 
it is recommended that it be fully charged, disconnected
from the charger and stored in a cool, dry location.

Warning!

When disconnecting the screwdriver from the

charger, be sure to unplug the charger from the outlet first
then disconnect the charger cord from the screwdriver.

USE

Removing and Installing Bits (Fig. C)

To install a screwdriver bit (

6) Fig. C

simply insert it into 

the cavity in the bit holder 

(3)

until it snaps into place. To

remove the bit pull it straight out. If bit does not fit, rotate
the bit and reinsert it. 

Adjusting the Handle

For optimum versatility, the handle can be be set to different
positions as shown in 

Fig. D.

To adjust the handle into the

desired position.

Note:

To avoid being pinched, grasp the handle below the

pinch point shown in 

Fig. D.

OPERATION (Fig. E)

Forward

►  Press the button on the top (Clockwise Arrow) 

(8)

and the tool will run forwards

.

►  Release the button and the tool will stop.

Reverse

► Press the button on the bottom (Counter Clockwise 

Arrow) 

(9)

and the tool will run in reverse

.

►  Release the button and the tool will stop.

Operating in Manual Mode

►  The tool can be used as a conventional non-powered 

screwdriver whenever the forward/reverse button is not 
depressed. With the button 

(ON/OFF)(1)

in the middle 

position, the tool will not activate.

HINTS FOR OPTIMUM USE

►  Always use the correct type of screwdriver bit.
► If screws are difficult to tighten, try applying a small 

amount of washing liquid or soap as a lubricant.

►  Use the screwdriver manually as a non powered 

screwdriver  to loosen very tight screws or to firmly 
tighten screws.

►  Always hold the tool and screwdriver bit in a straight 

line with the screw.

   MAINTENANCE

Use only mild soap and damp cloth to clean the tool. Never
let any liquid get inside the tool; never immerse any part of
the tool into a liquid.

Important!

To assure product 

SAFETY

and 

RELIABILITY,

repairs, maintenance and adjustment (other than those
listed in this manual) should be performed by authorized
service centers or other qualified service organizations,
always using identical replacement parts.

Your tool has been designed to operate over a long period
of time with a minimum of maintenance.
Continuous satisfactory operation depends upon proper tool
care and regular cleaning.
►  Clean the housing with a clean, damp cloth. 

Do not use solvents.

LUBRICATION

Black & Decker tools are properly lubricated at the factory
and are ready for use.

BATTERY PACK REMOVAL

Important! 

This tool is designed for disassembly for the

purpose of battery pack removal and recycling. It is not
designed to be re-assembled by the consumer. Before
attempting to disassemble this tool, turn it on and run it in
either direction until it stops to ensure a complete discharge

ENGLISH • 13

Summary of Contents for 9036

Page 1: ... er ri ia a 3 3 6 6V V 3 3 6 6V V C Co or rd dl le es ss s S Sc cr re ew wd dr ri iv ve er r MANUAL DE iNstrUccioNEs MANUAL DE iNstrUçÕEs iNstrUctioN MANUAL Cat N 9036 Español 3 Português 7 English 11 ADVERTENCIA LEASE ESTE INSTRUCTIVO ANTES DE USAR EL PRODUCTO ADVERTÊNCIA LEIA ESTAS INSTRUÇÕES ANTES DE USAR O PRODUTO WARNING READ INSTRUCTION MANUAL BEFORE USING PRODUCT ...

Page 2: ...FIG A FIG B FIG C 1 2 3 7 5 4 6 3 FIG D FIG E 8 9 4 Pinch Point ...

Page 3: ...rica ni tire de él para sacar el enchufe de la toma de corriente Mantenga el cable eléctrico alejado del calor aceite bordes afilados o piezas móviles Los cables eléctricos dañados o enredados pueden provocar una descarga eléctrica e Al trabajar con la herramienta eléctrica en la intemperie utilice solamente cables alargadores homologados para su uso en exteriores La utilización de un cable alarga...

Page 4: ...e pueda dar lugar a una conexión entre los bornes El cortocircuito entre los bornes de la batería puede ocasionar quemaduras o un incendio d Un mal uso puede dar lugar a que la pila pierda líquido evite cualquier contacto con el líquido Si accidentalmente entra en contacto con el líquido enjuáguese con agua Si le entra líquido en los ojos busque rápidamente asistencia médica El líquido que pierde ...

Page 5: ...Para realizar la mayoría de los pequeños trabajos de arreglo una recarga de entre 3 y 4 horas es suficiente 5 Si el destornillador no se utilizará por un largo período de tiempo se recomienda que se cargue completamente desconectarlo del cargador y guárdarlo en un lugar fresco y seco Advertencia Al desconectar el destornillador del cargador asegúrese de desenchufar el cargador de la toma de corrie...

Page 6: ...earse con su her ramienta se encuentran a su disposición con su distribuidor local o en los centros de servicio autorizado Advertencia El uso de accesorios no recomendados para utilizar con esta herramienta puede resultar peligroso PROTECCIÓN DEL MEDIO AMBIENTE Separación de desechos Este producto no debe desecharse con la basura doméstica normal Si llega el momento de reemplazar su producto Black...

Page 7: ...dos ou torcidos aumentam o risco de choques elétricos e Quando trabalhar com uma ferramenta elétrica ao ar livre utilize um cabo de extensão apropriado para esse fim A utilização de um cabo apropriado para áreas ao ar livre reduz o risco de choques elétricos f Se for inevitável trabalhar com uma ferramenta elétrica num local úmido utilize um Dispositivo de Corrente Residual RCD A utilização de um ...

Page 8: ...om os olhos procure ajuda médica O líquido expelido da bateria pode causar irritação ou queimaduras 6 Serviço a Peça a um técnico para fazer a manutenção de sua ferramenta elétrica utilizando apenas peças de reposição idênticas Isso garantirá que a segurança da ferramenta elétrica será mantida 7 Segurança Elétrica Sua Ferramenta tem isolamento duplo no entanto não é necessário o uso de fio terra S...

Page 9: ...das tarefas comuns de fixação basta uma carga de 3 a 4 horas 5 Para longos períodos sem utilização da parafusadeira é recomendável que ela esteja totalmente carregada desconectada do carregador e armazenada em local fresco e seco Se a ferramenta ficar completamente descarregada serão necessárias 12 horas para deixá la com plena carga É evidente que quanto mais utilizada for a ferramenta mais rapid...

Page 10: ...ck Decker que dará uma destinação adequada às mesmas REMOÇÃO DA BATERIA Importante Esta ferramenta é desenhada para fácil desmontagem para remoção e reciclagem da bateria Ela não é projetada para ser remontada pelo consumidor Antes de tentar desmontar esta ferramenta ligue a e opere a em qualquer dos sentidos até que pare para garantir a descarga completa da bateria Para desmontar a ferramenta rem...

Page 11: ...es the risk of electric shock Note The term Residual Curent Device RCD can be replaced by Ground Fault Circuit Interrupter GFCI or by Earth Leakage Circuit Breaker ELCB 3 Personal Safety a Stay alert watch what you are doing and use common sense when operating a power tool Do not use a power tool while you are tired or under the influence of drugs alcohol or medication A moment of inattention whil...

Page 12: ...ed by the manufacturer authorized Black Decker Service Center or an equally qualified person in order to avoid damage or injury If the power cord is replaced by an equally qualified person but not authorized by Black Decker the warranty will not be valid 7 Labels on tool The label on your tool may include the following symbols Avoid prolonged contact with dust from power sanding sawing grinding dr...

Page 13: ...erent positions as shown in Fig D To adjust the handle into the desired position Note To avoid being pinched grasp the handle below the pinch point shown in Fig D OPERATION Fig E Forward Press the button on the top Clockwise Arrow 8 and the tool will run forwards Release the button and the tool will stop Reverse Press the button on the bottom Counter Clockwise Arrow 9 and the tool will run in reve...

Page 14: ...h efficient and reliable power tool service For more information about our authorized service centers and if you need technical advice repair or genuine factory replacement parts contact the Black Decker location nearest you or visit us at www BlackandDecker la com SPECIFICATIONS 9036 Voltage 3 6V Speed 200 rpm Torque 35 in lbs Charge Time 8 hr Solamente para propósito de Argentina Importado por B...

Reviews: