background image

25

WARNING: Do not connect to AC distribution wiring!

Rated Versus Actual Current Draw of Equipment

Most electrical tools, appliances, electronic devices and audio/visual equipment have labels that

indicate the power consumption in amps or watts. Be sure that the power consumption of the

item to be operated is below 200 watts. If the power consumption is rated in amps AC, simply

multiply by the AC volts to determine the wattage.

Resistive loads are the easiest for the inverter to run; however, it will not run larger resistive loads

(such as electric stoves and heaters), which require far more wattage than the inverter can deliver.

Inductive loads (such as TVs and stereos) require more current to operate than do resistive loads

of the same wattage rating. For safety reasons, the unit will simply shut down if it is overloaded.

To restart the unit, simply unplug all devices plugged into the unit; switch the unit OFF then ON,

BEFORE plugging the appliance back in.

Operation of the AC Outlet

1. Connect the inverter to a functioning 12 volt DC power source as described in this Instruction 

Manual. Make sure there is adequate space for proper ventilation of the inverter.

2. Press the Power Pushbutton to turn the unit ON.

3. The green Power LED Indicator will light, indicating a proper connection. If the either the 

yellow Input Fault LED Indicator or red Output Fault LED Indicator lights, indicating a fault 

condition exists, refer to the “Troubleshooting” section of this Instruction Manual.

4. Plug the (AC) appliance into the Inverter’s AC outlet and operate normally.

Note: The Inverter will not operate appliances and equipment that generate heat, such as hair

dryers, electric blankets, microwave ovens and toasters.

Remember to disconnect the inverter from any power source when not in use.

Operation of the USB Charging Port

1. Connect the inverter to a functioning 12 volt DC power source as described in this Instruction 

Manual. Make sure there is adequate space for proper ventilation of the inverter.

2. Press the Power Pushbutton to turn the unit ON.

3. The green Power LED Indicator will light, indicating a proper connection. If the either the 

yellow Input Fault LED Indicator or red Output Fault LED Indicator lights, indicating a fault 

condition exists, refer to the “Troubleshooting” section of this Instruction Manual.

4. Plug the USB-powered device into the inverter’s USB Charging Port and operate normally.

Note: This unit’s USB Charging Port does not support data communication. It only provides 5

volts/500mA DC power to an external USB-powered device.

Remember to disconnect the inverter from any power source when not in use.

Protective Features

The inverter monitors the following conditions:

Low Battery Voltage:

This condition is not harmful to the inverter, but could damage the power

source, so the inverter will automatically shut down when input voltage drops below 10.5 ± 0.3

volts DC.

Input Voltage Too High: 

The inverter will automatically shut down when DC input voltage exceeds

15.5 ± 0.3 volts, as this can harm the unit.

Thermal Shutdown Protection:

The inverter will automatically shut down when the unit becomes

overheated.

Overload/Short Circuit Protection: 

The inverter will automatically shut down when a short circuit

occurs.

Operating Tips

The inverter should only be operated in locations that are:

DRY:

Do not allow water or other liquids to come into contact with the inverter.

COOL:

Surrounding air temperature should ideally be 10-20°C (50-68°F). Keep the inverter away

Summary of Contents for BDI200

Page 1: ... rt t t te e e er r r r w w w wi i i it t t th h h h U U U US S S SB B B B M MA AN NU UA AL L D DE E I IN NS ST TR RU UC CC CI IO ON NE ES S M MA AN NU UA AL L D DE E I IN NS ST TR RU UÇ ÇÕ ÕE ES S I IN NS ST TR RU UC CT TI IO ON N M MA AN NU UA AL L Cat N BDI200 A AD DV VE ER RT TE EN NC CI IA A L LE EA AS SE E E ES ST TE E I IN NS ST TR RU UC CT TI IV VO O A AN NT TE ES S D DE E U US SA AR R E E...

Page 2: ...n costo adicional en su distribuidor local o en el Centro de mantenimiento de Black Decker NO TIRE DEL CABLE Nunca transporte el aparato por el cable ni lo jale para desconectarlo del tomacorriente Mantenga el cable alejado del calor el aceite y los bordes afilados NO SE ESTIRE Conserve el equilibrio y párese adecuadamente en todo momento DESCONECTE LOS APARATOS Desconecte el aparato de la fuente ...

Page 3: ...GURA Cuando se utilizan herramientas o equipos siempre se deben respetar las precauciones de seguridad para reducir el riesgo de lesiones personales La operación el mantenimiento o la modificación incorrectos de herramientas o equipos pueden provocar lesiones graves y daños a la propiedad Las herramientas y los equipos están diseñados para determinados usos Black Decker recomienda enfáticamente qu...

Page 4: ... cuenta que este inversor no funcionará con aparatos o equipos de alta potencia en vatios que produzcan calor como secadores de cabello hornos de microondas y tostadores No abra el inversor no hay piezas que el usuario pueda reparar en su interior No utilice este inversor con dispositivos médicos No se ha comprobado su funcionamiento en aplicaciones médicas Mantenga fuera del alcance de los niños ...

Page 5: ...que convierte electricidad de CC corriente continua de bajo voltaje de una batería a energía para uso doméstico de CA corriente alterna Durante el diseño de este inversor Black Decker incorporó técnicas de diseño utilizadas anteriormente en fuentes de energía para computadoras El resultado de estas innovaciones en el diseño es un inversor eléctrico más pequeño más liviano y más fácil de utilizar L...

Page 6: ... los equipos operados con batería La mayoría de estos dispositivos utiliza un cargador o transformador por separado que está enchufado en un tomacorriente de CA El inversor puede funcionar con la mayoría de los cargadores y transformadores MAXX SST tecnología suave del comienzo La tecnología suave del comienzo de Black Decker gradualmente rampas para arriba la energía de los inversores de comenzar...

Page 7: ...4 Conecte una prolongación de cable en un lado del soporte del fusible o del interruptor automático Conecte el otro extremo del cable al terminal POSITIVO del inversor 5 Conecte una prolongación del cable entre el terminal NEGATIVO del inversor y el terminal NEGATIVO de la fuente de energía de CD 6 Conecte una prolongación corta del cable al otro terminal del soporte del fusible o al interruptor a...

Page 8: ...a LED de la entrada o las luces de indicador rojas de la avería LED de la salida indicando una condición de avería refiera a la sección de localización de averías de este manual de instruccionne 4 Si el inversor no funciona asegúrese de que el interruptor de accesorios ignición esté suministrando realmente energía al tomacorriente para accesorios Algunos vehículos exigen que el interruptor de igni...

Page 9: ...ste es un aparato eléctrico que puede generar chispas durante breves períodos si se establecen conexiones eléctricas o éstas se rompen IMPORTANTE Durante el encendido del vehículo el voltaje caera abajo de 10 5V y el inversor se apagará Para reiniciar la unidad apague la unidad por unos segundos y vuelvala a encender una vez que el motor haya encendido CUIDADO Y MANTENIMIENTO Almacenamiento 1 La t...

Page 10: ...equiere de mucha potencia Reduzca la carga a maximo 200W Inversor en condición de exceso de temperatura Permita que el inversor se refresque Asegúrese que haya ventilación adecuada alrededor de la unidad y la carga es no más de 200 vatios para la operación continua Cortocircuito en la salida de CA Desconecte el aparato de CA del inversor Desconecte el inversor de cualquier fuente de 12V CC Luego r...

Page 11: ...eu revendedor ou Centro de Serviços Black Decker local NÃO ESTIQUE O CABO DEMAIS Nunca carregue a ferramenta pelo cabo ou puxe o para desconectá lo da tomada Mantenha o cabo distante do calor óleo e pontas afiadas NÃO EXAGERE Mantenha a posição do corpo equilibrada e firme a todo o momento DESCONECTE AS FERRAMENTAS Desconecte a ferramenta da fonte de energia quando não em uso antes do serviço ou d...

Page 12: ...ertas aplicações para as quais as ferramentas e equipamentos são projetados A Black Decker recomenda que este produto não seja modificado e ou usado para outro fim que não seja o projetado Leia e entenda todas as ADVERTÊNCIAS e instruções de operação antes de usar qualquer ferramenta ou equipamento ADVERTÊNCIA A FIM DE REDUZIR O RISCO DE CHOQUE ELÉTRICO Não o conecte a rede elétrica de distribuiçã...

Page 13: ...s bem como aquelas publicadas pelo fabricante das baterias e o fabricante de qualquer equipamento que você pretenda usar com esta unidade Estude os sinais de cuidado nestes produtos e no motor INTRODUÇÃO Obrigado por adquirir o Inversor de Voltagem BDI200 de 200 watts com Porta USB Este inversor pode ser usado para operar aparelhos eletrônicos pessoais tais como laptops câmeras digitais de vídeo t...

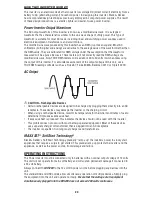
Page 14: ...rática A maioria dos voltímetros CA tanto digitais quanto analógicos são mais sensíveis ao valor médio da forma de onda do que ao valor de RMS Eles são calibrados para voltagem RMS assumindo se que a forma de onda medida será uma onda sinusoidal pura Estes voltímetros não lêem corretamente a voltagem RMS de uma onda sinusoidal modificada Voltímetros de RMS FALSAS lerão por volta de 20 a 30 volts a...

Page 15: ...e se de que a voltagem de todos os equipamentos conectados simultaneamente ao BDI200 não excederá 200 watts contínuos Conexão na Fonte de Energia O Inversor de Energia possui Clipes de Bateria para conexão na fonte de energia Conexão na Fonte de Energia com Clipes de Bateria Utilize os Clipes de Bateria com fios para conectar o Inversor de Energia diretamente à fonte de energia de 12 volts como se...

Page 16: ...com instalações elétricas CA Não Conectar o Inversor de Energia a quaisquer circuitos de carga CA em que o condutor neutro esteja conectado no solo terra ou no terminal negativo da fonte CC bateria ADVERTÊNCIA Não conectar em instalações elétricas de CA Classificação X Configuração Atual do Equipamento A maioria das ferramentas elétricas instrumentos dispositivos eletrônicos e equipamentos de áudi...

Page 17: ...ticamente desligará quando a voltagem de entrada CC exceder 15 5 0 3 volts podendo danificar a unidade Proteção de Desligamento Térmico O inversor automaticamente desligará quando a unidade estiver superaquecida Proteção de Sobrecarga Curto Circuito O inversor automaticamente desligará quando ocorrer um curto circuito Dicas Operacionais O inversor deve utilizado em locais SECOS Não permitir que o ...

Page 18: ...ecessário 2 Ajustar a orientação dos cabos da antena e o fio da tomada da TV para minimizar a interferência 3 Certifique se de que a antena que alimenta a TV fornece um sinal apropriado livre de neve e que o cabo coberto da antena de alta qualidade está sendo usado Luzes LED de falha O LED vermelho de falha indica que a parada do inversor devido a um defeito de sobrecarga e o LED amarelo de falha ...

Page 19: ...Desligamento por Baixa Voltagem CC de 10 5 0 3 volts Desligamento Térmico Automático Forma de Onda Onda Senoidal Modificada MSW Fusíveis Internos 25 Amps Acessórios de Conexão CC 8 Amp Fios de Entrada Fios do Clipe de Bateria e Plugue Acessório 12V Temperatura Operacional 10 20 C 50 68 F Temperatura de Armazenamento 0 40 C 32 104 F Umidade Relativa Operacional 5 95 não condensada ...

Page 20: ...blades and the like AVOID UNINTENTIONAL STARTING Don t carry plugged in appliance with finger on switch Be sure switch is off when plugging in PROPER COOLING is essential when operating the inverter Do not place the unit near the vehicle s heat vent or in direct sunlight ELECTRICAL FAULT CIRCUIT INTERRUPTOR protection should be provided on the circuits or outlets to be used Receptacles are availab...

Page 21: ...EDUCE THE RISK OF INJURY OR PROPERTY DAMAGE Remove appliance plug from outlet before working on the appliance DO NOT attempt to connect or set up the unit or its components while operating your vehicle Not paying attention to the road may result in a serious accident Always use the inverter where there is adequate ventilation Do not block ventilation slots ALWAYS turn the inverter OFF by disconnec...

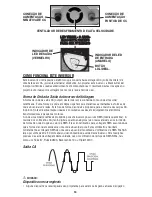
Page 22: ...struction Manual carefully before use to ensure optimum performance and to avoid damage to this product FEATURES The front panel provides three LED indicators The green LED indicates power and proper operation of the inverter The AC and USB outlets are ready to use The red LED indicates inverter shutdown from an over load Yellow LED lit fault indicates an input fault or over temperature If the red...

Page 23: ...an 4410 or Triplett 4200 AC Output CAUTION Rechargeable Devices Certain rechargeable devices are designed to be charged by plugging them directly into an AC receptacle These devices may damage the inverter or the charging circuit When using a rechargeable device monitor its temperature for the initial ten minutes of use to determine if it produces excessive heat If excessive heat is produced this ...

Page 24: ... in the installation area 2 Identify the positive and negative DC power source battery terminals 3 Install a fuse holder or breaker close to the positive terminal of the DC source battery 4 Connect a length of wire on one side of the fuse holder or circuit breaker Connect the other end of the wire to the Positive terminal of the inverter 5 Connect a length of wire between the inverter s negative t...

Page 25: ...t such as hair dryers electric blankets microwave ovens and toasters Remember to disconnect the inverter from any power source when not in use Operation of the USB Charging Port 1 Connect the inverter to a functioning 12 volt DC power source as described in this Instruction Manual Make sure there is adequate space for proper ventilation of the inverter 2 Press the Power Pushbutton to turn the unit...

Page 26: ... fuses are replaceable however only trained personnel should attempt fuse replacement If the unit is damaged during fuse replacement the warranty may be voided TROUBLESHOOTING Common Audio Visual Problems Problem Buzzing Sound In Audio Systems Some inexpensive stereo systems and boom boxes make a buzzing sound when operated from the inverter because the power supply in the electronic device does n...

Page 27: ...ull network of company owned and authorized service locations All Black Decker Service Centers are staffed with trained personnel to provide customers with efficient and reliable power tool service Whether you need technical advice repair or genuine factory replacement parts contact the Black Decker location nearest you SPECIFICATIONS Maximum Continuous Power 200 Watts Surge Capacity 400 Watts USB...

Page 28: ... 507 360 5700 Solamente para propósitos de Colombia Importado por Black Decker de Colombia S A Carrera 85D 51 65 Bodega 23 Complejo Logístico San Cayetano Bogota Colombia Tel 744 7100 Solamente para propósito de Chile Importado por Black Decker de Chile S A Av Pdte Eduardo Frei M 6001 67 Conchalí Santiago de Chile Tel 56 2 687 1700 Solamente para propósito de México Importado por Black Decker S A ...

Reviews: