5
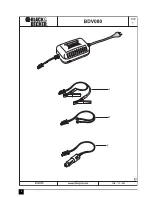
Features
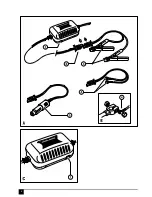
1.
Charge rate selector switch
2.
Charging indicators
3.
Battery clamps
4.
Ring terminals
5.
DC accessory plug
6.
In-line connector
Connecting the battery charger
When all the preparations for charging and personal safety
have been completed, proceed as follows:
X
For most automotive and similar applications the battery
charger may be connected to the battery while it is
connected to the dc circuit. If this is acceptable follow the
instructions given in "Charging a battery installed in the
circuit".
X
If the battery must be disconnected from the circuit before
charging, follow the instructions given in "Charging a
battery disconnected from the circuit".
Warning!
A marine (boat) battery must be removed and
charged on shore. To charge it on-board requires equipment
specially designed for marine use.
Charging a battery installed in the circuit.
Incorrect connection, battery short circuit, location of battery
and location of the battery charger may create a hazard.
Make sure that adequate preparation has been made before
proceeding.
Warning!
If the battery posts cannot be accessed or the battery
charger clamps will contact the bodywork or components
adjacent to the battery, the battery must be removed before
charging. Follow the manufacturer's instructions to remove the
battery.
Check the polarity of the battery posts. A positive (POS, P, +)
battery post usually has a larger diameter than the negative
(NEG, N, -) battery post.
Follow the manufacturers' instructions to remove any
insulating covers from the battery posts.
Connect the positive (red) clamp from the battery charger to
the positive (POS, P, +) post of the battery.
Connect the negative (black) clamp from the battery charger
to the negative (NEG, N, -) post of the battery.
When disconnecting the battery charger from the battery,
always:
X
Switch off and unplug the battery charger.
X
Remove the negative (black) clamp first.
X
Remove the positive (red) clamp last.
X
Refit any insulating covers to the battery posts.
Charging a battery disconnected from the circuit.
Warning!
Incorrect connection, battery short circuit, location of
battery and location of the battery charger may create a hazard.
Make sure that adequate preparation has been made before
proceeding.
If the battery is not already removed from the circuit, follow
the manufacturers' instructions to remove the battery before
charging.
Check the polarity of the battery posts. A positive (POS,P, +)
battery post usually has a larger diameter than the negative
(NEG, N, -) battery post.
Connect the positive (red) clamp from the battery charger to
the positive (POS, P, +) post of the battery.
Connect the negative (black) clamp from the battery charger
to the negative (NEG, N, -) post of the battery.
When disconnecting the battery charger from the battery,
always:
X
Switch off and unplug the battery charger.
X
Remove the negative (black) clamp first.
X
Remove the positive (red) clamp last.
X
Refit any insulating covers to the battery posts.
Use
Connecting the appliance with the battery clamps
(fig. A)
Warning!
Always disconnect the ac plug from the ac mains
socket before connecting or disconnecting the appliance to or
from the battery.
X
Connect the battery clamps (3) to the battery charger with
the in-line connector (6).
X
The appliance's output leads have colour-coded battery
clamps (3) (red-positive and black-negative). These connect
directly to the corresponding connectors on the battery
terminals.
X
Follow the steps outlined in "Safety instructions" at the
front of this manual.
X
Insert the ac plug of the battery charger into an ac mains
socket.
Connecting the appliance with the ring terminals
(fig. A & B)
Warning!
Always disconnect the ac plug from the ac mains
socket before connecting or disconnecting the appliance to or
from the battery.
X
Connect the ring terminals (4) to the battery charger with
the in-line connector (6).
X
The output leads have crimped, colour-coded ring terminals
(4) (red-positive and black-negative). The ring terminals (4)
connect directly to the corresponding connectors on the
battery terminals.
Summary of Contents for BDV 08
Page 1: ...UK Ireland Australia New Zealand ...
Page 2: ...2 ...
Page 8: ...8 ...
Page 9: ...9 ...
Page 10: ...10 ...
Page 11: ...11 ...
Page 12: ...90507184 11 06 ...


