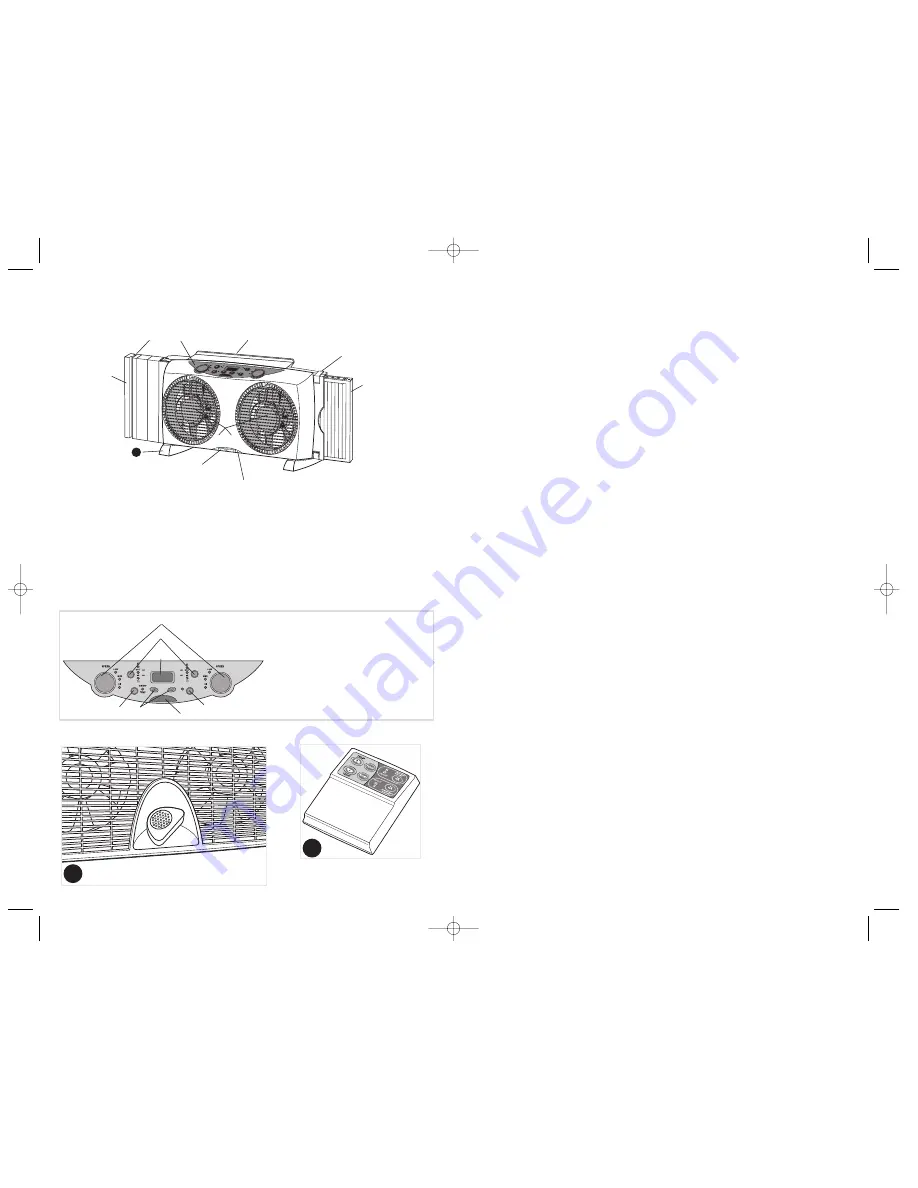
background image

4

3


11

† 1. Panel insert 

(2 panel inserts per set
Part #103409900592)

2. Groove
3. Digital control panel
4. Carry handle
5. Release clamp
6. Expandable panel
7. Twin motors
8. 7" (18cm) reversible blades

9. Remote control storage

† 10. Remote control

(Part #103530000021)

† 11. Optional feet

(2 optional feet per set, 

right Part #103409900583,

left Part #  103409900584)

12. 10' cord (25 cm)(not shown)
13. Screws (not shown)

† Consumer replaceable

Product may vary slightly from what is illustrated. 


1. 3-Speed/On/Off button
2. Reverse buttons
3. Digital temperature display
4. Rainsafe™ button
5. Remote control sensor
6. Adjustable thermostat buttons
7. Temperature control button

B

A

How to Use

This appliance is for household use.

IMPORTANT: 

During the first few minutes of initial use, a slight odor may be noticeable.

This is normal and will quickly disappear.

INSTALLATION INSTRUCTIONS

1. Unpack twin window fan carefully.
2. This unit is designed for use in double-hung, casement and vertical slider-type windows

with minimum openings of 23.5" (59.5 cm) wide and 11.2" (28.5 cm) high.

3. This fan is designed to be used (and recommended for use) with a screen in the window.
4. With the sliding portion of the window fully open, take an accurate inside measurement

(left to right for double-hung type windows and top to bottom for vertical slider-type
windows) of the window opening where the unit is to be placed.

For double-hung type windows

1. With the window fully open, set the fan in the window with front of fan facing the

INSIDE.  

2. Hold fan with one hand while attaching/adjusting panels with the other. Attach one of

the panel inserts by sliding it down the groove located at the top left of fan. Before
closing window, pull open clamps located at top and bottom on right side on fan, and
adjust expandable panel, if necessary.

3. Close the window on top of the fan with the bottom edge of the window behind the lip

of fan housing.

4. If the fan still does not fit properly in the window, readjust the expandable panel on

right side of fan to fill in remaining space between panel and window frame until a
secure fit is achieved. 

For vertical slider-type windows

1. Position the fan in the window with the power switch facing the center of the opening.
2. To adjust height, remove fan from window. If additional height required is 4" (10 cm) 

or less, extend the expandable panel until it matches the height of the window. (For
example, if window height is 28" (71 cm), adjust panel so that the height of the fan is
also 28" (71 cm)). If fan height required is more than 28" (71 cm), attach one or both of
the insert panels, as described in #2 of FOR DOUBLE-HUNG TYPE WINDOWS section
above.

3. With the window fully open, position the fan in the window with the expandable panel

at the top and with power switch facing the center of the opening.

4. Fan must fit securely against the inside edge of the window opening.
5. Slide the sliding window to meet the edge of the fan. The side edge of the window must

fit securely behind the lip of fan housing.

6. Adjust the expandable panel to fill in remaining space between fan and window frame.

Expandable panel locks into position by closing the clamps once fit is established.
OPERATING INSTRUCTIONS

1. Plug into 120V AC electric outlet.
2. On/Off/SPEED— Press speed button to turn the fan on. Fan default direction when the

unit is turned on is intake. Fan begins blowing at LOW speed, the corresponding LED
speed indicator illuminates. To turn the fan off press the speed button through the cycle
(LOW, MED, HI) until all speed lights are off.

3. Intake/Exhaust/Exchange — Both fans are automatically reversible and operate

independently in either an intake or exhaust mode. The IN/OUT directional LED
illuminates green for intake and red for exhaust.
To pull in fresh air from the outside – push reverse button to IN (green).
To remove stale or smoky air from the room - push reverse button to OUT (red). 
For air exchange –set one button to IN (green) and one button to OUT (red).

BDWF7710Pub1000001430  10/11/04  4:51 PM  Page 4

Summary of Contents for BDWF7710

Page 1: ...800 738 0245 Accesorios Partes EE UU Canadá Accessoires Pièces É U Canada USA Canada 1 800 231 9786 Mexico 01 800 714 2503 www blackanddecker com Model Modelo Modèle BDWF7710 Digital Twin Window Fan with Rainsafe Sensor Ventilador doble dígital con sensor Rainsafe para ventana Ventilateur double à affichage numérique de fenêtre avec capteur Rainsafemc BDWF7710Pub1000001430 10 11 04 4 51 PM Page 1 ...

Page 2: ...r Return the fan to the nearest authorized service facility for examination or electrical or mechanical adjustment Or call the appropriate toll free number listed on the cover of this manual Do not use attachments not recommended by the manufacturer Do not let cord hang over table or counter or touch hot surfaces To disconnect grip plug and pull from wall outlet Never yank on cord Always use on a ...

Page 3: ...If the fan still does not fit properly in the window readjust the expandable panel on right side of fan to fill in remaining space between panel and window frame until a secure fit is achieved For vertical slider type windows 1 Position the fan in the window with the power switch facing the center of the opening 2 To adjust height remove fan from window If additional height required is 4 10 cm or ...

Page 4: ...Rainsafe sensor has turned off the fan Fan automatically restarts after the water evaporates Note If the fan has shutoff due to the Rainsafe feature being activated you can restart the fan by pressing the Rainsafe button therefore bypassing the Rainsafe function Press Rainsafe button a second time to deactivate the Rainsafe feature LED Rainsafe indicator will not be illuminated To Use with the Rem...

Page 5: ...y antes de limpiarlo Nunca introduzca los dedos lápices u otros objetos a través de la parrilla cuando el ventilador se encuentre en funcionamiento Desconecte el ventilador antes de limpiarlo Asegúrese de colocar el ventilador sobre una superficie estable para evitar que se caiga una vez en marcha No coloque el ventilador ni ninguna de las piezas cerca de una llama aparatos de cocina o de calefacc...

Page 6: ... la abertura 2 Para ajustar la altura retire el ventilador de la ventana Si la altura adicional requerida es de 10 cm 4 pulgadas o menor extienda el panel extensible justo hasta la altura de la ventana Por ejemplo si la ventana mide 71 cm 28 pulgadas de alto el panel se debe ajustar de manera que el ventilador también mida 71 cm 28 pulgadas Si la altura del ventilador es mayor de 71 cm 28 pulgadas...

Page 7: ... los ajustes a la temperatura programada presione el botón del control de temperatura 6 Dispositivo Rainsafe Este dispositivo funciona con el modo de admisión de aire solamente Cuando las gotas de agua pegan contra el sensor Rainsafe en la parte trasera del ventilador A el aparato se apaga a fin de evitar que el agua penetre en el ventilador y sople adentro de la habitación Presione el botón Rains...

Page 8: ... l appareil lorsqu on ne s en sert pas lorsqu on le déplace avant de le nettoyer et avant d en enlever ou d en installer des composantes Ne jamais insérer un doigt un crayon ou tout autre objet dans la grille lorsque le ventilateur fonctionne Débrancher le ventilateur avant de le nettoyer Vérifier que le ventilateur est sur une surface stable pendant qu il fonctionne pour éviter qu il ne se renver...

Page 9: ...ux de l autre main Attacher l un des panneaux en le faisant glisser dans la rainure située au coin supérieur gauche du ventilateur Si le deuxième panneau est requis le fixer en le faisant glisser dans la rainure sur le côté du premier panneau Avant de fermer la fenêtre ouvrir les brides situées sur le dessus et au bas du côté droit du ventilateur et régler le panneau extensible au besoin 3 Fermer ...

Page 10: ...oncer le sélecteur de température 6 Dispositif Rainsafemc fonctionne seulement en mode d entrée d air Lorsque de la pluie touche au capteur du dispositif qui se trouve derrière l appareil A l appareil s éteint afin d éviter que de la pluie ne s infiltre dans l appareil et qu elle soit soufflée dans la pièce Enfoncer le bouton Rainsafemc pour activer le dispositif Le témoin à D É L rouge reste allu...

Page 11: ...es do not allow the exclusion or limitation of consequential or incidental damages so this limitation may not apply to you How does state law relate to this warranty This warranty gives you specific legal rights and you may also have other rights that vary from state to state or province to province NECESITA AYUDA Para servicio reparaciones o preguntas relacionadas al producto por favor llame al n...

Page 12: ...ts Quelles lois régissent la garantie Les modalités de la présente garantie donnent des droits légaux spécifiques L utilisateur peut également se prévaloir d autres droits selon l état ou la province qu il habite Póliza de Garantía Válida sólo para México Duración Applica de México S de R L de C V garantiza este producto por 2 años a partir de la fecha original de compra Qué cubre esta garantía Es...

Page 13: ...Lee Centro Comercial Mega Plaza Carretera a la Lima San Pedro Sula Honduras Tel 504 553 1612 México Art 123 y José Ma Marroquí 28 D Centro Mexico D F Tel 55 5512 7112 55 5512 3164 Nicaragua H L Electronic Zumen 3 C Arriba y 15 Varas al Sur Managua Nicaragua Tel 505 260 3262 Panamá Authorized Service Center Electrodomésticos S A Boulevard El Dorado al lado del Parque de las Mercedes Panamá Panamá T...

Reviews: