background image

2

1

When using electrical appliances, basic safety precautions should 

always be followed, including the following:

 Read all instructions.

 Do not touch hot surfaces. Use handles or knobs.

 To protect against risk of electrical shock, do not immerse cord, 

plug, or any non-removable parts of this oven in water or other 

liquid.

 Close supervision is necessary when any appliance is used by  

 or near children.

 Unplug from outlet when not in use and before cleaning. Allow to 

cool before putting on or taking off parts.

 Do not operate any appliance with a damaged cord or plug 

or after the appliance malfunctions or is dropped or damaged 

in any manner. Return the appliance to the nearest authorized 

service facility for examination, repair, or electrical or mechanical 

adjustment. Or, call the appropriate toll-free number listed on the 

cover of this manual.

 The use of accessory attachments not recommended by the 

appliance manufacturer may cause injuries.

 Do not use outdoors.

 Do not let cord hang over edge of table or counter, or touch hot 

surfaces.

 Do not place on or near a hot gas or electrical burner, or in a 

heated oven.

 Extreme caution must be used when moving an appliance 

containing hot oil or other hot liquid.

 To disconnect, turn any control to OFF, then remove plug from 

wall outlet.

 Do not use appliance for other than intended use.

 Oversized foods or metal utensils must not be inserted in this 

appliance, as they may create a fire or risk of electric shock.

 A fire may occur if the toaster oven is covered or touching 

flammable material including curtains, draperies, walls and the 

like, when in operation. Do not store any item on top of unit 

when in operation.

IMPORTANT SAFEGUARDS

SAVE THESE INSTRUCTIONS.

GROUNDED PLUG

As a safety feature, this product is equipped with a grounded plug, which will 

only fit into a three-prong outlet. Do not attempt to defeat this safety feature. 

Improper connection of the grounding conductor may result in the risk of electric 

shock. Consult a qualified electrician if you are in doubt as to whether the outlet 

is properly grounded.

ELECTRICAL CORD

a)  A short power-supply cord is to be provided to reduce the risk resulting from 

becoming entangled in or tripping over a longer cord.

b)  Longer extension cords are available and may be used if care is exercised in 

their use.

c)  If an extension cord is used,

  1)  The marked electrical rating of the cord set or extension cord should be 


at least as great as the electrical rating of the appliance, and

  2)  The cord should be arranged so that it will not drape over the countertop 


or tabletop where it can be pulled on by children or tripped over 


unintentionally.

If the appliance is of the grounded type, the extension cord should be a 

grounding-type 3-wire cord.

TAMPER-RESISTANT SCREW

Warning : This appliance is equipped with a tamper-resistant screw to prevent 

removal of the outer cover. To reduce the risk of fire or electric shock, do not 

attempt to remove the outer cover. There are no user-serviceable parts inside. 

Repair should be done only by authorized service personnel.

Note: 

If the power supply cord is damaged, it should be replaced by qualified 

personnel or in Latin America by an authorized service center.

 Do not clean with metal scouring pads. Pieces can break off the 

pad and touch electrical parts resulting in a risk of electric shock.

 Extreme caution should be used when using containers 

constructed of other than metal or glass. 

 Do not store any material, other than manufacturer's 

recommended accessories, in this oven when not in use.

 Do not place any of the following materials in the oven: paper, 

cardboard, plastic wrap, and the like.

 Do not cover crumb tray or any parts of the oven with metal foil. 

This will cause overheating of the oven.

 To stop toasting, broiling or baking turn the controls to OFF.

 Use extreme caution when removing tray or disposing of hot 

grease.

Summary of Contents for CTO6120

Page 1: ...om Accessories Parts USA Canada Accesorios Partes EE UU Canadá Accessoires Pièces É U Canada 1 800 738 0245 Register your product online at www prodprotect com applica for a chance to WIN 100 000 Registre su producto en la Internet en el sitio Web www prodprotect com applica y tendrá la oportunidad de GANAR 100 000 Inscrivez votre produit en ligne à l adresse www prodprotect com applica et courez ...

Page 2: ...t Do not attempt to defeat this safety feature Improper connection of the grounding conductor may result in the risk of electric shock Consult a qualified electrician if you are in doubt as to whether the outlet is properly grounded ELECTRICAL CORD a A short power supply cord is to be provided to reduce the risk resulting from becoming entangled in or tripping over a longer cord b Longer extension...

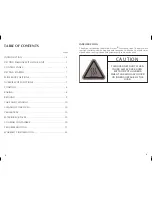
Page 3: ...OVEN GETS HOT WHEN IN USE ALWAYS USE OVEN MITTS OR POT HOLDERS WHEN TOUCHING ANY OUTER OR INNER SURFACE OF THE OVEN TABLE OF CONTENTS Pages INTRODUCTION 4 GETTING FAMILIAR WITH YOUR UNIT 5 CONTROL PANEL 6 GETTING STARTED 7 SLIDE RACK POSITIONS 7 OVERVIEW OF FUNCTIONS 7 TOASTING 8 BAKING 8 BROILING 9 CARE AND CLEANING 10 CLEANING YOUR OVEN 10 CRUMB TRAY 10 EXTERIOR SURFACES 10 COOKING CONTAINERS 10...

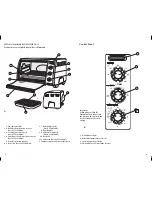
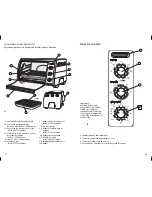
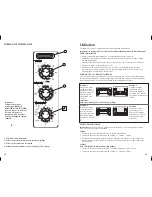
Page 4: ...or Part CTO6120 03 5 Extra deep curved interior 6 Broil rack Part CTO6120 04 7 Bake pan drip tray Part CTO6120 05 8 Door handle 9 Slide out crumb tray Part CTO6120 06 10 Rack slot 11 Slide rack Part CTO6120 07 Consumer replaceable removable parts GETTING FAMILIAR WITH YOUR UNIT Product may vary slightly from what is illustrated 6 A 1 2 3 4 5 6 7 8 9 10 11 1 2 3 4 B Important When using the TOAST T...

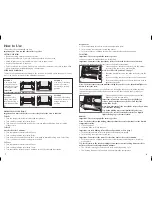
Page 5: ...ssary to preheat the oven for toasting Important You must set the toast shade selector as desired for the oven to function 1 Make sure temperature selector is set to the Broil Toast position 2 Open oven door Insert the slide rack into the bottom rack slot using the rack up position D Note See slide rack position 3 on page 7 3 Place the bread directly on the slide rack and close the door 4 Turn the...

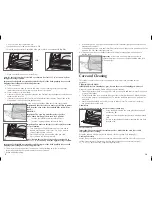
Page 6: ...lements 6 The first time you broil an item in this oven cook according to recipe or package instructions and check at minimum time to see if it is done 7 When finished broiling G H 10 9 If the timer was on the signal bell sounds the ON indicator light goes off and the oven automatically shuts off If the timer was not on turn the Timer Toast selector from the Stay On position to the Off position Th...

Page 7: ...aparato Este aparato se debe utilizar solamente con el fin previsto A fin de evitar el riesgo de incendio o choque eléctrico jamás introduzca alimentos demasiado grandes ni utensilios de metal adentro del aparato 12 11 TROUBLE SHOOTING PROBLEM POSSIBLE CAUSE SOLUTION Unit is not heating or stops heating Electrical outlet is not working or oven is unplugged Check to make sure outlet is working Both...

Page 8: ...rate de alterar esta medida de seguridad La conexión inapropiada del conductor de tierra puede resultar en un riesgo de choque eléctrico Si tiene alguna duda consulte con un eléctricista calificado para asegurarse de que la toma de corriente sea una de tierra CABLE ELÉCTRICO a El producto debe proporcionarse con un cable corto para reducir el riesgo de enredarse o de tropezar con un cable largo b ...

Page 9: ...38 40 16 15 INTRODUCCIÓN Gracias por escoger el horno de Black Decker para el mostrador Los controles de las diferentes funciones son fáciles y prácticos de manejar y el cronómetro de 60 minutos produce una señal audible al finalizar el ciclo de cocción y apaga el aparato automáticamente 65 0 THIS OVEN GETS HOT WHEN IN USE ALWAYS USE OVEN MITTS OR POT HOLDERS WHEN TOUCHING ANY OUTER OR INNER SURFA...

Page 10: ...a Nº CTO6120 03 5 Interior curvo extra profundo 6 Parrilla de asar Pieza Nº CTO6120 04 7 Bandeja de hornear de goteo Pieza Nº CTO6120 05 8 Asa de la puerta 9 Bandeja corrediza para los residuos Pieza Nº CTO6120 06 10 Ranuras para la parrilla 11 Parrilla corrediza Pieza Nº CTO6120 07 Reemplazable removible por el consumidor A 1 2 3 4 5 6 7 8 9 10 11 CONOCIMIENTO DEL PRODUCTO El producto puede varia...

Page 11: ...OAST 2 Ajuste el control de las funciones de cocción a la posición de tostar TOAST 3 Gire el control del grado de tostado pasando el nivel 20 y luego gírelo a la izquierda hasta alcanzar el nivel deseado Mantener caliente 1 Ajuste el control de temperatura a la posición MIN 2 Ajuste el control de las funciones de cocción a la posición KEEP WARM mantener caliente 3 Gire el cronómetro pasando el niv...

Page 12: ...tan siempre utilice una agarradera o un guante de cocina para retirar los alimentos G O Fa Fb G 22 21 PARA ASAR Advertencia Las superficies superiores y laterales de este horno se calientan Nota Precaliente el horno durante 5 minutos antes de asar 1 Ajuste el control de temperatura a la posición de asar tostar BROIL TOAST 2 Ajuste el control de las funciones de cocción a la posición de asar BROIL ...

Page 13: ...ntar La toma de corriente no funciona o el horno está desconectado Verifique que la toma de corriente esté funcionando Tanto el control de temperatura como el cronómetro deben ser ajustados para que el horno funcione La segunda tanda de tostado resulta muy oscura El control del grado de tostado está a un nivel demasiado alto Si repite varias tandas escoja un grado de tostado más bajo que el anteri...

Page 14: ...placer avec une extrême prudence un appareil renfermant de l huile chaude ou tout autre liquide chaud Mettre toutes les commandes à la position d arrêt OFF avant de brancher ou de débrancher l appareil Utiliser l appareil seulement aux fins qu il est prévu Ne pas introduire dans l appareil des aliments grandes dimensions ni des ustensiles en métal qui pourraient provoquer des risques d incendies o...

Page 15: ...placé de manière à provoquer un trébuchement par inadvertance Lorsque l appareil est de type mis à la terre il faut utiliser un cordon de rallonge mis à la terre à trois broches VIS INDESSERRABLE Avertissement L appareil est doté d une vis indesserrable empêchant l enlèvement du couvercle extérieur Pour réduire les risques d incendie ou de secousses électriques ne pas tenter de retirer le couvercl...

Page 16: ... 02 4 Minuterie de 60 minutes Sélecteur du degré de rôtissage pièce n CTO6120 03 5 Intérieur courbé très profond 6 Grille de lèchefrite pièce n CTO6120 04 7 Plat de cuisson Plateau d égouttage pièce n CTO6120 05 8 Poignée de la porte 9 Plateau à miettes coulissant pièce n CTO6120 06 10 Fente pour les grilles 11 Grille coulissantes pièce n CTO6120 07 Pièce amovible e remplaçable par le consommateur...

Page 17: ...les fentes inférieures qui se trouvent le long des parois du four Insérer la grille en position vers le bas Position 1 Utiliser les fentes supérieures qui se trouvent le long des parois du four Insérer la grille en position vers le haut Position 2 Utiliser les fentes supérieures qui se trouvent le long des parois du four Insérer la grille en position vers le bas Utilisation Cet appareil est conçu ...

Page 18: ...ès un cycle de rôtissage tourner le sélecteur du degré de rôtissage à un réglage légèrement plus clair pour obtenir le même résultat CUISSON Important Le dessus et les côtés du four deviennent chauds Nota Pour obtenir de meilleurs résultats lors de la cuisson toujours préchauffer le four 8 minutes pour atteindre la température désirée D E 34 33 1 Ouvrir la porte du four 2 Insérer la grille couliss...

Page 19: ...ser des gants de cuisine ou des poignées pour sortir les aliments du four car la porte et la grille coulissante seront chaudes J Entretien et nettoyage L utilisateur ne peut effectuer lui même l entretien d aucune pièce de cet appareil En confier l entretien à du personnel qualifié NETTOYAGE DU FOUR Important Avant de nettoyer une pièce quelconque s assurer que le four est éteint débranché et froi...

Page 20: ...te to state or province to province DÉPANNAGE PROBLÈME CAUSE POSSIBLE SOLUTION L appareil ne chauffe pas ou cesse de chauffer La prise de courant est défectueuse ou le four n est pas branché S assurer que la prise de courant fonctionne bien Le régulateur de température et la minuterie doivent être réglés pour que le four fonctionne Le deuxième grillage est trop foncé Le four est réglé à un degré d...

Page 21: ...pas retourner le produit où il a été acheté Ne pas poster le produit au fabricant ni le porter dans un centre de service On peut également consulter le site web indiqué sur la page couverture Garantie limitée de un an Valable seulement aux États Unis et au Canada Quelle est la couverture Tout défaut de main d oeuvre ou de matériau toutefois la responsabilité de la société Applica se limite au prix...

Page 22: ...to dentro de sus red de servicio Argentina Servicio Central Attendace Monroe 3351 Ciudad Autónoma de Bs As Buenos Aires Argentina Tel 0810 999 8999 Chile Servicio Máquinas y Herramientas Ltda Av Apoquindo No 4867 Las Condes Santiago Chile Tel 562 263 2490 Colombia PLINARES Avenida Quito 88A 09 Bogotá Colombia Tel sin costo 01 800 7001870 Costa Rica Aplicaciones Electromecanicas S A Calle 26 Bis y ...

Page 23: ...el Hidalgo CP 11570 MEXICO Servicio y Reparación Art 123 y José Ma Marroquí 28 D Col Centro Mexico D F CP 06050 Servicio al Consumidor Venta de Refacciones y Accesorios 01 800 714 2503 Copyright 2007 Applica Consumer Products Inc Made in People s Republic of China Printed in People s Republic of China Importado por APPLICA DE MEXICO S DE R L DE C V Presidente Mazaryk No111 1er Piso Col Chapultepec...

Reviews: