4
ENGLISH
Features
1. On/off button
2. Hotplate
3. Carafe
4. Carafe lid
5. Bowl
6. Bowl lid
7. Water reservoir
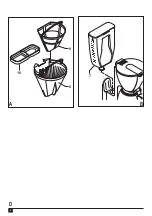
Fig. A.
8. Filter holder
9. Filter
10. Water reservoir filter
Assembly
Fitting and removing the water reservoir (fig. A & B)
u
Place the water reservoir filter (10) in the water reservoir (7).
u
Slide the water reservoir (7) in the back of the appliance
until it is correctly fitted.
u
Pull the water reservoir from the back to remove it.
Use
u
Warning!
Never use the appliance without water in the
reservoir.
Before first use
u
Wash the carafe, the filter holder and the filter in hot,
soapy water.
u
Rinse and dry all parts.
Filling the water reservoir (fig. A & B)
The water reservoir can also be filled while fitted to the
appliance. The filter can be removed if required.
u
Remove the water reservoir (7) from the appliance.
u
Open the water reservoir lid.
u
Fill the water reservoir (7) with the desired amount of
water through the water reservoir filter (10).
Adding coffee
u
Place the filter (9) in the filter holder (8). Add the desired
amount of coffee.
u
Open the lid (6) and place the filter holder in the bowl (5).
Make sure the pins on the filter holder fit securely into the
bayonet holes in the bowl.
u
Place the carafe under the bowl.
Switching on and off
u
To switch the appliance on, press the on/off button (1).
u
To switch the appliance off, press the on/off button (1)
again.
Anti-drip function
The appliance is fitted with an anti-drip function, allowing you
to remove the carafe at any time, even when coffee is still
dripping from the filter bowl.
u
Take the carafe (3) from the hotplate (2) and pour the
desired amount of coffee.
u
Replace the carafe on the hotplate and allow the
remainder of the coffee to drip into the carafe.
Cleaning and maintenance
Warning!
Before cleaning and maintenance, switch the
appliance off and remove the plug from the socket.
u
Using the handles, remove the filter (9) and the filter
holder (8) from the bowl (5). Remove the used coffee
grounds from the filter.
u
Wash the carafe (3), the filter holder and the filter in hot,
soapy water. Dry all parts and refit them.
u
Wipe the outside of the appliance with a damp cloth.
Note:
The carafe is not dishwasher proof.
Descaling the appliance
If the appliance is used in an area with hard water, it is
advised to descale the appliance when from time to time.
u
Use a commercial descaling agent for coffee makers,
or use water and vinegar as follows:
u
Fill the water reservoir (7) and add 3 teaspoons of vinegar.
Operate the appliance as for making coffee until the
reservoir is empty.
u
Discard the used water and repeat the procedure
2 or 3 times with fresh water.
Protecting the environment
Z
Separate collection. This product must not be
disposed of with normal household waste.
Should you find one day that your Black & Decker product
needs replacement, or if it is of no further use to you, do not
dispose of it with household waste. Make this product
available for separate collection.
z
Separate collection of used products and packaging
allows materials to be recycled and used again.
Re-use of recycled materials helps prevent
environmental pollution and reduces the demand for
raw materials.
Local regulations may provide for separate collection of
electrical products from the household, at municipal waste
sites or by the retailer when you purchase a new product.
Summary of Contents for DCM400
Page 1: ...www blackanddecker eu English 3 Italiano 6 Ελληνικά 9 1 2 3 4 5 7 6 ...
Page 2: ...2 D B A 9 8 10 7 ...
Page 13: ...13 ...
Page 14: ...14 ...


