

5
sheet-metal body parts. Connect to a heavy gauge metal part of the frame
or engine block.
DO NOT TURN SAFETY SWITCH ON IF REVERSE POLARITY ALARM
SOUNDS OR THE REVERSE POLARITY INDICATOR LIGHTS. REVERSE
THE CLAMP CONNECTIONS.
6. After making proper connections, turn safety power switch to ON.
7. Start vehicle (do not turn key for longer than 5-6 seconds).
8. After vehicle starts, turn the safety power switch to off, remove clamps (disconnect
the frame or engine clamp first, followed by the battery cable). Disconnect the
cables from unit.
Notes:
Always disconnect the engine or frame jumper clamp first; followed by
the battery jumper clamp.
If engine fails to start, leave the ignition turned off and disconnect the
negative (–) clamp first, then the positive (+) clamp. Try again later — the
engine may be flooded.
Recharge the Electromate after each use.
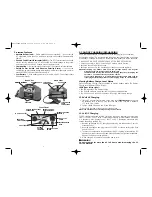
USING THE ALTERNATOR CHECK FEATURE
1. Connect jumper cables to vehicle.
2. Turn the Jump-Start Power Switch on the back of the unit to the ON position. The
Alternator Check LED lights.
3. Start the engine, and turn vehicle accessories off.
4. A solid LED indicates a good alternator. A flashing LED indicates a bad
alternator.
USING THE 12 VOLT DC PORTABLE POWER SUPPLY
1. Flip open the 12 volt DC outlet cover on the Front Panel.
2. Insert the 12 volt DC plug from the appliance into the receptacle.
3. Turn on the appliance and operate normally.
CAUTION
DO NOT USE UNIT TO POWER APPLIANCES THAT DRAW MORE THAN
5 AMPS DC.
USING THE 120 VOLT AC POWER SUPPLY
The AC Power Supply is designed for maintaining today's modern lifestyle while
traveling in vans, RVs, automobiles, trucks, or vehicles that have a 12 volt battery
power supply and a means to recharge those batteries. The
Electromate 250
comes with:
1. AC On/Off Switch — Slide switch to turn the AC Power Supply ON and OFF.
2. 120 Volt AC Power Outlet
3. AC Power Supply “ON” Status Indicator — red LED lights when AC outlet is
turned on; red LED flashes on and off when faulted.
4
USING THE ELECTROMATE AS A JUMP-STARTER
WARNING
Before using this system to jump-start any vehicle read and
understand all instructions, safety tips, warnings, cautions and first
aid information provided in this manual and on the product labeling.
Additional important information may also be provided in the
battery manual.
CAUTION
To avoid possible damage that may shorten the unit’s working life,
protect this unit from direct sunlight, direct heat and moisture.
This system is to be used ONLY on vehicles, garden tractors and
gasoline-powered generators with 12 volt DC battery systems.
This system is NOT designed to be installed as a replacement for a
vehicle battery.
WARNING
Connect or disconnect battery leads ONLY when AC or DC charging
supply cord is disconnected.
Jump-Starting Instructions
This jump-starter is equipped with a manual safety switch that only allows jump-start
energy to flow when proper connections are made to battery and frame.
Connect — RED clamp first, then BLACK clamp. Disconnect — BLACK clamp first,
then RED clamp.
1. Turn OFF vehicle ignition and all accessories (radio, A/C, lights, cell phone, etc.).
Place vehicle in “park” and set the emergency brake.
2. Make sure jump-start system’s ON/OFF power switch is turned to OFF.
3. Connect jumper cables to unit.
4. To jump-start a NEGATIVE GROUNDED SYSTEM (NEGATIVE battery terminal
is connected to the chassis — the most common configuration), follow steps 4a
and 4b, then proceed to step 6.
4a. Connect the POSITIVE (+) RED clamp to vehicle battery’s POSITIVE
ungrounded post.
4b. Connect the NEGATIVE (–) BLACK clamp to the vehicle chassis or engine
block away from the battery. Do not connect the clip to carburetor, fuel lines
or sheet-metal body parts. Connect to a heavy gauge metal part of the frame
or engine block.
5. To jump-start a POSITIVE GROUNDED SYSTEM — In the rare event that the
vehicle to be started has a POSITIVE Grounded System, POSITIVE battery
terminal is connected to chassis, replace steps 4a and 4b above with steps 5a
and 5b, then proceed to step 6.
5a. Connect NEGATIVE (–) BLACK clamp to vehicle battery’s NEGATIVE
ungrounded post.
5b. Connect POSITIVE (+) RED clamp to the vehicle chassis or engine block
away from the battery. Do not connect the clip to carburetor, fuel lines or
VEC1026BD_Manual_050305 5/9/05 2:25 PM Page 4


