


8
ENGLISH
(Original instructions)
9
ENGLISH
(Original instructions)
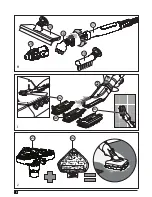
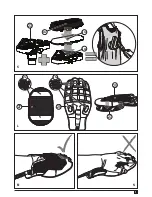
Attaching accessories (Fig H)
u
Align the lugs on the steam nozzle (17) with the recesses
on the accessory.
u
Press the accessory onto the steam nozzle (17) and twist
anti-clockwise until the accessory clicks into place.
Important!
All accessories, apart from the SteaMitt
TM
(25)
which has its own hose and connector (26), must be attached
to the steam hose (16) for use.
Removing the hose and accessories
Warning!
The steam hose (16), Steam nozzle (17) and
accessories become hot during use. Allow the unit and all
accessories to cool before attempting to remove.
Removing an accessory
u
Twist the accessory clockwise then pull away from the
hose (16).
Removing the hose
u
Press the steam hose release button (16a) on the steam
hose (16) and pull away from the hand held steam unit.
SteaMitt
TM
Your BLACK+DECKER
TM
SteaMitt
TM
has been designed for
sanitising and cleaning tiles, work tops, kitchen surfaces and
bathroom surfaces. This appliance is intended for indoor
household use only.
Attaching the SteaMitt
TM
hose to the hand held
steam unit
Warning!
Inspect the seal between the connection point on
the hand held steam cleaner (5) and the SteaMitt
TM
hose
(26) before each use. If the seal malfunctions or is damaged,
please contact your nearest authorised repair agent. Do not
use the appliance.
u
Press the SteaMitt
TM
hose release button on the SteaMitt
TM
hose (26).
u
Connect the SteaMitt
TM
hose (26) to the hand held steam
cleaner (5) and release the SteaMitt
TM
hose release button
making sure it clicks into place.
Important!
Ensure that the SteaMitt
TM
hose (26) is securely
connected to the hand held steam cleaner (5).
If steam escapes from the joint, the hose is incorrectly fitted.
Switch off, allow the unit to cool then remove and refit the
hose.
Fitting a cleaning pad to the
SteaMitt
TM
(Fig. L)
u
Fit the cleaning pad (27) to the SteaMitt
TM
(25) by
attaching the 'loop' velcro strips (27a) on the upper side
of the cleaning pad, to the 'hook' velcro pads (25a) on the
underside of the SteaMitt
TM
(4). Press down firmly.
Warning!
The SteaMitt
TM
should not be used without fitting a
cleaning pad.
Note:
The SteaMitt
TM
accommodates 3 types of cleaning pads
of varying thickness. The thinnest can be used for cleaning 3D
forms such as taps etc. The thicker versions can be used for
larger flat areas.
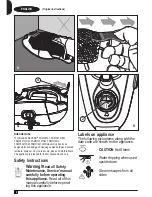
@
Warning!
Always use the SteaMitt
TM
as shown in
figure M, with your hand inside the protective glove.
@
Warning!
Never attempt to use the SteaMitt
TM
by
gripping it externally as shown in figure N.
This will result in scalding.
@
Warning!
Avoid using the SteaMitt
TM
in tight corners
as shown in figure O.
@
Warning!
Should a problem occur during use,
use the quick release tab to quickly remove the
SteaMitt
TM
from your hand as shown in figure P.
@
Warning!
Do not use the SteaMitt
TM
on cold glass,
such as windows as damage may be caused by the
sudden change in temperature.
@
Warning!
Never point or direct the mitt at yourself
or any other person.
Note:
Variable steam dial is disconnected when the
SteaMitt
TM
is fitted and subsequently the flow of steam is
limited.
Use
Important!
This unit will kill 99.9% of bacteria and germs
when used in accordance with the instructions in this manual
and with the micro fibre pads fitted and a continuous run time
of 90 seconds.
Switching on and off
u
To switch the appliance on, press the ON/Off switch (1).
It takes approximately 15 seconds for the steam mop to
heat up.
u
To switch the appliance off, press the ON/Off switch (1).
Note:
always have your hand inside the SteaMitt
TM
before you
press the steam button.
Caution!
Never leave the steam mop in one spot on any
surface for any period of time.
Always place the steam mop with the handle (8) supported in
the upright position when stationary and make sure the steam
mop is turned off when not in use.
Caution!
Always empty the steam mop after use.
Note!
When first filled or after running dry, it can take up to 45
seconds for steam to be produced.
Autoselect
TM
Technology (Fig. R)
This steam mop is fitted with an Autoselect
TM
dial (2) which
shows various cleaning applications. They are used to select
the correct operating mode for your particular cleaning
operation.
Summary of Contents for FSMH1321
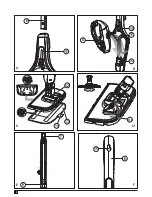
Page 2: ...2 12a 5 10 11 11a C1 8 11 B A 12 13 14 C 7 9 E 15 6 F ...
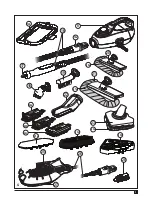
Page 3: ...3 5 16 26 17 19 20 21 22 22a 25 18 27 22b 22c 23 21a 20a 23a 16a 12b 23b 23c 23d 28 G ...
Page 4: ...4 18 17 20 28 19 H 22 22a 22c 22b I 23 23a J ...
Page 5: ...5 N 23 23b 23d 23c K 27 25 25 27 27a 25a L M ...
Page 13: ...13 ENGLISH Original instructions ...
Page 14: ...14 ENGLISH Original instructions ...


