background image

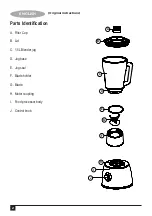
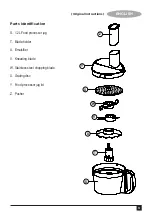
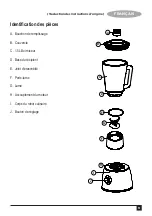
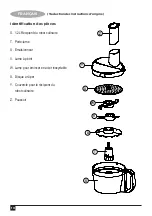
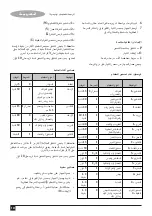
Stainless Steel blade for chopping, beating, 

creaming, crumbling, cutting, folding in, 

mashing, mincing and mixing.
Shredding and Slicing disc for grating and 

shredding vegetables, fruits and cheese. The 

reverse side of this disc is used for cutting 

and slicing vegetables and fruits.
Fanned disc for whisking, whipping and 

emulsifying.
Separate blade for kneading dough.
**  Blender for blending, crushing, foaming, 

grinding, pureeing, homogenizing, 

liquidizing, milling, shaking and stirring.

•  This appliance is intended to be used in 

household and similar applications.

•  This appliance is not intended to be used 

in

•  Staff kitchen areas in shops, offices and 

other working environments;

•  Farm houses;
•  By clients in hotels, motels and other 

residential type environments;

•  Bed and breakfast type environments; or 

any other non-household environments.

After use

•  Remove the plug from the socket before 

leaving the appliance unattended and 

before changing, cleaning or inspecting 

any parts of the appliance.

•  When not in use, the appliance should be 

stored in a dry place. Children should not 

have access to stored appliances.

Inspection and repairs

•  Switch off the appliance before cleaning, 

changing accessories or approaching 

parts which move in use

•  Before use, check the appliance for 

damaged or defective parts. Check for 

breakage of parts, damage to switches 

and any other conditions that may affect 

its operation.

5

ENGLISH

(Original instructions)

•  Do not use the appliance if any part is 

damaged or defective.

•  Do not use the appliance if the blade is 

damaged.

•  Have any damaged or defective parts 

repaired or replaced by an authorised 

repair agent.

•  Before use, check the power supply cord 

for signs of damage, ageing and wear.

•  Do not use the appliance if the power 

supply cord or mains plug is damaged or 

defective.

•  If the power supply cord or mains plug is 

damaged or defective it must be repaired 

by an authorised repair agent in order to 

avoid a hazard. Do not cut the power 

supply cord and do not attempt to repair 

it yourself.

•  Never attempt to remove or replace any 

parts other than those specified in this 

manual.

Mains plug replacement

If a new mains plug needs to be fitted:
•  Safely dispose of the old plug.
•  Connect the brown lead to the live 

terminal of the new plug.

•  Connect the blue lead to the neutral 

terminal.

•  If the product is class I (earthed), connect 

the green/yellow lead to the earth 

terminal.

Warning

! If your product is class II double 

insulated (only 2 wires in the cord set), no 

connection is to be made to the earth 

terminal
•  Follow the fitting instructions supplied 

with good quality plugs

•  Any replacement fuse must be of the 

same rating as the original fuse supplied 

with the product.

Warning

! The above section on mains plug 

replacement is for authorized service centre 

personals.

Summary of Contents for FX400B

Page 1: ...www blackanddecker ae EN FR AR FX400B ...

Page 2: ... C D E G F H I J 2 ENGLISH Original instructions Parts Identification A Filler Cap B Lid C 1 5L Blender jug D Jug base E Jug seal F Blade holder G Blade H Motor coupling I Food processor body J Control knob ...

Page 3: ... Original instructions Parts Identification S 1 2L Food processor jug T Blade holder U Emulsifier V Kneading blade W Stainless steel chopping blade X Grating disc Y Food processor jug lid Z Pusher Z Y X W V U T S ...

Page 4: ... unit from water or excessive humidity If the power supply cord is damaged during use disconnect the appliance from the power supply immediately Do not touch the power supply cord before disconnecting from the power supply Disconnect the appliance from the power supply when not in use before fitting or removing parts and before cleaning Never let the appliance operate unattended Never reach into th...

Page 5: ... Check for breakage of parts damage to switches and any other conditions that may affect its operation 5 ENGLISH Original instructions Do not use the appliance if any part is damaged or defective Do not use the appliance if the blade is damaged Have any damaged or defective parts repaired or replaced by an authorised repair agent Before use check the power supply cord for signs of damage ageing and...

Page 6: ...ulse Operation O Power Off 1 Low Speed 2 High Speed The appliance should be disconnected from the mains supply before removing the jug Recommendations when food processing 1 Use the Chopping blade W 2 Use the kneading blade V 3 Use the grating disc X 4 Use the Emulsifier U Note The The food processor functions should not be run for longer than 1 minute After a continuous run of 1 minute the blender ...

Page 7: ...incer without lid K fitted Maintenance cleaning Switch the appliance off remove the plug from the wall socket and wait until the blade has stopped rotating The appliance is easier to clean if you do so immediately after use Do not use abrasive cleaning agents scourers acetone alcohol etc to clean the appliance All detachable parts are dishwasher safe The recommended temperature for cleaning using a ...

Page 8: ...om the date of purchase BLACK DECKER warranty to replace defective parts repair products subjected to fair wear and tear or replace such products to ensure minimum inconvenience to the customer unless The product has been used for trade professional or hire purposes The product has been subjected to misuse or neglect The product has sustained damage through foreign objects substances or accidents ...

Page 9: ... origine B A C D E G F H I J Identification des pièces A Bouchon de remplissage B Couvercle C 1 5L Bol mixeur D Base du récipient E Joint d étanchéité F Porte lame G Lame H Accouplement du moteur I Corps du robot culinaire J Bouton de réglage ...

Page 10: ...rigine Identification des pièces S 1 2L Récipient du robot culinaire T Porte lame U Emulsionneur V Lame à pétrir W Lame pour émincer en acier inoxydable X Disque à râper Y Couvercle pour le récipient du robot culinaire Z Poussoir Z Y X W V U T S ...

Page 11: ...é de sources de chaleur ou dans un four chaud Ne pas utiliser l appareil à l extérieur Toujours protéger le bloc moteur à l abri des projections d eau ou d une humidité excessive Si le cordon d alimentation est endommagé lors de l utilisation débranchez l appareil immédiatement Ne touchez pas le cordon d alimentation avant d avoir débranché l alimentation électrique Débrancher l appareil de l alim...

Page 12: ...ngé dans un endroit sec Les enfants ne doivent pas avoir accès aux appareils rangés Inspection et réparations Eteindre l appareil avant de le nettoyer de changer les accessoires ou d approcher les pièces en mouvement lors de son fonctionnement Avant l utilisation vérifier que l appareil n a aucune pièce endommagée ou défectueuse Vérifier la présence de pièces cassées d interrupteurs endommagés ou to...

Page 13: ...récipient D 4 Verrouiller le porte lame F en le tournant dans le sens inverse des aiguilles d une montre Utilisation 1 Placer l appareil sur un plan de travail plat et stable 2 Mettre les ingrédients dans le récipient requis 3 Si vous utilisez le robot culinaire enclencher le couvercle Y sur le récipient S en le tournant dans le sens horaire 4 Si vous utilisez le blender pousser le couvercle B et ...

Page 14: ...on électrique appropriée Tournez le bouton de réglage J sur la vitesse souhaitée Fonction Types Vitesse Durée d aliments Couper 1 Légumes et Pulse 15 sec fruits ou 2 Couper 1 Viande fromage 1 20 sec et chocolat Mélanger 1 Soupes et 1 20 sec boissons épaisses Réduire en Légumes 1 10 15 purée 1 cuits et fruits sec tendres Mixer 1 Pâtisserie et 2 40 sec scones Réduire en Pommes de terre 2 60 sec puré...

Page 15: ...es pièces démontables peuvent être nettoyées avec une brossette de nettoyage à l eau tiède et un peu de liquide vaisselle puis rincées sous le robinet Retirer les pièces sales du bloc moteur Nettoyez le bloc moteur avec un chiffon humide Ne plongez jamais le bloc moteur dans l eau et ne le rincez pas sous le robinet Données techniques Protection de l environnement Collecte séparée Les piles et les ...

Page 16: ...niciens ne faisant pas partie du service technique de BLACK DECKER Pour avoir recours à la garantie il est nécessaire de fournir une preuve d achat au vendeur ou à un réparateur agréé Pour connaître l adresse du réparateur agréé le plus proche de chez vous contactez le bureau BLACK DECKER à l adresse indiquée dans ce manuel Vous pourrez aussi trouver une liste des réparateurs agréés de BLACK DECKE...

Page 17: ... ájOÉ dG IOÉYEG hCG ÉgOGOÎ SG øµÁ OGƒe Y äÉjQÉ ÑdGh äÉéàæŸG ƒà á dhC G OGƒŸG Y Ö dG π j É ÉgôjhóJ höû d Ék ah äÉjQÉ ÑdGh á FÉHô µdG äÉéàæŸG æ üJ IOÉYEG Lôoj www 2helpU com Y äÉeƒ ŸG øe ójõŸG ôaƒàJ á ëŸG ɪ dG Ékfɪ V Vô Jh É JÉéàæe IOƒL BLACK DECKER ãJ πLC G πjƒW ƒfÉ dG É ëæÁ àdG bƒ M EG áaÉ VE ÉH ƒµj Gòg ɪ dG É H GƒMC G øe ÉM CÉH É H πîj h Ö Y ÖÑ ùH BLACK DECKER èàæe π N OƒLh ádÉM øeGkô T24 ÓN Ò...

Page 18: ...G π UƒàH ºb áHƒ ŸG áYöùdG ójóëàd J ºµëàdG ìÉàØe ôjhóàH Vh EG ºµëàdG ìÉàØe QOCG øë dG á ªY ɪàcG óæY 0 É jE G âbƒdG áYöùdG ΩÉ dG GƒfCG áØ XƒdG á fÉK 15 2 hCG Ñf cGƒØdG 1 àdG äGhö ÿGh á fÉK 20 1 Í Gh ºë dG 1 àdG áJ ƒcƒ ûdGh á fÉK 20 1 äÉHhöûŸGh AÉ ù G 1 ÿG ΩGƒ dG á Z 10 15 1 á dG äGhö ÿG 1 jQƒH á fÉK ájô dG cGƒØdGh á fÉK 40 2 µdGh äÉjƒ G 1 êõŸG á fÉK 60 2 á ŸG SÉWÉ ÑdG 1 Sô dG ÉØWC G ΩÉ Wh á fÉK 20 ...

Page 19: ...óªà e ùØæH MÓ UEG QÉ ûŸG J ÒZ AGõLCG ájCG GóÑà SG hCG ádGREG Ék e hÉ π dódG Gòg É dEG AÉHô µdG ùHÉb GóÑà SG ójóL FÉHô c ùHÉb Ö côJ Ö J GPEG áæeBG á jô H Ëó dG ùHÉ dG øe ü îJ ójó G ùHÉ dG G ô dÉH æÑdG ùdG π UhCG ójÉëŸG ô dÉH QRC G π UƒàdG S π UhCG ö NC G ùdG π UhCG kÉ VQDƒe 1 áÄØdG èàæŸG Éc GPEG VQC G ô dÉH ôØ UC G ÚàdRÉY Úà Ñ H GkOhõeh 2 áÄØdG øe èàæŸG Éc GPEG ôjò π UƒàdG Ωõ j Óa a ÉæKG ÉaôW πHɵd...

Page 20: ...ÉHô µdG Qó üe øY RÉ G π üaG æàdG πÑbh É dGóÑà SG hCG AGõLC G Ö côJ πÑbh áÑbGôe hO πª j RÉ G óJ πªY AÉæKCG AÉYƒdG iôNCG OGƒe CG hCG HÉ UCG πNóoJ RÉ G ájCG bƒJ ó Hh RÉ G π ûJ É jEG ó H a AÉYƒdG õfG ácôëàe AGõLCG àdG äGôØ T ùª J Gkó H πjƒW ô T hCG á VÉØ a ùHÓe ájCG AÉ HEG Y UôMG ácôëàe AGõLCG ájCG hCG ΩÉ WE G ܃ÑfCG øY AÉæKCGh IOÉ G àdG äGôØ T e πeÉ àdG AÉæKCG Qò G ñƒJ æàdG AÉæKCGh AÉYƒdG jôØJ πFGƒ S...

Page 21: ...ﻌـﺮﺑـﻴـﺔ á ù FôdG äɪ àdG áªLôJ Z Y X W V U T S AGõLC G jô J Îd 1 2 ΩÉ dGö fi AÉYh S IôØ ûdG πeÉM T ꃪŸG Uô dG U øé dG IôØ T V CGó ü d ΩhÉ ŸG P ƒØdG øe J IôØ T W Ö ãŸG Uô dG X ΩÉ dG ö fi AÉYh AÉ Z Y aGódG Z ...

Page 22: ...ﻟـﻌـﺮﺑـﻴـﺔ á ù FôdG äɪ àdG áªLôJ B A C D E G F H I J AGõLC G jô J AπŸG áëàa AÉ Z A AÉ dG B Îd 1 5 ÓÿG AÉYh C AÉYƒdG IóYÉb D AÉYƒdG IOGó S E IôØ ûdG πeÉM F IôØ T G ôëŸG ù H ΩÉ dG ö fi πµ g I ºµëàdG ìÉàØe J ...

Page 23: ...azi Libya P O Box 18182 Salmany ext 103 LIBYA North Africa Trading P O Box 348 7 October 00218061 3383994 nissrine hajj aces com lb El Ghoul Brothers Street 11 Benghazi LIBYA North Africa Trading AlBarniq Dewalt Center 00218021 3606430 nagte ly gmail com El Ghoul Brothers Mokhazin elsukar St ElFallah Tripoli nagte dpt gmail com MAURITIUS The Brandhouse Ltd Rogers Industrial Park 1 Riche 00230 2069...

Page 24: ...B WARRANTY REGISTRATION CARD YOUR NAME VOTRE NOM YOUR ADDRESS VOTRE ADRESSE POSTCODE CODE POSTAL DATE OF PURCHASE JOUR D ACHAT DEALER S NAME ADDRESS NOM ET ADRESSE DU VENDEUR ù ß r F M u Ê d e d b Í U a A d ß r Ë M u Ê U z l ...

Reviews: