12
E N G L I S H
Setting the tool to trimming or edging mode
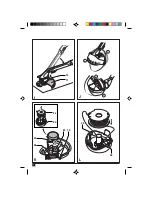
(fig. D, E & F)
The tool can be used in trimming mode as shown
in fig. D or in edging mode to trim overhanging
grass along lawn edges and flower beds as shown
in fig. E.
Trimming mode (fig. D & F)
For trimming, the trimmer head should be in the
position shown in fig. D. If it is not:
◆
Turn the locking ring (7) counterclockwise.
◆
Rotate the trimmer body counterclockwise
until the trimmer head engages in the
trimming position.
◆
Tighten the locking ring by turning it clockwise.
Edging mode (fig. E & F)
For edging, the trimmer head should be in the
position shown in fig. E. If it is not:
◆
Turn the locking ring (7) counterclockwise.
◆
Rotate the trimmer body clockwise until the
trimmer head engages in the edging position.
◆
Tighten the locking ring by turning it clockwise.
GL670/GL670P - Adjusting the position of the
secondary handle (fig. A & G)
The secondary handle can be adjusted to provide
optimum balance and comfort.
◆
Let the guard (11) rest on the ground.
◆
While keeping the handle button (6) depressed,
move the handle (5) into the desired position.
◆
Release the handle button.
GL660/GL660P/GL670/GL670P -
Adjusting the height of the tool (fig. A & H)
This tool has a telescopic body, allowing you to
set it to a comfortable height.
◆
Let the guard (11) rest on the ground.
◆
Turn the locking ring (7) counterclockwise.
◆
Move the switch handle up or down to the
desired height.
◆
Tighten the locking ring by turning it clockwise.
GL670/GL670P -
Adjusting the trimmer head angle (fig. I)
The adjustable trimmer head angle allows you to
set the optimum trimming angle regardless of
your length.
It also allows you to trim under benches and
shrubs.
◆
Let the guard (11) rest on the ground.
◆
Keeping the pedal (10) depressed with your
foot, move the switch handle up or down as
required.
◆
Release the pedal.
Switching on and off (fig. A)
◆
To switch the tool on, push the on/off switch (1).
◆
To switch the tool off, release the the on/off
switch.
Never attempt to lock a switch in the on
position.
Hints for optimum use
Trimming
◆
Hold the tool as shown in fig. D.
◆
Gently swing the trimmer from side to side as
shown in fig. D.
◆
When cutting long grass, work in stages from
the top. Take small cuts.
◆
Keep the tool away from hard objects and
delicate plants.
◆
If the tool starts running slowly, reduce the load.
Edging
Optimum cutting results are achieved on edges
deeper than 50 mm.
◆
Do not use the tool to create edges. To create
edges, use an edging spade.
◆
Guide the tool as shown in fig. E. Keep the
edge guide against the lawn edge.
◆
To make a closer cut, slightly tilt the tool.
General
◆
In order to achieve optimum cutting results,
only cut dry grass.
GL660P/GL670P - Using the plant protector (fig. J)
The plant protector will help you to protect plants
while trimming along lawn edges.
◆
In trimming mode, set the plant protector to
position A.
◆
In edging mode, set the plant protector to
position B or C.
Summary of Contents for GL650
Page 1: ...1 GL650 GL660 GL660P GL670 GL670P ...
Page 3: ...3 A 8 9 10 11 3 2 6 5 7 12 15 14 13 8 4 1 8 9 10 11 5 7 12 14 15 13 8 2 3 1 4 ...
Page 4: ...4 C B D 16 11 20 17 18 20 19 19 ...
Page 5: ...5 F E H G 7 6 5 7 ...
Page 6: ...6 J I K 10 11 D A C B 24 22 12 23 26 21 L 25 25 ...
Page 7: ...7 N M 27 27 27 27 28 O P ...
Page 75: ...75 ...
Page 76: ...76 ...
Page 77: ...77 ...


