5
Chargers
Your charger has been designed for a specific voltage.
Always check that the mains voltage corresponds to the
voltage on the rating plate.
Warning!
Never attempt to replace the charger unit with a
regular mains plug.
Use your Black & Decker charger only to charge the
battery in the appliance/tool with which it was supplied.
Other batteries could burst, causing personal injury and
damage.
Never attempt to charge non-rechargeable batteries.
If the supply cord is damaged, it must be replaced by the
manufacturer or an authorised Black & Decker Service
Centre in order to avoid a hazard.
Do not expose the charger to water.
Do not open the charger.
Do not probe the charger.
The appliance/tool/battery must be placed in a well
ventilated area when charging.
Electrical safety
If the supply cord is damaged, it must be replaced by the
manufacturer or an authorised Black & Decker Service
Centre in order to avoid a hazard.
Warning!
Never attempt to replace the charger unit with a
regular mains plug.
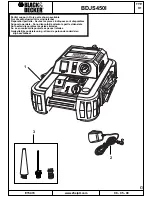
Features
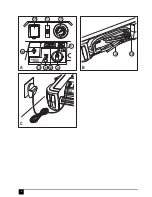
This appliance includes some or all of the following features:
1. Inflator on/off switch
2. Air hose with universal valve adaptor
3. Pressure gauge
4. Heavy-duty copper clamps
5. LED area light on/off switch
6. Reverse polarity indicator
7. Jumper cables
8. Mains charging adaptor
9. ON/OFF switch
10. LED area light
11. Battery status pushbutton
12. Carry handle
13. Battery status LEDs
14. 12 Vdc charging socket
15. Accessory storage
16. Clamp holders
Use
Charging the unit (fig. A)
This unit is shipped in a partially charged state.
Charge the unit before first use using the mains
charging adaptor (8) for 48 hours.
Lead-acid batteries require routine maintenance to ensure a
full charge and a long battery life. All batteries lose energy
from self-discharge over time and more rapidly at higher
temperatures. When the unit is not in use, Black & Decker
recommend that the battery is charged at least every 60
days.
Check the battery charge level by pressing the battery
status pushbutton (11). The LED charge status display
(13) will indicate the level of battery charge. When only
one red LED lights, charge the unit.
Note:
Charging the battery after each use will prolong the
battery life; frequent heavy discharges between charges
and/or overcharging will reduce battery life.
The battery can be charged using the mains charging
adaptor (8).
Charging the unit with the mains charger (fig. C)
Make sure that the ON/OFF switch (9) and the LED area light
(10) are turned off while the unit is being charged.
Insert the jack plug of the charging adaptor (8) into the
charging socket (14).
Insert the charging adaptor (8) into a mains power
socket.
As charging progresses, the red LEDs will light one by one.
Charge the unit until the green FULL LED lights/flashes.
Continue to charge for one to two more hours.
Fail-safe isolating transformer. The mains supply is
electrically separated from the transformer output.
The charger automatically shuts off if the ambient
temperature becomes too high. As a consequence
the charger will be inoperable. The charging base
must be disconnected from the mains supply and
taken to an authorised service centre for repair.
Read all of this instruction manual carefully.
This appliance is intended for indoor use only
Your charger is double insulated; therefore no earth
wire is required. Always check that the mains
voltage corresponds to the voltage on the rating
plate.
130
o
C
Summary of Contents for Jump starter
Page 1: ...3 4 5 10 11 12 13 14 6 15 1 2 7 8 9 UK Ireland Australia New Zealand ...
Page 2: ...2 1 3 9 10 4 16 13 11 15 6 14 ...
Page 10: ...10 ...
Page 11: ...11 ...


