


10
11
3. Insert the gold-colored tip of the 12 volt DC vehicle adapter plug into the vehicle’s 12 volt DC
accessory outlet.
Notes:
Some vehicles require that the ignition be switched to the accessory outlet position in order to power the accessory outlet.
If your vehicle ignition is required to be turned to the ACC position, be sure all the vehicle accessories (i.e. heater, fan, radio,
TV, lights, etc.) are turned off. If not turned off, the maintainer might not be able to maintain the battery.
4. Plug the standard household AC extension cord into a standard 120-volt AC wall outlet.
5. When the unit is properly connected and charging, the charging status LED indicator will flash
green to indicate the battery is charging.
6. When the charging status LED indicator lights solid green, charging is complete.
When disconnecting the charger, unplug and disconnect the extension cord, disconnect the 12 volt DC
charging adapter.
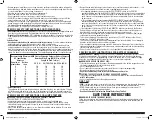
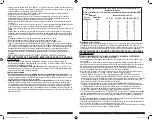
TRoUBlESHooTING
Jump-Starter, 12 Volt DC Power Supply and lED Area light
problem
Solution
Unit will not charge
•
Make sure the Jump Starter power switch is in the off position.
•
Make sure a suitable gage extension cord is properly connected
to both the unit and a functioning AC outlet.
Unit fails to jump-start
•
Make sure unit’s power switch is in the ON position.
•
Check that the unit has a full charge. Recharge unit if necessary.
•
Make sure a proper polarity cable connection has been established.
12 volt DC portable power supply
will not power appliance
•
Make sure the appliance does not draw more than 5 amps.
•
Check that the unit has a full charge. Recharge unit if necessary.
LED Area Light does not come on
•
Make sure the LED Area Light ON/OFF button is in the ON position
•
Check that the unit has a full charge. Recharge unit if necessary.
Battery Charger
problem
Solution
Unit fails to charge the battery
•
Make sure a suitable gage extension cord is properly connected
to both the unit and a functioning AC outlet.
•
Make sure a proper polarity cable connection has been established.
•
If the battery to be charged has fallen below 2 volts, the battery
cannot be recharged with this unit.
CARE AND MAINTENANCE
All batteries lose energy from self-discharge over time and more rapidly at higher temperatures. When
the unit is not in use, we recommend that the battery is charged at least every 30 days.
Never submerge the unit in water. If the unit gets dirty, gently clean the outer surfaces of the unit with a
soft cloth moistened with a mild solution of water and detergent.
There are no user-replaceable parts. Periodically inspect the condition of adapters, connectors and
wires. Contact manufacturer to replace any components that have become worn or broken.
Battery replacement/disposal
BATTERY REPLACEMENT
The battery should last the service life of the unit. Service life is dependent on a number of factors
including but not limited to the number of recharge cycles, and proper care and maintenance of the
battery by the end user. Contact manufacturer for any information you may need.
SAFE BATTERY DISPOSAL
Contains a maintenance-free, sealed, non-spillable, lead acid battery, which must be
disposed of properly. Recycling is required, contact your local authority for information.
Failure to comply with local, state and federal regulations can result in fines, or
imprisonment.
Contact your local waste management authority to dispose of this product.
PLEASE
RECYCLE
block away from battery. Do-not connect clip to carburetor, fuel lines or sheet-metal body parts.
Connect to a heavy gauge metal part of the frame or engine block.
7. Plug the standard household AC extension cord into a standard 120-volt AC wall outlet.
Note:
If the clamps are incorrectly connected with regard to polarity, the charging status LED indicator will light red. Unplug the
charger; then remove the clamps. Reconnect the clamps properly.
8. When the unit is properly connected and charging, the charging status LED indicator will flash
green to indicate the battery is charging.
9. When the charging status LED indicator lights solid green, charging is complete.
When disconnecting the charger, unplug and disconnect the extension cord, remove the clamp from
vehicle chassis, and then remove the clamp from battery terminal.
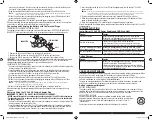
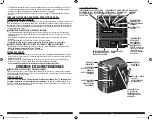
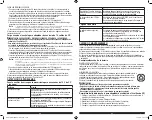
Connecting and Charging the Battery with the Terminal Rings
CONNECTING THE CHARGER WITH TERMINAL RINGS
The charger’s output leads have crimped, color-coded terminal rings (RED-POSITIVE and BLACK-
NEGATIVE). These rings connect directly to the corresponding connectors on the battery posts.
NUt
CONNECtOR
tERmINAL RING
BOLt
1. Remove the nuts from the bolts of the battery post’s connectors.
2. Position the RED terminal on the bolt of the POSITIVE battery post connector.
3. Position the BLACK terminal on the NEGATIVE post connector; then replace the nuts.
ImpORtANt:
If there is any problem connecting the output leads, check with a reputable auto supply
store or contact the Customer Service Department toll-free at 1-877-571-2391 for assistance in
finding an appropriate connection device for your particular application.
CHARGING WITH THE TERMINAL RINGS
1. Connect a standard household AC extension cord (not included) to the built-in AC input plug of the
battery charger at the bottom-left of unit.
2. Insert the double barrel tip of the terminal ring cable into the double barrel charger connector
cable; then insert the remaining double barrel of the charger connector cable into the battery
charger connector outlet. Position it as far away from the battery as possible.
3. Connect the terminal rings as described in the previous section.
4. Plug the standard household AC extension cord into a standard 120-volt AC wall outlet.
5. When the unit is properly connected and charging, the charging status LED indicator will flash
green to indicate the battery is charging.
Note:
If the terminal rings are incorrectly connected with regard to polarity, the charging status LED indicator will light red.
Disconnect the terminal rings, then reconnect them properly.
6. When the charging status LED indicator lights solid green, charging is complete.
When disconnecting the charger, unplug and disconnect the extension cord, disconnect the ring
terminals.
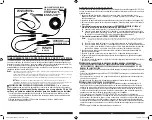
Charging Using the 12 Volt DC Vehicle Adapter Plug
WARNING: tO REDUCE tHE RISK OF INJURY OR pROpERtY DAmAGE:
•
NEVER connect this product to a positive grounded vehicle using the 12 volt DC vehicle adapter plug.
•
to reduce the risk of fire, make sure that the 12 volt outlet is free of debris and the adaptor plug
fits tightly in the outlet.
1. Connect a standard household AC extension cord (not included) to the built-in AC input plug of the
battery charger at the bottom-left of unit.
2. Insert the double barrel tip of the 12 volt DC vehicle adapter plug into the double barrel charger
connector cable; then insert the remaining double barrel of the charger connector cable into the
battery charger connector outlet. Position it as far away from the battery as possible.
J752BCB_ManualENSP_061213.indd 10-11
6/12/2013 3:01:11 PM


