background image

6

E N G L I S H

General

1. Keep work area clean

Cluttered areas and benches
can cause accidents.

2. Consider work area

environment

Do not expose the tool to rain.
Do not use the tool in damp
or wet conditions. Keep the
work area well lit. Do not use
the tool where there is a risk of
causing fire or explosion, e.g.
in the presence of flammable
lixWids and gases.

3. Keep children away

Do not allow children, visitors
or animals to come near the
work area or to touch the tool.

4. Dress properly

Do not wear loose clothing or
jewellery, as these can be
caught in moving parts.
Preferably wear rubber gloves
and non-slip footwear when
working outdoors. Wear
protective hair covering to
keep long hair out of the way.

5. Personal protection

Always use safety glasses.
Use a face or dust mask
whenever the operations may
produce dust or flying
particles. Wear ear protection
whenever the sound level
seems uncomfortable.

6. Do not overreach

Keep proper footing and
balance at all times.

7. Stay alert

Watch what you are doing.
Use common sense. Do not
operate the tool when you
are tired.

8. Secure workpiece

Use clamps or a vice to hold
the workpiece. It is safer and
it frees both hands to operate
the tool.

9. Use appropriate tool

The intended use is described
in this instruction manual.

Do not force small tools or
attachments to do the job of
a heavy-duty tool. The tool
will do the job better and
safer at the rate for which it
was intended. Do not force
the tool.

Warning!

 The use of any

accessory or attachment or
performance of any operation
with this tool other than those
recommended in this
instruction manual may present
a risk of personal injury.

10. Check for damaged parts

Before use, carefully check
the tool for damage. Check
for misalignment and seizure
of moving parts, breakage of
parts, damage to guards and
switches and any other
conditions that may affect its
operation. Ensure that the
tool will operate properly and
perform its intended function.
Do not use the tool if any part
is damaged or defective.
Do not use the tool if the
switch does not turn it on and
off. Have any damaged or
defective parts repaired or
replaced by an authorised
repair agent. Never attempt
any repairs yourself.

11. Avoid unintentional starting

Do not carry the tool with a
finger on the on/off switch.

12. Store idle tools

When not in use, tools and
batteries should be stored in
a dry, locked up or high
place, out of reach of
children.

13. Maintain tools with care

Keep cutting tools sharp and
clean for better and safer
performance. Follow the
instructions for maintenance
and changing accessories.
Keep handles and switches
dry, clean and free from oil
and grease.

Summary of Contents for KC9006

Page 1: ...1 KC9006 ...

Page 2: ...2 Copyright Black Decker ...

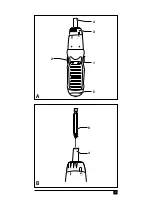
Page 3: ...3 A B 3 1 2 5 4 4 6 ...

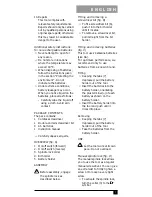
Page 4: ...4 C E D 5 5 7 3 1 2 ...

Page 5: ...T Hong Kong INTENDED USE Your Black Decker screwdriver KC9006 has been designed for inserting and removing screws and nuts using the appropriate accessories This tool is intended for consumer use only SAFETY INSTRUCTIONS Warning symbols The following symbols are used in this manual Denotes risk of personal injury loss of life or damage to the tool in case of non observance of the instructions in t...

Page 6: ...tended use is described in this instruction manual Do not force small tools or attachments to do the job of a heavy duty tool The tool will do the job better and safer at the rate for which it was intended Do not force the tool Warning The use of any accessory or attachment or performance of any operation with this tool other than those recommended in this instruction manual may present a risk of ...

Page 7: ...older 5 Battery holder ASSEMBLY Before assembly engage the spindle lock as described below Fitting and removing a screwdriver bit fig B To fit a screwdriver bit 6 push it into the bit holder until it locates To remove a screwdriver bit pull it straight from the bit holder Fitting and removing batteries fig C This tool uses 4 alkaline batteries size AA For optimum performance we recommend only to u...

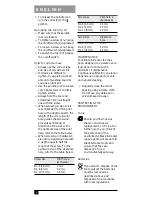
Page 8: ...earance hole with a depth equal to half the length of the screw For the optimum size of the clearance hole refer to the table below Screw size Pilot hole ø softwood No 6 3 5 mm 2 mm No 8 4 mm 3 2 mm No 10 5 mm 3 5 mm Screw size Pilot hole ø hardwood No 6 3 5 mm 2 5 mm No 8 4 mm 3 5 mm No 10 5 mm 4 0 mm Screw size Clearance hole No 6 3 5 mm 4 mm No 8 4 mm 5 0 mm No 10 5 mm 5 7 mm MAINTENANCE Your B...

Page 9: ...ur service staff or authorised repair agents This guarantee is offered as an extra benefit and does not affect your statutory rights AFTER SALES SERVICE UK SOUTH AFRICA AUSTRALIA AND NEW ZEALAND ONLY Black Decker offers a nationwide network of authorised repair agents The use of other than genuine Black Decker parts and accessories may reduce the performance of the tool and cause personal injury a...

Page 10: ...x 09 579 8200 Penrose Auckland New Zealand South Africa Black Decker South Africa Pty Ltd Tel 011 653 1400 Physical address Fax 011 653 1499 146 Lechwe Street Corporate park Randjiesfontein Midrand Postal address Postnet Suite 107 Private Bag X65 Halfway House 1685 United Kingdom Black Decker Tel 01753 511234 210 Bath Road Fax 01753 551155 Slough Berkshire SL1 3YD Helpline 01753 574277 ...

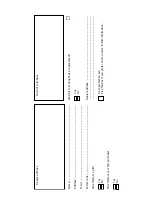
Page 11: ...ent Yes No Dealer address Data protection act Tick the box if you prefer not to receive further information Dealer address Date of purchase Name Address Town Postal code Was this tool a gift Yes No Was this tool your first purchase Yes No ...

Page 12: ...lease complete this section immediately after the purchase of your tool and send it to Black Decker in your country If you live in Australia or New Zealand please register by using the alternative guarantee card supplied ...

Reviews: