8
ENGLISH
Switching on and off
Switching on
u
Keep the lock-off button (2) depressed and press the on/off
switch (1).
u
Release the lock-off button.
Switching off
u
Release the on/off switch.
Planing
u
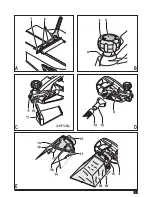
Hold the tool with the nose piece of the shoe resting on
top of the workpiece surface.
u
Switch the tool on.
u
Move the tool steadily forward to perform the cutting stroke.
u
Switch the tool off after the stroke has been completed.
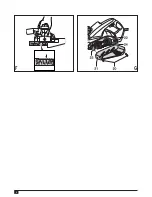
Rebating (fig. F)
u
Fit and adjust the parallel fence.
(KW712KA ONLY)
u
Proceed as for planing.
Chamfering edges
The V-groove in the nose piece of the shoe enables you to
chamfer edges at 45° angles.
u
Hold the tool at an angle with the groove around the edge
of the workpiece and perform the cutting stroke.
Emptying the shavings collection bag
The shavings collection bag should be emptied regularly while
using it.
u
Unzip the bag and empty it before continuing.
Hints for optimum use
u
Move the tool along the grain of the wood.
u
If the grain is cross or curly, or if the workpiece material is
a hard type of wood, adjust the depth of cut to take only
a very thin shaving at each pass and take several passes
to achieve the desired result.
u
To keep the tool in a straight line, press down the front of
the tool at the start, and press down the back of the tool at
the end of the cutting stroke.
Accessories
The performance of your tool depends on the accessory used.
Black & Decker and Piranha accessories are engineered to
high quality standards and designed to enhance the performance
of your tool. By using these accessories you will get the very
best from your tool.
The following types of cutting blades can be obtained from
your local retailer:
- Tungsten carbide tipped reversible cutting blades
(part no. X35007, supplied per pair)
- High-speed steel reversible cutting blades
(part no. X24192-XJ11, supplied per pair)
Maintenance
Your tool has been designed to operate over a long period of
time with a minimum of maintenance. Continuous satisfactory
operation depends upon proper tool care and regular cleaning.
Warning!
Before performing any maintenance, switch off and
unplug the tool.
u
Regularly clean the ventilation slots in your tool using a soft
brush or dry cloth.
u
Regularly clean the motor housing using a damp cloth.
Do not use any abrasive or solvent-based cleaner.
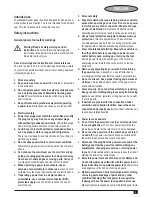
Replacing the drive belt (fig. G)
u
Loosen the screws (20) and remove the cover (21).
u
Remove the old drive belt.
u
Place the new belt (22) over the pulleys. Place the belt
over the large pulley (23) first, then over the small pulley
(24), whilst manually rotating the belt steadily.
u
Put the cover back in place and tighten the screws.
Mains plug replacement (U.K. & Ireland only)
If a new mains plug needs to be fitted:
u
Safely dispose of the old plug.
u
Connect the brown lead to the live terminal in the new plug.
u
Connect the blue lead to the neutral terminal.
Warning!
No connection is to be made to the earth terminal.
Follow the fitting instructions supplied with good quality plugs.
Recommended fuse: 5 A.
Protecting the environment
Separate collection. This product must not be
disposed of with normal household waste.
Should you find one day that your Black & Decker product
needs replacement, or if it is of no further use to you, do not
dispose of it with household waste. Make this product available
for separate collection.
z
Separate collection of used products and packaging
allows materials to be recycled and used again.
Re-use of recycled materials helps prevent
environmental pollution and reduces the demand for
raw materials.
Local regulations may provide for separate collection of
electrical products from the household, at municipal waste
sites or by the retailer when you purchase a new product.
Summary of Contents for KW712
Page 1: ...KW712 KW712KA ...
Page 3: ...3 C E B A D KW712KA ...
Page 4: ...4 F G ...
Page 73: ...73 ...


