background image

6

Food Guide

FOOD

ATTACHMENT

COMMENTS

APPLES

Disc, Slicing Side

Stack 2 quarters horizontally in chute. 
Use moderate pressure.

BANANAS

Disc, Slicing Side

Peel and cut in half; use light pressure.

CABBAGE

Disc, Shredding Side

Cut to fit chute; shred into bowl. Add slaw ingredients 
(mayo, vinegar, salt, etc.)

CARROTS

Disc, Slicing Side

Cut into 4” (10.2 cm) lengths and pack in chute, 

(Sliced, shredded)

alternating thick and thin ends.

Shredding Side

Position in chute & shred.

CELERY, CHOPPED

Chopping Blade

Up to 1 cup cut into 

1

2

” (1.27 cm) lengths. Pulse to 

Chopping Lid

desired texture.

CUCUMBER

Disc, Slicing Side

Cut to fit chute; use light pressure.

CHEESE, PARMESAN

Chopping Blade

Cut into 

1

2

” (1.27 cm) cubes and pulse up to 

1

2

cup 

Chopping Lid

at a time.

CHEESE, CHEDDAR

Disc, Shredding Side

Cut chilled cheese to fit chute/shred.

EGGS (HARD COOKED)

Chopping Blade

Quarter up to 3 eggs and pulse to desired texture. Add 

Chopping Lid

mayo, salt, and seasoning for egg salad.

NUTS, CHOPPED

Chopping Blade

Add up to 1 cup; pulse to desired fineness.

Chopping Lid

ONIONS

Chopping Blade

Quarter or cut large onions into 8 pieces. Add to bowl.  

Chopping Lid

Pulse. For even, coarse results, only chop 2 quarters 
at a time.

BREAD

Chopping Blade

Use up to 2 slices/broken into pieces. Pulse speed.

Chopping Lid

PARSLEY, OTHER

Chopping Blade

Add up to 1 cup; pulse to desired fineness.

HERBS

Chopping Lid

PEPPERONI

Disc, Slicing Side

Cut into 4” (10 cm) lengths. Slice 1 piece at a time 
using firm pressure.

POTATOES

Disc, Shredding Side

Cut to fit chute. After shredding, place in cold water 
to prevent darkening before frying.

SQUASH (SHREDDED)

Disc, Shredding Side

Cut to fit chute; shred, salt and drain. Fries well in 
butter or oil.

Need Help?

For service, repair, or any questions regarding your appliance, call the appropriate
“800” number on the cover of this book. Do NOT return the product to the place of
purchase. Do NOT mail the product back to the manufacturer nor bring it to a service
center. You may also want to consult the website listed on the cover of this manual.

5

Chopping Blade

The Chopping Blade speeds up many everyday tasks and is designed to chop, crumb,
grind, mince and mix quickly.
1. Slip the Bowl over the center Post and twist it toward the Base to be sure the Bowl

locks into place.

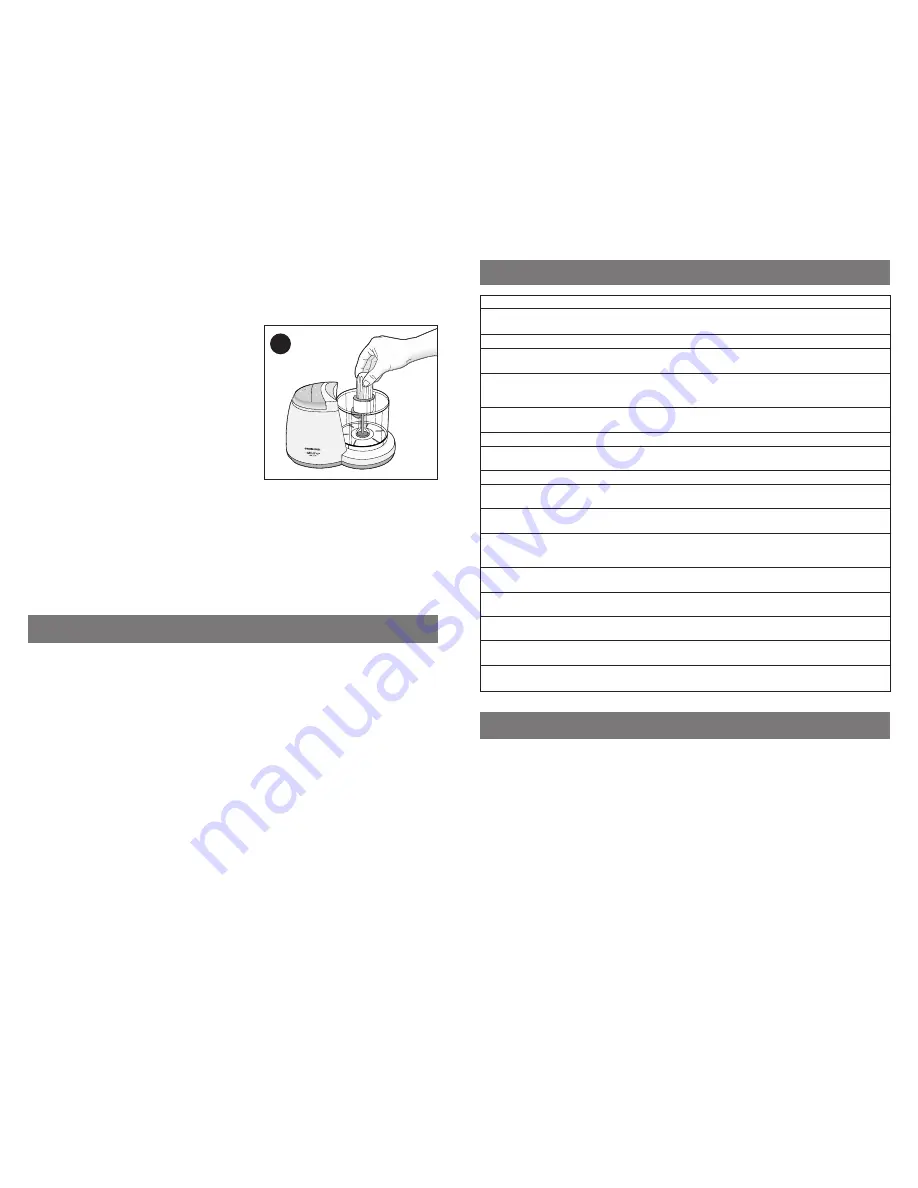
2. Grasp the Chopping Blade by its center hub

and slide it down onto the Post (C).

3. Use the Food Guide to help you prepare food

for chopping/mincing/mixing and crumbing,
then place the food into the Bowl. Place the
Chopping Lid onto the Bowl and twist it toward
the Base until you hear it click into place.

4. Plug the cord into an electrical outlet.
5. Use the continuous On (MFP100), Hi or Low

(MFP200) for longer processing tasks to make
salad dressing, dips, or baby food. Use the
Pulse position for short processing like
chopping nuts or crumbing bread. Hold the
Pulse position for about 2-3 seconds: check results; repeat for desired consistency. 

It

is better to use several short pulses rather than a single long one

unless mixing

ingredients that require longer processing times.

6. After processing food, turn the unit “off” by pressing on the elevated end of the

rocker “lever” so that it will be even with the top of the unit in the “Off” position or
release the Pulse button.  Let the Chopping Blade stop spinning before you twist the
Chopping Lid off.

7. Grasp the Chopping Blade by its hub and remove. Unlock the Bowl by twisting it off

the Base. Empty the processed food.

Care and Cleaning

NOTE:

Do not attempt to sharpen the cutting edges of the Chopping Blade or the

Reversible Slice/Shred Disc. They are permanently sharpened at the factory and will be
ruined by attempted sharpening.

Cleaning

1. Before cleaning, be sure the unit is Off and unplugged.
2. Rinse parts immediately after processing for easy cleanup. Removable parts can be

washed by hand or in a dishwasher, top rack.

If washing by hand, use warm soapy water, rinse, and dry thoroughly. If necessary,
use a small bristle brush to thoroughly clean the Bowl, Cover with Continuous Flow
Chute, Chopping Blade, and Slice/Shred Disc.

In a dishwasher, place removable parts on the top rack only — not in or near the
utensil basket.

3. Wipe the Base with a damp sponge or cloth and dry thoroughly. Remove stubborn

spots with a damp cloth and a mild, non-abrasive cleaner. Do not immerse the Base
in liquid.

4. Do not use rough scouring pads, abrasives, or cleansers on any parts.
5. Do not fill the Bowl with boiling water or place any parts in boiling water. Some foods,

such as carrots, may temporarily stain the Bowl. To remove stains, make a paste of 1
tablespoon baking soda and two tablespoons warm water. Apply the paste to the
stains and rub with a cloth. Rinse in sudsy water and dry.

C

Summary of Contents for MFP200T

Page 1: ...ile processing food to prevent the possibility of severe personal injury or damage to the food processor A scraper may be used but it must be used only when the food processor is not running Blades are sharp Handle carefully Be sure to insert or remove Chopping Blade and Slice Shred Disc by using hubs to avoid injury To avoid injury never place Chopping Blade or Slice Shred Disc on Base without fi...

Page 2: ...he processor and bowl are far enough back on the counter to prevent bits from falling on the floor 7 After processing food turn the unit off by pressing on the elevated end of the rocker lever so that it will be even with the top of the unit in the Off position or release the Pulse button Allow the Disc to stop spinning completely before you remove the Cover with Continuous Flow Chute by turning i...

Page 3: ... locks into place 2 Grasp the Chopping Blade by its center hub and slide it down onto the Post C 3 Use the Food Guide to help you prepare food for chopping mincing mixing and crumbing then place the food into the Bowl Place the Chopping Lid onto the Bowl and twist it toward the Base until you hear it click into place 4 Plug the cord into an electrical outlet 5 Use the continuous On MFP100 Hi or Lo...

Page 4: ...redding Lid with pepper strips Slice peppers directly into pasta Repeat with remaining pepper strips 4 Combine balsamic and white wine vinegar add to pasta mixture along with the pine nuts 5 Stir gently to thoroughly blend ingredients serve at room temperature Makes 14 1 cup servings 7 Recipes Tomato Arugula Salad with Parsley Oregano Vinaigrette Salad Dressing 1 package 10 ounce 296 g arugula 1 3...

Page 5: ...tra el riesgo de un choque eléctrico no coloque la base el cable ni el enchufe en agua ni en ningún otro líquido Se requiere la supervisión de un adulto al usarse cualquier unidad cerca de los niños o por ellos mismos Desconecte la unidad de la toma decorriente cuando no esté en uso cuando le quite o le ponga partes y antes de limpiarla Para desconectarla sujete el enchufe y jálelo de la pared Nun...

Page 6: ...nja o con un paño humedecido y séquela bien Elimine las manchas persistentes humedeciendo un paño con un agente limpiador suave sin abrasivos C Cuidado y limpieza 12 11 Uso del procesador IMPORTANTE Con el fin de protegerle esta unidad cuenta con un sistema de seguro de cierre Al deslizar el recipiente sobre la guía gírelo hacia la base hasta encajar en su lugar Asegúrese de girar la tapa o tapa p...

Page 7: ...formen burbujas 7 Sirva caliente con galletas Da una porción de 2 tazas 4 No use almohadillas de fibras abrasivas ni agentes limpiadores fuertes en ninguna parte de la unidad 5 No llene el recipiente con agua hirviendo ni coloque ninguna de las partes de la unidad en agua hirviendo Algunos alimentos tal como las zanahorias pueden manchar el recipiente Para eliminar las manchas prepare una pasta co...

Page 8: ...e cabra lo largo en tiras de 1 27 cm 1 2 pulgada 2 tazas de hojas de albahaca fresca 2 3 taza de vinagre balsámico 2 dientes de ajo 1 3 taza de vinagre blanco 2 pimientos rojos sin semillas cortados a lo largo en 1 2 taza de piñones tostados tiras de 1 27 cm 1 2 pulgada 1 Prepare la pasta conforme las indicaciones del paquete Escúrrala y pásela a un recipiente grande para mezclarla Agregue el ques...

Page 9: ... soin afin d en prolonger la durée éviter de tirer dessus et de le soumettre à des contraintes près des prises ou des connexions de l appareil Avant la première utilisation Lorsqu on déballe l appareil et qu on enlève les matériaux d emballage manipuler avec soin le couteau et le disque éminceur déchiqueteur ils sont extrêmement tranchants Laver toutes les pièces à l exception du socle NOTE RELATI...

Page 10: ...Ne jamais placer les pièces dans de l eau bouillante Certains aliments comme les carottes peuvent tacher temporairement le bol Pour enlever de telles taches mélanger une cuillère à table de bicarbonate de soude et deux cuillères à table d eau chaude Enduire les taches de ce produit et les frotter à l aide d un chiffon Rincer dans de l eau savonneuse et assécher NOTE Laisser l appareil fonctionner ...

Page 11: ...s ingrédients pour préparer la vinaigrette et traiter jusqu à ce que les herbes soient finement hachées et que le mélange soit homogène 6 Verser sur la salade et mélanger Donne 6 portions de 11 4 t Table d utilisation 21 ALIMENT ACCESSOIRES CONSEILS PRATIQUES NOIX HACHÉES Couteau Traiter un maximum de 240 ml 1 t à la fois à impulsion Couvercle de hachage jusqu à l obtention de la consistance voulu...

Page 12: ...no Para que esta garantía sea válida debe presentar el producto con su recibo de compra y o la tarjeta de registro correspondiente Esta garantía le otorga derechos específicos y usted podría tener otros que pueden variar en su país Si tiene alguna pregunta comuníquese con una sucursal o centro de servicio más cercano autorizado por Black Decker NOTA Usted podrá encontrar partes componentes consumi...

Reviews: