7
BEFORE BREWING
PROGRAMMING YOUR
MILL & BREW
™
COFFEE MAKER
1.
Carefully unpack your coffeemaker, removing all packaging materials, labels,
and/or stickers from your coffeemaker.
2. Clean your coffeemaker thoroughly before using for the first time. Wash
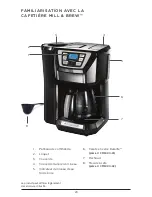
the Glass Carafe, Washable Brew Basket, 2-in-1 Grinder and Permanent Filter
Basket, and Removable Showerhead in warm, soapy water. Rinse and dry, then
place back into your coffeemaker.
3. Clean the inside of your coffeemaker by running two full brewing cycles with
water only, no coffee.
a. Pour fresh, cold water into the water reservoir up to the 12-cup MAX
mark, then place carafe on the warming plate.
b. Plug cord into standard electrical outlet.
c. Press the GRIND button until you reach the symbol to turn the grinder
OFF ( )
d. Push the ON-OFF / Power Button to immediately brew water through
the coffeemaker without adding coffee.
e. Once the cycle is finished, discard water and rinse out the 2-in-1
Grinder and Permanent Filter Basket.
f. Turn off appliance, unplug and allow to cool down for 15 minutes
before repeating.
Setting the Digital Clock
1.
Plug the coffeemaker into a standard electrical outlet.
2. The digital clock display flashes “12:00”.
3. To set the time, press the HR button until the correct hour appears on the
display. The “PM” symbol will appear in the upper right corner of the digital
display for PM time settings.
4. Press the MIN button to select minutes.
Note:
If the unit is unplugged or power interrupted, the time will need to
be reset, as will the Auto Brew delay start time.
Setting the Auto Brew Delay Start
The programmable Auto Brew delay start allows you to set the 24-hour timer
to brew coffee at the selected time, day or night. To activate the Auto Brew
timer, follow the steps on the next page
:
Note:
The first button press illuminates the backlit display and any
subsequent presses will perform the programming.
• Please go to www.prodprotect.com/applica to register your warranty and for information
about replaceable parts.


