background image

9

CARE AND CLEANING

This product contains no user serviceable parts. Refer service to qualified  
service personnel.

1.  Before cleaning, turn off and unplug the appliance.
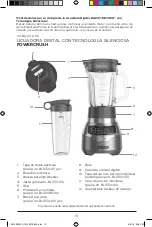
2.  Lift the blending jar by the handle off the base. 
3.  Remove jar base by turning it counterclockwise until loose. 
4.  Remove the blade assembly.

Caution: Blades are sharp. Handle carefully.

5.  Remove lid.
6.  Wash removable parts by hand or in the dishwasher. Place the jar on the 

bottom rack and the rest of the parts on the top rack only.

CLEANING TIPS:

•  For quick cleanup, combine 1 cup hot water and a drop of liquid dish soap  

in the blending jar.

•  Cover and blend on Speed 2 for about 30 seconds.
•  Discard liquid and rinse thoroughly.

Important:

•  Do not place the jar parts in boiling liquids.
•  Do not immerse the base in liquid. Wipe the base with a damp cloth and 

dry thoroughly.

•  Remove stubborn spots by rubbing with a damp cloth and nonabrasive 

cleaner.

Note:

 If liquids spill onto the base, wipe with a damp cloth and dry thoroughly. 

Do not use rough scouring pads or cleansers on parts or finish.
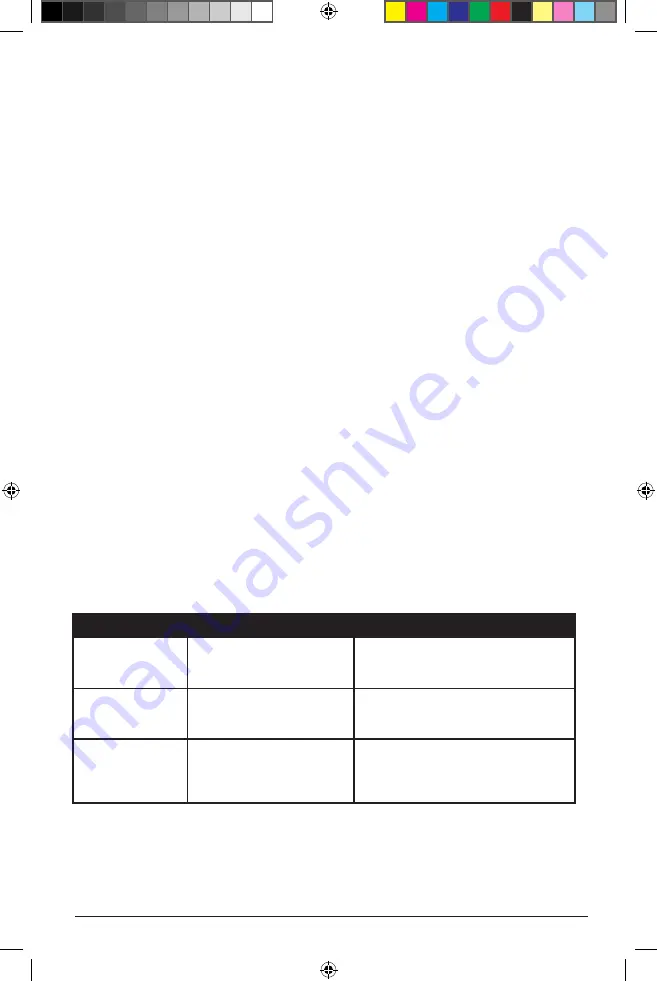
TROUBLESHOOTING

Problem


Possible Cause

Solution

LED blinking 

quickly

Blender overheated or

button held longer

than 30 seconds.

Unit must be reset. Unplug to 

reset. Let unit cool for at least  

20 minutes. 

Blender stops/

goes into

STANDBY mode

Blending time exceeds

2.5 minutes.

Re-select appropriate speed 

setting to start blender.

Blender is 

having difficulty 

blending

Mixture is too thick or 

air bubble has formed 

between mixture & blade.

Turn blender off.  Use rubber spatula 

to scrape down sides of jar and 

redistribute, pushing food towards 

blades. Add more liquid if needed.

BL1300DG-P_IB_22879-002.indd   9

8/8/18   3:48 PM

Summary of Contents for PowerCrush BL1300DG-P

Page 1: ...POWERCRUSH DIGITAL BLENDER WITH QUIET TECHNOLOGY LICUADORA DIGITAL CON TECNOLOGL A SILENCIOSA use and care manual manual de uso y cuidado BL1300DG P BL1300DG P_IB_22879 002 indd 1 8 8 18 3 48 PM ...

Page 2: ...n to the store Si usted tiene alguna inquietud o pregunta con su producto por favor llame a nuestra línea de servicio al cliente una atención inmediata 1 800 465 6070 EE UU Canadá 01 800 714 2503 México No devuela a la tienda Thank you for your purchase Gracias por su compra www prodprotect com blackanddecker BL1300DG P_IB_22879 002 indd 2 8 8 18 3 48 PM ...

Page 3: ...ppliance by a person responsible for their safety Children should be supervised to ensure that they do not play with the appliance Do not place on or near a hot gas or electric burner or in a heated oven Do not operate with damaged blades PLEASE READ AND SAVE THIS USE AND CARE BOOK IMPORTANT SAFEGUARDS When using electrical appliances always follow basic safety precautions to reduce the risk of fi...

Page 4: ...d Part BL1550 03 11 Single serve jar Part BL1550 04 12 Cord storage under base Product may vary slightly from what is illustrated Congratulations on your purchase of the BLACK DECKER PowerCrush Digital Blender with Quiet Technology From delicious smoothies to creamy soups the PowerCrush blender s powerful motor and unique QuadPro blade design work together to ensure superior blending and crushing ...

Page 5: ...wise until tight It is important to tighten to avoid leaking while blending 4 Turn assembled jar right side up 5 Place the dual opening lid on blender jar 6 Uncoil power cord from storage area under the blender base 7 Place the jar assembly on blender base B 8 Blender is now ready for use USING YOUR BLENDER Important Appliance should always have lid in place when in use Caution Do not place blende...

Page 6: ...y after stopping the blender Turn the blender OFF before using a utensil 7 Open the ingredient slot to add ingredients while the blender is running Drop ingredients through the opening C Important Do not remove the lid while the blender is running 8 When finished press ON OFF to stop blending Make sure blades have completely stopped before attempting to remove the blending jar from the base refer ...

Page 7: ...ng before removing jar Important If the jar gets stuck on the blending base or begins to loosen from the jar base follow these steps a Unplug the unit b Turn the jar clockwise to tighten jar onto the jar base 7 Remove the jar base from the single serve jar by turning counterclockwise Then carefully remove blade assembly 8 Place the single serve jar drinking lid on the single serve jar and enjoy yo...

Page 8: ...lending jar Do not overfill the blender the blender is more efficient with less rather than more DO NOT USE BLENDER TO BLEND Large pieces of frozen foods Tough foods such as raw turnips sweet potatoes and potatoes Bones Hard salami pepperoni Boiling liquids cool for 5 minutes before place in blending jar Egg whites Dough Meats SPEED AND FUNCTION CHART Function Food Type Speed Setting 1 Stir Mix Cr...

Page 9: ...oiling liquids Do not immerse the base in liquid Wipe the base with a damp cloth and dry thoroughly Remove stubborn spots by rubbing with a damp cloth and nonabrasive cleaner Note If liquids spill onto the base wipe with a damp cloth and dry thoroughly Do not use rough scouring pads or cleansers on parts or finish TROUBLESHOOTING Problem Possible Cause Solution LED blinking quickly Blender overhea...

Page 10: ...equila 1 6 oz can frozen limeade mix 4 cups ice cubes Place ingredients in blender with liquids first and ice last cover Blend on AUTO setting 1 Serve with lime wedges if desired Makes 6 servings VANILLA MALTED MILKSHAKE 4 large scoops Vanilla Ice cream 1 cup cold milk cup malted milk powder 1 tsp vanilla extract Place ingredients into blender jar in order shown above cover Blend on AUTO setting 3...

Page 11: ...ar replacement product that is either new or factory refurbished How do you get support Save your receipt as proof of date of sale Visit the online service website at www prodprotect com blackanddecker or call toll free 1 800 465 6070 for general warranty service If you need parts or accessories please call 1 800 738 0245 What does my warranty not cover Damage from commercial use Damage from misus...

Page 12: ...rca del uso del aparato por una persona responsable de su seguridad Los niños deben ser supervisados para asegurar que no jueguen con el aparato No coloque sobre ni cerca de una hornilla de gas o eléctrica que esté caliente ni adentro de un horno caliente No opere con cuchillas que estén dañadas ENCHUFE POLARIZADO Este aparato cuenta con un enchufe polarizado un contacto es más ancho que el otro A...

Page 13: ... pieza no BL1550 03 11 Vaso de porción individual pieza no BL1550 04 12 Guardacable debajo de la base El producto puede variar ligeramente del que aparece ilustrado Felicitaciones por su compra de la Licuadora Digital BLACK DECKER con Tecnología Silenciosa Desde batidos deliciosos hasta sopas cremosas el potente motor y el diseño único de la cuchilla QuadPro de la licuadora PowerCrush trabajan en ...

Page 14: ...ara evitar goteos durante el licuado 4 Voltee la jarra ensamblada boca arriba 5 Coloque la tapa de dos aperturas sobre la jarra 6 Desenrolle el cable de alimentación del guardacable debajo de la base de la licuadora 7 Coloque el ensamble de la jarra sobre la base de la licuadora B 8 La licuadora ya está lista para ser utilizada USO DE SU LICUADORA Importante La licuadora siempre debe tener la tapa...

Page 15: ...clar los ingredientes y luego haga funcionar continuamente hasta que los alimentos alcancen la consistencia deseada El soltar el botón de pulso detiene el licuado y la unidad regresa al modo de espera STANDBY Usted puede usar una espátula o un utensilio para mover los ingredientes y la mezclas espesas alrededor del interiror de la jarra pero sólo después de haber detenido el funcionamiento de la l...

Page 16: ...ota Para mejores resultados añada los ingredientes en el orden siguiente a Líquidos b Hielo c Alimentos duros d Alimentos suaves e Polvos 2 Coloque el montaje de cuchillas en la apertura del vaso con las cuchillas hacia abajo 3 Coloque la base del vaso sobre el vaso y gire hacia la derecha hasta que esté ajustada Es importante adjustar la base para prevenir goteos durante el licuado 4 Voltee el va...

Page 17: ... está preparando batidos espesos o licuados de leche No use la función de pulso por más de 10 segundos a la vez Suelte el botón de pulso triturar hielo PULSE Ice Crush regularmente permita que la licuadora descanse por un momento luego continue su funcionamiento No haga funcionar la licuadora por mas de 1 minutos al mismo tiempo No use la licuadora si la jarra está astillada o rajada Sirve de ayud...

Page 18: ...oso Batidos Cremosos Función preprogramada Bebidas Congeladas Margaritas Daiquirís Función preprogramada Mezclar Licuados Mezclar Licuados de leche Función preprogramada CUIDADO Y LIMPIEZA Este producto no contiene piezas que puedan ser reparadas por el consumidor Para servicio acuda a personal de servicio calificado 1 Antes de limpiar apague y desenchufe el aparato 2 Alce la jarra por el asa fuer...

Page 19: ... acabado RESOLUCIÓN DE PROBLEMAS FALLAS PROBLEMA CAUSA POSIBLE SOLUCIÓN Todas las luces LED están parpadeando rápidamente La licuadora se sobrecalentó o el botón se ha mantenido presionado por más de 30 segundos Es necesario reajustar el aparato Desenchúfelo para reajustarlo Deje que el aparato se enfríe por lo menos 20 minutos La licuadora para de funcionar y cambia al modo de espera Tiempo de li...

Page 20: ...lata de mezcla de gaseosa con sabor a lima 4 tazas de cubos de hielo Coloque los ingredientes en la licuadora con los líquidos primero y los cubos de hielo último Licúe en la función AUTO velocidad 1 Sirva con rodajas de lima si lo desea Prepara 6 porciones Batido de Vainilla Malteada 4 bolas grandes de helado de vainilla 1 taza de leche fría taza de polvo de leche malteada 1 cucharadita de extrac...

Page 21: ...bles y accesorios Procedimiento para hacer válida la garantía Acuda al Centro de Servicio Autorizado con el producto con la póliza de Garantía sellada o el comprobante de compra original ahí se reemplazará cualquier pieza o componente defectuoso sin cargo alguno para el usuario final Esta Garantía incluye los gastos de transportación que se deriven de su cumplimiento Excepciones Esta Garantía no s...

Page 22: ...oducto de reemplazo similar que sea nuevo o que ha sido restaurado de fábrica Cómo se puede obtener asistencia Conserve el recibo original de compra Para servicio al cliente y para registrar su garantía visite www prodprotect com blackanddecker o llame al número 1 800 465 6070 para servicio al cliente Por favor llame al número del centro de servicio autorizado 1 800 738 0245 Qué no cubre mi garant...

Page 23: ...2281 3882 2240 9870 El Salvador Sedeblack Calle San Antonio Abad Colonia Lisboa No 2936 San Salvador Depto de San Salvador Tel 503 2284 8374 Guatemala Kinal 17 avenida 26 75 zona 11 Centro comercial Novicentro Local 37 Ciudad Guatemala Tel 502 2476 7367 Honduras Serviteca San Pedro Sula B Los Andes 2 calle entre 11 12 Avenida Honduras Tel 504 2550 1074 México Articulo 123 95 Local 109 y 112 Col Ce...

Page 24: ...mportado y Distribuido por RAYOVAC ARGENTINA S R L Humboldt 2495 Piso 3 C1425FUG C A B A Argentina C U I T NO 30 70706168 1 Importado por Imported by Spectrum Brands de México SA de C V Autopista México Querétaro No 3069 C Oficina 004 Col Centro Industrial Tlalnepantla CP 54030 Tlalnepantla Estado de México Para atención de garantía marque 01 800 714 2503 Importado por Imported by Spectrum Brands ...

Reviews: