background image

EN

G

LI

SH

ENGLISH

MAINTENANCE & CARE

16

14

15

 CAUTION:  Maintenance

DISASSEMBLY

1.  Replacement parts may be available at the store where you purchased 

your faucet.

2.  When replacement parts are not available, please write or call Price Pfister 

Consumer Service.

3. 

Always turn off water and relieve pressure before working on your 

faucet.

 NOTE:  Trim Care

Cleaning Instructions:

For all handles and decorative finishes, use only a soft damp cloth 

to clean and shine.  Use of polish, detergents, abrasive cleaners, 

organic solvents or acid may cause damage.  

Use of other than 

a soft damp cloth will nullify our warranty!


Special Trim:


Trim products which contain porcelain or other similar substance 

are not acceptable for public areas or commercial use.  Installation 

of Said Trim is at Users Risk!

1–800–PFAUCET (1–800–732–8238)

For Toll-Free Pfaucet information call 

1–800–PFAUCET (1–800–732–8238) 

or visit www.pricepfister.com

•   Installation Support

•   Care and Warranty Information

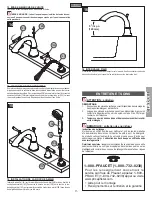
13  UNIT START UP

Turn on hot and cold water supply valves.


CAUTION:  Check all connections for leaks.  Failure to do so can result in 

water damage.

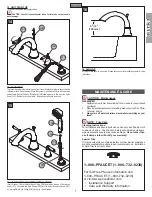
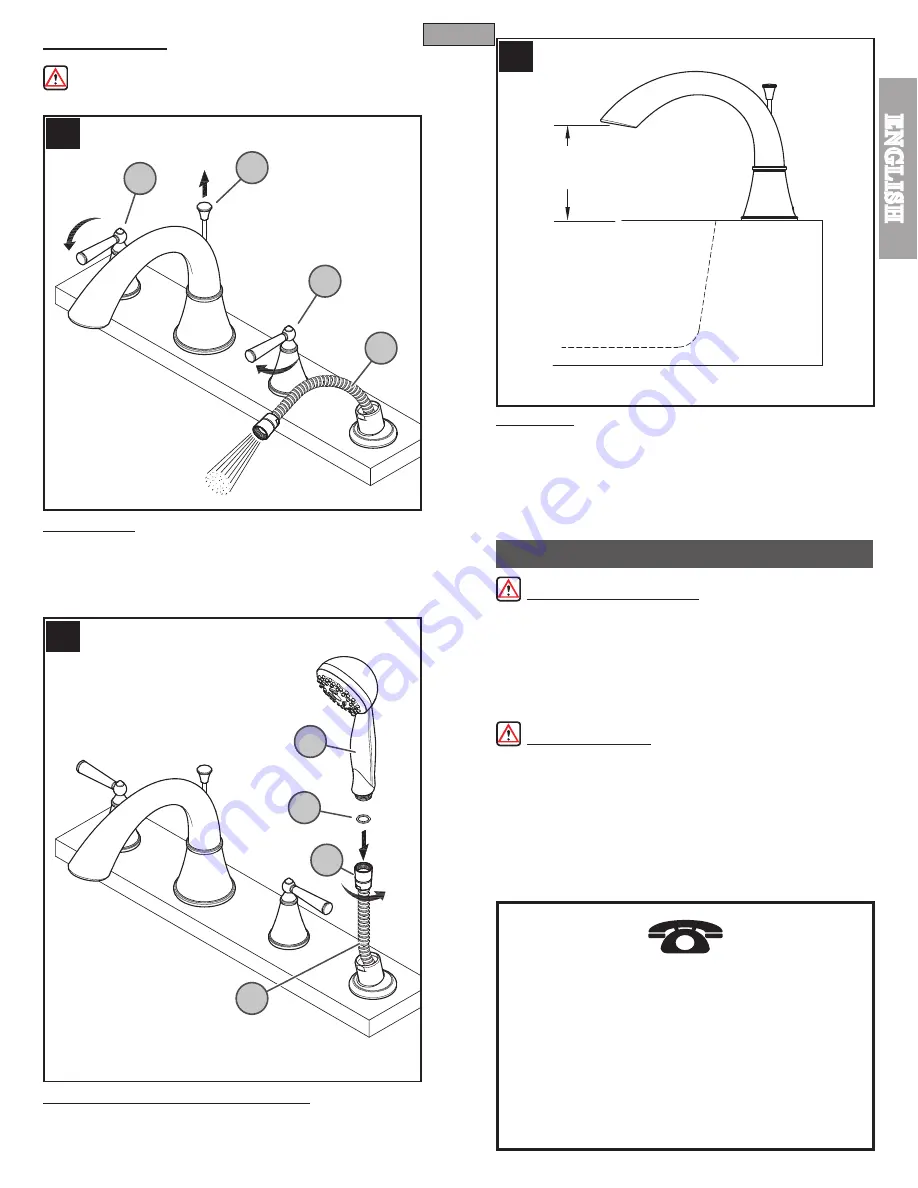
14  FLUSHING

To prevent damage to the internal parts of your faucet from debris that may have collected 

in the water lines, it is necessary to flush the system.  Open Valves (

14A

) to full on position 

and activate Diverter Valve by lifting Knob (

14B

) allowing water to flow from the Spray 

Hose (

14C

).  Run water for one minute.  Repeat in hot and cold positions.

15  HAND HELD SHOWER INSTALLATION

Insert Washer (

15A

) into Metal Hose Fitting (

15B

) located on the end of Decorative 

Hose (

15C

).  Connect Hand Held Shower (

15D

) into the end of Decorative Hose  (

15C

by turning Metal Hose Fitting (

15B

) clockwise.  Hand tighten.

16  AIR GAP

Air Gap for this spout is as shown.  Please consult your local building code for Air Gap 

restrictions.

5

1

/

16

(129 mm)

14A

14B

14A

14C

15D

15A

15B

15C

Summary of Contents for Price Pfister SAXTON RT6 Series

Page 1: ...r a Price Pfister y recibir ayuda o servicio bajo esta garantía el comprador original puede 1 llamar al 1 800 Pfaucet 1 800 732 8238 para hablar con un representante de servicio al cliente que lo pueda ayudar o 2 escribir al departamento de servicio al consumidor c o Price Pfister Inc 19701 DaVinci Lake Forest CA 92610 U S A e incluir una descripción del problema el número del modelo su nombre dir...

Page 2: ... you are replacing an existing faucet remove the faucet from the tub and clean the tub surface thoroughly 3 TOOLS RECOMMENDED PTFE Plumber s Tape or Thread Sealant Phillips Screwdriver Adjustable Wrench Hacksaw Flashlight Cloth Your installation may require new supply lines and or shut off valves or other additional tools 4 IMPORTANT DIMENSIONS Note Price Pfister recommends that all holes be 1 1 4...

Page 3: ...T INSTALLATION Assemble and align Quick Connect Spout 8A onto Diverter Body 8B and tighten Set Screw 8C Place Button 8D 9 KNOB INSTALLATION Place Knob 9A onto Diverter Stem 9B as shown Make sure Knob 9A is securely tighten to Diverter Stem 9B For pressure testing Seal Spray Hose 9D with Plug 9E Supplied with Rough In 0X6 44 Run water and perform pressure test Look for leaks WARNING Pressure testin...

Page 4: ...Washer 12C into Decorative Hose 12D Remove Clip 12E and Plaster Guard 12F from Spray Hose 12G From underneath deck slide Washer 12H and Locknut 12J into Spray Hose 12G as shown Apply PTFE plumber s tape to threaded end of Decorative Hose 12D according to manufacturer s instructions Attach Spray Hose 12G to Decorative Hose 12D Connect Guide Holder 12A onto Hose Guide 12B Insert Hose Guide 12B throu...

Page 5: ...et information call 1 800 PFAUCET 1 800 732 8238 or visit www pricepfister com Installation Support Care and Warranty Information 13 UNIT START UP Turn on hot and cold water supply valves CAUTION Check all connections for leaks Failure to do so can result in water damage 14 FLUSHING To prevent damage to the internal parts of your faucet from debris that may have collected in the water lines it is ...

Page 6: ...dor Phillips Llave Ajustable Sierra Para Metales Linterna Paño Para hacer la instalación podría ser necesario contar con nuevas tuberías de suministro válvulas de cierre o herramientas adicionales 4 DIMENSIONES IMPORTANTES Nota Price Pfister recomienda que todos los orificios tengan 1 1 4 pulg 32 mm de diámetro A Para pared gruesa el grosor de la plataforma debe ser de 1 3 8 pulg 35 mm a 3 pulg 76...

Page 7: ...or de conexión rápida 8A sobre el cuerpo del desviador 8B y apriete el tornillo de ajuste 8C Coloque el botón 8D 9 INSTALACIÓN DE LA PERILLA Coloque la perilla 9A en el vástago del desviador 9B y apriete el tornillo de ajuste 9C como se ilustra Asegúrese de que el tornillo de ajuste 9C esté bien fijado a la perilla 9A Para realizar una prueba de presión Tape la manguera del rociador 9D con el tapó...

Page 8: ...D Retire el clip 12E y la pieza de protección para la pared 12F de la manguera del rociador 12G Por abajo de la plataforma deslice la arandela 12H y la tuerca de retención 12J dentro de la manguera del rociador 12G como se ilustra Aplique cinta de plomería de PTFE al extremo roscado de la manguera decorativa 12D siguiendo las instrucciones del fabricante Fije la manguera del rociador 12G a la mang...

Page 9: ...epfister com Apoyo a instaladores Información sobre cuidado y garantías 13 ARRANQUE DE LA UNIDAD Abra las válvulas de suministro de agua caliente y fría ATENCIÓN Inspeccione todas las conexiones para comprobar que no haya fugas Si no lo hace el agua puede ocasionar daños 14 PURGA Para evitar que la suciedad que puede acumularse en las tuberías dañe las piezas internas de su grifo es necesario purg...

Page 10: ...l est facile de poser ce mitigeur à l aide d un outillage de base et de nos illustrations très claires Pour toute question concernant ce produit appeler le 1 800 Pfaucet 1 800 732 8238 4 DIMENSIONS IMPORTANTES Remarque Price Pfister recommande que les trous aient 1 1 4 po 32 mm de diamètre A Pour paroi épaisse l épaisseur du plateau doit mesurer entre 1 3 8 po 35 mm et 3 po 76 mm au maximum Veuill...

Page 11: ...rapide 8A sur l inverseur 8B et serrez la vis de mise en place 8C Placez le bouton 8D 9 INSTALLATION DU BOUTON Placez le bouton 9A sur la tige de l inverseur 9B et serrez la vis de mise en place 9C tel que montré Assurez vous que la vis de mise en place 9C est vissée solide ment sur le bouton 9A Pour vérifier la pression scellez la conduite du jet 9D avec le bouchon 9E fourni dans la panoplie de q...

Page 12: ...ur la conduite décorative 12D Retirez la pince 12E et le garde de plastic 12F de la conduite du jet 12G À partir d en dessous du plateau glissez la rondelle 12H et le contre écrou 12J sur la conduite du jet 12G tel que montré Appliquez du ruban de plomberie PTFE au bout de la conduite décorative 13A selon les instructions du fabri cant Fixez la conduite du jet 12B à la conduite décorative 12D conn...

Page 13: ...0 732 8238 appel ou visite www pricepfister com Aide pour le montage Rensignements sur l entretien et la garantie 13 MISE EN MARCHE DE L UNITÉ Ouvrez les valves d alimentation en eau chaude et froide MISE EN GARDE faites l inspection pour les fuites de toutes les con nexions Vous pourriez subir des dommages causés par l eau si vous omettez cette procédure 14 VIDANGEAGE DES CONDUITES Pour prévenir ...

Page 14: ...Fini C A Polished Chrome Cromo Pulido Chrome Poli K J PVD Brushed Nickel PVD Niquel Cepillado PVD Nickel Brosse Y Y Tuscan Bronze Bronce Toscano Bronze Le Toscan 931 980 950 110 951 085 951 720 960 117 931 600 950 200 941 669 950 524 910 020 931 054 0X6 44 Supplied Separately Se Suministran por Separado Fournies Séparément 975 026 16 190 970 017C Gray Gris Gris 970 017B Black Negra Noire 940 704 9...

Reviews: