background image

10

11

BAGEL

1. 

Select BAGEL function using function knob.

2.   Use the TEMP knob to select desired toast shade, with 1 being the lightest and 

7 being the darkest.

3.  Turn the TIME knob to select the number of bagel slices being toasted.

4.   Place bagel slices, cut side up, directly on the wire rack in the upper rack 

position. Press the Time knob (START/STOP) to begin toasting. 

5.   There will be 3 audible beeps once the cycle is complete and the oven will stop 

heating.

PIZZA 

1. 

Place wire rack in the lower rack position .

2.   Select the PIZZA function using the function knob. Turning the TEMP knob, 

adjust temperature to desired temperature.

3.  Turning the TIME knob, adjust time to set cook time. 

4.  Press the Time knob (START/STOP) to begin preheating.

5.   The temperature display will blink while the oven is preheating. 

Note:


For best results place baking pan in oven while preheating, then place 

pizza on preheated pan to bake.

6.   Once the oven has preheated, you will hear 2 audible beeps and the timer will 

automatically begin counting down.

7.  Place pizza directly on pan and place in oven.

8.   There will be 3 audible beeps once the baking cycle is complete and the oven 

will stop heating.

9.  Unplug the appliance when not in use. 

BROIL

Note:

 It is not necessary to preheat the oven before broiling.

1. 

Place wire rack or baking pan in the upper rack position .  

2.   Slide the baking pan under the wire rack to catch drippings during broiling. 

3.   Select the BROIL function. The oven will default to 450˚F. NO PREHEAT, and 

CONVECTION are not available on the BROIL setting.

4.  If needed, turn the TIME knob to set cook time.  

5.   Press the Time knob (START/STOP) to begin broiling. 

Note:


For best results when broiling meat, turn over the meat half-way 

through broiling.

6.   There will be 3 audible beeps once the broiling cycle is complete. The oven will 

stop heating.

7.  Unplug the appliance when not in use. 

ROAST

1. 

Place wire rack in the lower rack position .

2.   Select the ROAST function using the function knob. NO PREHEAT, and 

CONVECTION are not available on the ROAST setting.

3.  Turning the TEMP knob, adjust temperature to desired temperature.

4.   Turning the TIME knob, adjust time to set cook time. You may choose STAY ON 

so the oven does not stop cooking until you press Stop. To choose STAY ON, 
turn the time knob counterclockwise past 0 (zero) until you see “ON”.

5.  Press the Time knob (START/STOP) to begin preheating.

6.  The temperature display will blink while the oven is preheating.

7.   Once the oven has preheated, you will hear 2 audible beeps and the time set 

will automatically begin counting down.

8.  Place food (on rack or pan) in the lower rack position.

9.   There will be 3 audible beeps once the baking cycle is complete and the oven 

will stop heating.

10.  Unplug the appliance when not in use.  
 

Note:


When cooking meat, use a meat thermometer to test for doneness by placing 

the thermometer in the thickest part of the meat.

WARM

1. 

 Place wire rack in the upper rack position . 

2.   Select the WARM function using the function knob. .

3.   Turning the TIME knob, adjust time to set cook time. You may choose STAY ON 

so the oven does not stop warming until you press Stop. To choose STAY ON, 
turn the time knob counterclockwise past 0 (zero) until you see “ON”.

4.   Place food on rack or in pan. Press the Time knob to begin warming.

5.   There will be 3 audible beeps once the warming cycle is complete. The oven 

will stop warming. 

6.  Unplug the appliance when not in use.

REHEAT

1. 

 Place wire rack in the upper rack position . 

2.   Select the REHEAT function using the function knob. You are not able to deselect 

NO PREHEAT. If you would like to preheat the oven or reheat without convection, 
please refer to TRADITIONAL BAKE instructions.

3.  Turning the TEMP knob, adjust temperature to recommended temperature.

Summary of Contents for TOD5035SS

Page 1: ...AIR FRY TOASTER OVEN WITH NO PREHEAT HORNO CON FREIDORA DE AIRE SIN PRECALENTAMIENTO use and care manual manual de uso y cuidado TOD5035SS TOD5135SS ...

Page 2: ...t return to the store Si usted tiene alguna inquietud o pregunta con su producto por favor llame a nuestra línea de servicio al cliente una atención inmediata 1 800 465 6070 EE UU Canadá 01 800 714 2503 México No devuela a la tienda Thank you for your purchase Gracias por su compra www prodprotect com blackanddecker www BlackAndDeckerAppliances com ...

Page 3: ...all outlet If not cooking just unplug from wall outlet Do not use appliance for other than intended use Use caution when removing tray or disposing of hot grease Do not clean oven with metal scouring pads Pieces can break off the pad and touch electrical parts causing risk of electric shock Do not attempt to clean the heating elements Oversized foods or metal utensils must not be inserted in a toa...

Page 4: ... extension cord should be at least as great as the electrical rating of the appliance 2 If the appliance is of the grounded type the extension cord should be a grounding type 3 wire cord and 3 The cord should be arranged so that it will not drape over the counter top or tabletop where it can be pulled on by children or tripped over Note If the power cord is damaged please contact the warranty depa...

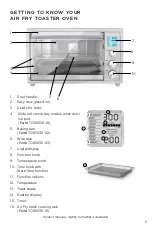
Page 5: ... for racks 4 Slide out crumb tray visible when door is open Part TOD5030 01 5 Baking pan Part TOD5030 02 6 Wire rack Part TOD5030 03 7 Digital display 8 Function knob 9 Temperature knob 10 Time knob with Start Stop function 11 Function options 12 Temperature 13 Toast shade 14 Heating display 15 Timer 16 Air Fry mesh cooking rack Part TOD5035 01 11 12 13 14 15 16 ...

Page 6: ... using the oven for the first time you may notice smoke or a slight odor during the first few minutes This is normal 3 Be sure food or baking pan does not come within 1 1 2 inches 3 8 cm of the upper heating elements 4 Food should not extend beyond the edges of the baking pan to avoid drippings from falling onto the heating elements 5 The heating elements will cycle on and off to maintain even hea...

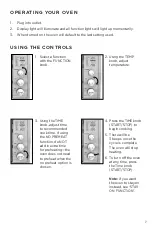
Page 7: ...st temperature 3 Using the TIME knob adjust time to recommended cook time If using the NO PREHEAT function do NOT add in extra time for preheating the oven does not need to preheat when the no preheat option is chosen 4 Press the TIME knob START STOP to begin cooking 5 There will be 3 beeps once the cycle is complete The oven will stop heating 6 To turn off the oven at any time press the Time knob...

Page 8: ...cle is complete and the oven will stop heating 6 Unplug the appliance when not in use BAKE Note During Bake mode the convection fan cycles on and off to circulate air and create optimal heat distribution 1 Place wire rack in the upper rack position or insert pan in the upper rack position 2 Select BAKE function using function knob 3 Turning the TEMP knob adjust temperature to desired temperature 4...

Page 9: ...t time to set cook time You may choose STAY ON so the oven does not stop cooking until you press Stop To choose STAY ON turn the time knob counterclockwise past 0 zero until you see ON 6 Press the Time knob START STOP to begin cooking 7 There will be 3 audible beeps once the baking cycle is complete and the oven will stop heating 8 To turn off the oven at any time press the Time knob START STOP 9 ...

Page 10: ...aking pan in oven while preheating then place pizza on preheated pan to bake 6 Once the oven has preheated you will hear 2 audible beeps and the timer will automatically begin counting down 7 Place pizza directly on pan and place in oven 8 There will be 3 audible beeps once the baking cycle is complete and the oven will stop heating 9 Unplug the appliance when not in use BROIL Note It is not neces...

Page 11: ...l stop heating 10 Unplug the appliance when not in use Note When cooking meat use a meat thermometer to test for doneness by placing the thermometer in the thickest part of the meat WARM 1 Place wire rack in the upper rack position 2 Select the WARM function using the function knob 3 Turning the TIME knob adjust time to set cook time You may choose STAY ON so the oven does not stop warming until y...

Page 12: ... accumulate in oven cavity Do not use aerosol or spray oven cleaners 1 Clean the glass door with a sponge soft cloth or nylon pad and dish soap and warm water Do not use a spray cleaner 2 Remove wire rack air fry mesh cooking rack and bake pan wash in hot water with dish soap To remove stubborn spots use a polyester or nylon pad Note The wire rack and air fry mesh cooking rack are dishwasher safe ...

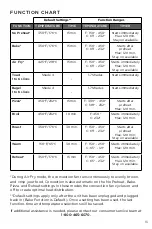
Page 13: ...ely Max 120 min Roast 350 F 176 C 30 min F 150 450 C 65 232 Starts after preheat Max 120 min Stay on available Warm 150 F 65 C 30 min F 150 250 C 65 121 Starts immediately Max 120 min Reheat 350 F 176 C 15 min F 150 450 C 65 232 Starts immediately Max 120 min Stay on available During Air Fry mode the convection fan runs continuously to evenly brown and crisp your food Convection is also automatic ...

Page 14: ...do you get service Save your receipt as proof of date of sale Visit the online service website at www prodprotect com blackanddecker or call toll free 1 800 465 6070 for general warranty service If you need parts or accessories please call 1 800 738 0245 What does your warranty not cover Damage from commercial use Damage from misuse abuse or neglect Products that have been modified in any way Prod...

Page 15: ...32 www BlackAndDeckerAppliances com 26644 T22 5004243 B ...

Reviews: