background image

6

ENGLISH

X

Press and hold the reset button (8) for five seconds and 
release.

X

The display will show 30. This will disappear after 
9 seconds and the counter will start.

X

To check the remaining life of the filter cartridge, press 
the reset button (8) momentarily.

Warning! 

Do not press the reset button continuously as this 

will reset the counter. 

X

Replace the filter cartridge (5) when the display reaches 
0 and starts to flash continuously.

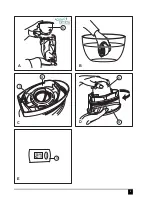
Changing the filter cartridge (fig. A - D)

The optimum life of a filter cartridge is 130 litres, which is 
approximately 4 weeks for a standard family in a hard water 
area.

X

Remove the lid (2).

X

Remove the water tank (4) from the filter jug (6).

X

Turn the filter cartridge (5) anti-clockwise to release it 
from the water tank (4).

X

Discard the filter cartridge (5).

X

If the seal (7) becomes dislodged while removing the 
filter cartridge (5), refit the seal (7) onto the lugs on the 
lower side of the water tank (4).

X

Prepare and insert a new Aqua Optima

TM 

filter 

cartridge (5).

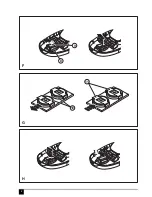
Replacing the batteries (figs. F, G and H)
Warning! 

Use CR1220 batteries only.

X

Remove the lid (2).

X

Turn the lid upside down to get access to the battery 
compartment (8) (fig. F).

X

Carefully remove the battery compartment cover (9) to 
get access to the two batteries.

X

Remove the circuit board complete with batteries from 
the battery compartment (8) (fig. G).

X

Slide the batteries (10) out from the battery clips (11).

X

Insert two replacement  batteries (10) into the battery 
clips (11), make sure to match the (+) positive side of 
the battery is at the top (fig. G).

X

Install the circuit board complete with batteries into the 
battery compartment (8) (fig. H).

X

Fit the battery compartment cover (9), make sure that it  
clicks firmly into place.

X

Replace the lid (2).

Note: 

Make sure that the seal is in position when closing the 

cover (9).

Cleaning and maintenance

The water tank, filter jug, lid and seal should be cleaned 
regularly.

Warning! 

Do not use any washing up liquid or anything that 

may taint the water.

Warning! 

Do not use any harsh or abrasive cleaning agents 

or solvents.

X

Wash all the parts by hand, rinse with clean water and 
dry thoroughly.

Protecting the environment

Should you find one day that your Black & Decker product 
needs replacement, or if it is of no further use to you, do not 
dispose of it with household waste. Make this product 
available for separate collection.

Separate collection of used products and packaging 
allows materials to be recycled and used again. Re-
use of recycled materials helps prevent 
environmental pollution and reduces the demand 
for raw materials. 

Local regulations may provide for separate collection of 
electrical products from the household, at municipal waste 
sites or by the retailer when you purchase a new product.
Black & Decker provides a facility for the collection and 
recycling of Black & Decker products once they have 
reached the end of their working life. To take advantage of 
this service please return your product to any authorised 
repair agent who will collect them on our behalf.
You can check the location of your nearest authorised repair 
agent by contacting your local Black & Decker office at the 
address indicated in this manual. Alternatively, a list of 
authorised Black & Decker repair agents and full details of 
our after-sales service and contacts are available on the 
Internet at: 

www.2helpU.com.

Batteries

X

Place the batteries in suitable packaging to ensure that 
the terminals cannot be short-circuited. 

X

Take the batteries to a local recycling station.

Separate collection. This product must not be 
disposed of with normal household waste.

At the end of their useful life, discard batteries with 
due care for our environment.:


Summary of Contents for wjd225

Page 1: ...500m l 1000m l M AX ENGLISH 5 ITALIANO 8 ΕΛΛΗΝΙΚΑ 11 ...

Page 2: ...2 500m l 1000m l M AX 4 1 5 6 3 2 ...

Page 3: ...3 B A D C E 5 4 5 7 4 3 RESET ...

Page 4: ...4 H F G 8 10 11 9 ...

Page 5: ...d lifting it from the filter jug X Take the water tank 4 and the filter cartridge 5 out of the filter jug 6 and remove any packaging X Clean the filter jug 6 with cold fresh water Assembly Preparing the water filter cartridge fig A and B X Prepare the filter cartridge 5 by carefully following all the instructions on the packaging X Remove the cartridge 5 from the packaging fig A Note There may be ...

Page 6: ...te Make sure that the seal is in position when closing the cover 9 Cleaning and maintenance The water tank filter jug lid and seal should be cleaned regularly Warning Do not use any washing up liquid or anything that may taint the water Warning Do not use any harsh or abrasive cleaning agents or solvents X Wash all the parts by hand rinse with clean water and dry thoroughly Protecting the environm...

Page 7: ...cts to make sure of the minimum inconvenience to the customer unless X The product has been used for trade professional or hire purposes X The product has been subjected to misuse or neglect X The product has sustained damage through foreign objects substances or accidents X Repairs have been attempted by persons other than authorised repair agents or Black Decker service staff To claim on the gua...

Page 8: ...erchio 3 Indicatore durata cartuccia 4 Serbatoio acqua 5 Cartuccia filtrante Aqua OptimaTM 6 Caraffa filtrante 7 Guarnizione Disimballaggio X Togliere tutto il materiale d imballo dalla caraffa filtrante X Togliere il coperchio afferrandone i lati 2 e sollevandolo dalla caraffa filtrante X Estrarre il serbatoio dell acqua 4 e la cartuccia filtrante 5 dalla caraffa filtrante 6 ed eliminare ogni imb...

Page 9: ...l rispettivo vano 8 fig G X Sfilare le batterie 10 dai rispettivi fermi 11 X Inserire le due batterie di ricambio 10 nei rispettivi fermi 11 verificando di abbinare il lato positivo della batteria che si trova in alto fig G X Montare la scheda di circuito con le due batterie nel rispettivo vano 8 fig H X Montare il coperchio della batteria 9 facendo attenzione che si agganci saldamente in sede X R...

Page 10: ...stituzione in modo da ridurre al minimo il disagio del cliente a meno che X Il prodotto non sia stato destinato ad usi commerciali professionali o al noleggio X Il prodotto non sia stato usato in modo improprio o scorretto X Il prodotto non abbia subito danni causati da oggetti o sostanze estranee oppure incidenti X Il prodotto non abbia subito tentativi di riparazione non effettuati da tecnici au...

Page 11: ... είκτης διάρκειας ζωής στοιχείου 4 εξαµενή νερού 5 Στοιχείο φίλτρου Aqua OptimaTM 6 Κανάτα φίλτρου 7 Στεγανοποίηση Αποσυσκευασία X Αποµακρύνετε όλα τα υλικά συσκευασίας από την κανάτα φίλτρου X Βγάλτε το καπάκι πιάνοντας τα πλαϊνά του 2 και σηκώνοντάς το από την κανάτα φίλτρου X Βγάλτε τη δεξαµενή νερού 4 και το στοιχείο φίλτρου 5 από την κανάτα φίλτρου 6 και αφαιρέστε υλικά συσκευασίας που τυχόν ...

Page 12: ...όσβαση στο κάλυµµα της υποδοχής µπαταριών 8 εικ F X Αφαιρέστε προσεκτικά το κάλυµµα υποδοχής µπαταριών 9 για να έχετε πρόσβαση στις δύο µπαταρίες X Αφαιρέστε την πλακέτα κυκλώµατος µαζί µε τις µπαταρίες από την υποδοχή των µπαταριών 8 εικ G X Σπρώξτε τις µπαταρίες 10 να βγουν από τα κλιπ τους 11 X Τοποθετήστε δύο ανταλλακτικές µπαταρίες 10 στα κλιπ µπαταριών 11 βεβαιωθείτε ότι ταιριάζετε το θετικό...

Page 13: ...της Black Decker παρουσιάσει βλάβη εξαιτίας ελαττωµατικών υλικών ποιότητας εργασίας ή έλλειψης συµφωνίας µε τις προδιαγραφές εντός 24 µηνών από την ηµεροµηνία αγοράς η Black Decker εγγυάται την αντικατάσταση των ελαττωµατικών τµηµάτων την επισκευή προϊόντων που έχουν υποστεί εύλογη φθορά λόγω χρήσης ή την αντικατάσταση των προϊόντων προκειµένου να εξασφαλίσει την ελάχιστη ενόχληση στους πελάτες τη...

Page 14: ...14 ...

Page 15: ...ODFN HFNHU 7HO DWK 5RDG D 6ORXJK HUNVKLUH 6 HOSOLQH WDOLD ODFN HFNHU WDOLD 6S 7HO 9LDOH OYH LD D 0RQ D 0 1XPHUR YHUGH ǽȝȝȑİį ODFN HFNHU ǼȜȜȐȢ ǹ ȉȘȜ ȈIJȡȐȕȦȞȠȢ ȁİȦij ǺȠȣȜȚĮȖȝȑȞȘȢ ĭĮȟ ȽȜȣijȐįĮ ǹșȒȞĮ ZZZ EODFNDQGGHFNHU HX ...

Page 16: ... www blackanddecker it productregistration Registrate il prodotto online su www blackanddecker it productregistration o inviate nome cognome e codice del prodotto al centro Black Decker del vostro paese ȃșȟ ȠıȥȑIJıijı ȟį ȜįijįȥȧȢȔIJıijı ijȡ ʍȢȡȨȪȟ IJįȣ www blackanddecker gr productregistration ȀĮIJĮȤȦȡȓıIJİ IJȠ ʌȡȠȧȩȞ ıĮȢ ıİ ıȪȞįİıȘ ıIJȘ ıİȜȓįĮ www blackanddecker gr productregistration Ȓ ıIJİȓȜIJİ IJȠ ȩȞȠȝĮ İʌȓ...

Reviews: