background image

724-746-5500   |   blackbox.com 

Page 8

Chapter 3: Installation

3. Installation
3.1 Operating Environment

• Make sure the cart and timer are located in a dry area. Moisture might damage the unit.

•  Install the timer using mounting points on timer’s cover to the selected mounting surface by using #6-32 screws and nuts (not included with 

the timer).

•  Install the timer in an environment that does not exceed the operating temperature and humidity requirements for safe operation.

• Make sure proper airflow is present, so that the timer can operate safely.

• Mount the timer in a position that prevents uneven mechanical loading, which could cause the cart to tip over.

•  Connect the iPads, Chromebooks, tablets, and/or laptops to the supply circuit so that the electrical circuits and supply wiring are not  

overloaded. Consider nameplate ratings when deciding how to install the cart and timer.

• Maintain reliable equipment grounding.

3.2 Electrical Connections

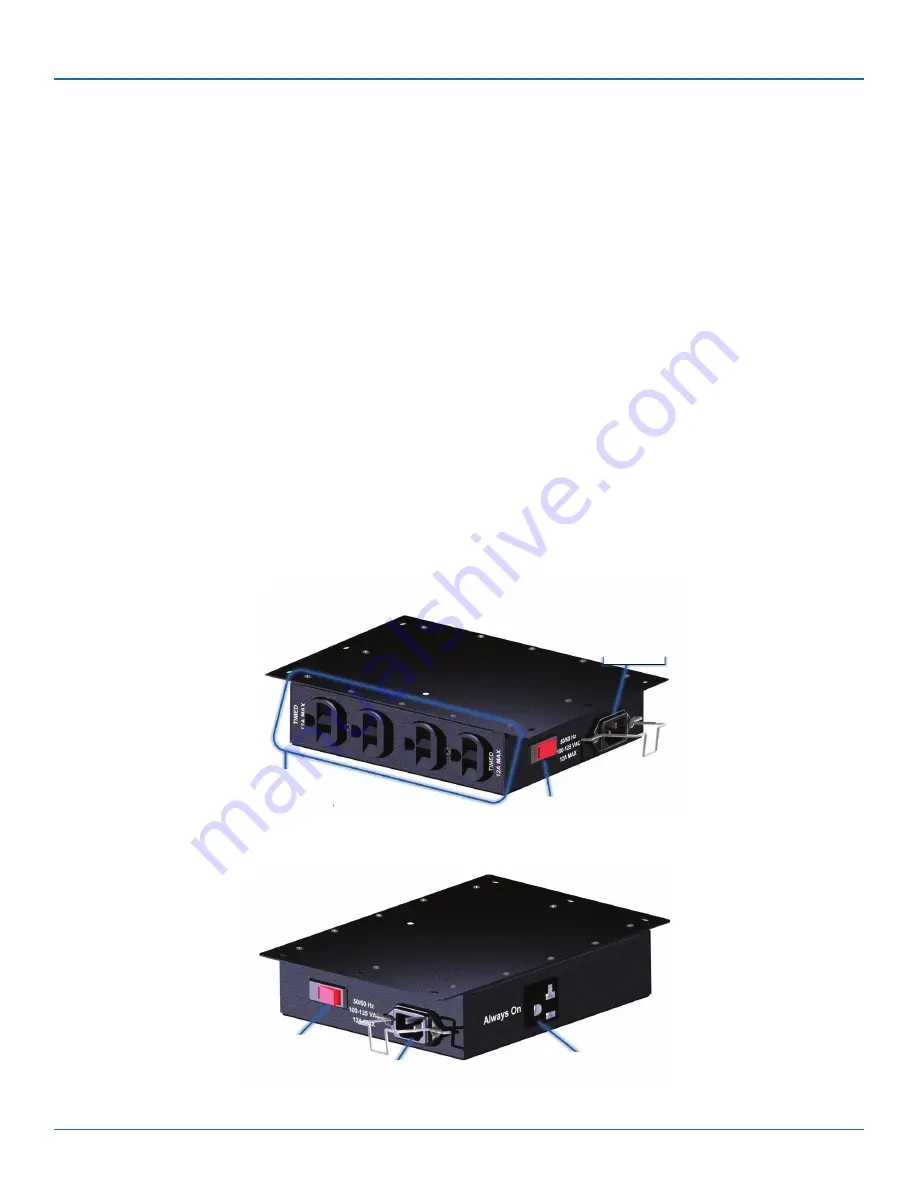
• Press the circuit breaker rocker switch to the “off” position, as shown in Figure 1.

•  Connect the iPads, Chromebooks, tablets, and/or laptops to AC outputs, as shown in Figures 1 and 2. Continuous current draw for all  

connected units must not exceed the input current rating.

CAUTION:

• The power source for the cart must be properly grounded.

• Connect the timer to a source rated at equal to or greater than the timer’s maximum input current rating.

• Total current draw through the timer must not exceed the timer’s maximum load current rating.

12 A timed outlets

Circuit protection

Power input 

receptacle

Figure 1. Front view of the timer.

Always-ON outlet

Circuit breaker 

switch

Power input 

receptacle

Figure 2. Side view of the timer.

Summary of Contents for CARTTIMER1

Page 1: ...nd Laptop Cart CARTTIMER1 Order toll free in the U S Call 877 877 BBOX outside U S call 724 746 5500 FREE technical support 24 hours a day 7 days a week Call 724 746 5500 or fax 724 746 0746 Mailing a...

Page 2: ...d read this manual to become familiar with the installation precautions Black Box Corporation cannot be held liable for any damage to persons or property if the safety information in the installation...

Page 3: ...en the equipment is operated in a commercial environment Operation of this equipment in a residential area is likely to cause interference in which case the user at his own expense will be required to...

Page 4: ...n el flujo de aire por los orificios de ventilaci n 10 El equipo el ctrico deber ser situado fuera del alcance de fuentes de calor como radiadores registros de calor estufas u otros aparatos incluyend...

Page 5: ...Safety Information 2 FCC and IC RFI Information 3 NOM Statement 4 1 Specifications 6 2 Overview 7 2 1 Description 7 2 2 Features 7 2 3 What s Included 7 3 Installation 8 3 1 Operating Environment 8 3...

Page 6: ...15R duplex receptacles timed to alternate power between outputs every 15 minutes 1 non timed receptacle Power Input 100 125 VAC 60 Hz 12 A max Output 12 A max per outlet 12 A max per timer NOTE All ou...

Page 7: ...thermal circuit breaker protects the attached loads from overcurrent The timer complies with UL 60950 requirements 2 2 Features Alternates power between four receptacles every 15 minutes via a 15 A t...

Page 8: ...hat the electrical circuits and supply wiring are not overloaded Consider nameplate ratings when deciding how to install the cart and timer Maintain reliable equipment grounding 3 2 Electrical Connect...

Page 9: ...e will be able to provide more efficient and accurate assistance if you have a complete description including the nature and duration of the problem when the problem occurs the components involved in...

Page 10: ...724 746 5500 blackbox com Page 10 NOTES...

Page 11: ...724 746 5500 blackbox com Page 11 NOTES...

Page 12: ...24 7 Tech support available in 60 seconds or less Copyright 2014 Black Box Corporation All rights reserved Black Box and the Double Diamond logo are registered trademarks of BB Technologies Inc Any t...

Reviews: