background image

CUSTOMER

SUPPORT

INFORMATION

Order 

toll-free

in the U.S.: Call 

877-877-BBOX

(outside U.S. call 

724-746-5500

)

FREE technical support 24 hours a day, 7 days a week: Call 

724-746-5500

or fax 

724-746-0746

Mailing address: 

Black Box Corporation

, 1000 Park Drive, Lawrence, PA 15055-1018

Web site: 

www.blackbox.com

•   E-mail: 

info@blackbox.com

DECEMBER 1993

LR5000A

RISC Router Expandable

POWER

RISC Router/2B

FAUL

T

WAN

LAN 1

LAN 2

RISC ROUTER EXP

ANDABLE

PORT

ACTIVITY

8

7

6

5

4

3

2

1

FAUL

T

PWR ON

Summary of Contents for LR5000A

Page 1: ... day 7 days a week Call 724 746 5500 or fax 724 746 0746 Mailing address Black Box Corporation 1000 Park Drive Lawrence PA 15055 1018 Web site www blackbox com E mail info blackbox com DECEMBER 1993 LR5000A RISC Router Expandable POWER RISC Router 2B FAULT WAN LAN 1 LAN 2 RISC ROUTER EXPANDABLE PORT ACTIVITY 8 7 6 5 4 3 2 1 FAULT PWR ON ...

Page 2: ......

Page 3: ...the interference Changes or modifications not expressly approved by the party responsible for compliance could void the user s authority to operate the equipment This digital apparatus does not exceed the Class A limits for radio noise emission from digital apparatus set out in the Radio Interference Regulation of Industry Canada Le présent appareil numérique n émet pas de bruits radioélectriques ...

Page 4: ... Table Mounting 14 3 3 Network Cables 14 3 3 1 DTE AUI Interface 14 3 3 2 Thin Net BNC Interface 15 3 3 3 RS 232 Interface 16 3 3 4 RS 449 Interface 16 3 4 Network Installation 17 3 4 1 Connecting an RS 232 Terminal to the Control Port 17 3 4 2 DTE AUI Connection 18 3 4 3 BNC Connection 18 3 4 4 MAU Connection 19 3 4 5 Wide Area Network Connection 20 3 5 AC Connection 23 4 0 UPGRADES 24 4 1 PROM C...

Page 5: ...UI Female DB15 Thin Ethernet BNC barrel connector MAU Male DB15 WAN Interface 2 RS 449 Serial ports configured as EIA 530 V 35 or RS 232 Control Port Interface RS 232 local modem connection Max Filtering Rate 90 000 packets per second 64 byte packets Max Forwarding Rate 56 000 packets per second 64 byte packets Power 90 to 132 or 175 to 264 VAC 47 to 440 Hz Size 5 3 H x 17 5 W x 14 D 13 5 x 44 5 x...

Page 6: ...hree interfaces A Media Access Unit MAU interface a standard 15 pin male connector You can connect a workstation directly to this interface A ThinNet BNC interface a standard Thin Ethernet connection A Data Terminal Equipment DTE interface a standard 15 pin female connector for a transceiver NOTE IEEE 802 3 and Ethernet v 2 are identified as simply Ethernet in this text The RISC Router Expandable ...

Page 7: ...r switch The RISC Router Expandable operates on 90 132 175 264 VAC 47 440 Hz and meets all regulatory power safety requirements The Network Control program is the user interface to the RISC Router Expandable and provides the software tools for the internetworking platform Depending on the hardware and software configuration of the RISC Router Expandable Network Control provides the following TCP I...

Page 8: ...e ports of the RISC Router Expandable Each port has a corresponding LED that lights when that port is active The ports are shown from 1 through 8 2 FAULT LED The FAULT LED amber indicates a software problem The software triggers a hardware timer once a second If it fails to do so the FAULT LED lights 3 PWR OK LED The PWR OK LED is green when the unit is ON Figure 2 1 Front Panel of the RISC Router...

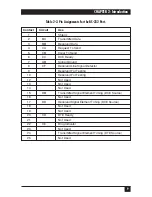
Page 9: ...er once a second If it fails to do so the FAULT LED lights This LED is the same as the FAULT LED on the front of the RISC Router Expandable 5 Wide Area Network WAN Port s The two WAN ports provide remote transparent bridging Each WAN port has a male DB37 connector You can jumper the signaling on the two ports to meet either RS 423 RS 232 RS 422 or V 35 The signal definitions for the EIA 530 specif...

Page 10: ...0 E Terminal Ready A 13 8 8 F Receiver Ready A 14 21 Remote Loopback 15 22 Incoming Call 16 23 Select Frequency 17 24 24 U Terminal Timing A 18 25 Test Mode 19 7 7 B Signal Ground 20 7 B Receive Ground 21 Spare 22 14 S Send Data B 23 12 AA Send Timing B 24 16 T Receive Data B 25 19 Request To Send B 26 9 X Receive Timing B 27 13 Clear To Send B 28 25 Terminal Service 29 22 Data Set Ready 30 23 Ter...

Page 11: ...dy 7 AB Signal Ground 8 CF Received Line Signal Detector 9 Reserved For Testing 10 Reserved For Testing 12 Not Used 13 Not Used 14 Not Used 15 DB Transmitted Signal Element Timing DCE Source 16 Not Used 17 DD Received Signal Element Timing DCE Source 18 Not Used 19 Not Used 20 CD DTE Ready 21 Not Used 22 CE Ring Indicator 23 Not Used 24 Transmitted Signal Element Timing DTE Source 25 Not Used ...

Page 12: ...nd are listed in the Table 2 3 2 BNC Thin Net Interface The BNC connector is an IEEE 802 3 Ethernet specification connector used for Thin Ethernet LAN connection This connector has built in transceiver circuitry and provides a direct connection to a ThinNet network 3 Terminator Switch This switch terminates the Ethernet connection In the ON position the BNC connection is terminated The switch is O...

Page 13: ...n 11 DO S Data Out Circuit Shield Out In 5 DI A Data In Circuit A In Out 12 DI B Data In Circuit B In Out 4 DI S Data In Circuit Shield In Out 8 CO S Control Out Circuit Shield 2 CI A Control In Circuit A In Out 9 CI B Control In Circuit B In Out 1 CI S Control In Circuit Shield In Out 6 VC Voltage Common Out In 13 VP Voltage Plus Out In 14 VS Voltage Shield Out In Shell PG Protective Ground Condu...

Page 14: ...s are not provided with the RISC Router Expandable 3 1 Unpacking Instructions Your RISC Router Expandable Package includes the following RISC Router Expandable AC Power Cord Manual Follow these steps to unpack the RISC Router Expandable 1 Remove the foam insert from the RISC Router Expandable carton Set it aside and save it 2 Remove the RISC Router Expandable and place it on a clean flat surface 3...

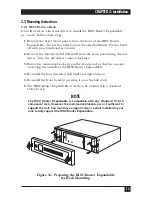
Page 15: ...ockwise 3 Rotate the mounting bracket from the front panel so that the cut outs are facing the outside of the RISC Router Expandable 4 Re install the four threaded ball studs and tighten them 5 Re install the front bezel by pressing it onto the ball studs 6 The RISC Router Expandable is ready to be mounted in a standard 19 inch rack NOTE The RISC Router Expandable is compatible with any standard 1...

Page 16: ... Do not use an extension cord 3 3 Network Cables This section describes the network cables that connect to the RISC Router Expandable interfaces 3 3 1 DTE AUI INTERFACE The male connector and cable shown in Figure 3 2 connects to the female DTE interface of the RISC Router Expandable This connector is identified by the two round posts that secure the connector The cable must conform to the IEEE 80...

Page 17: ...AUI electrical and hardware specification See Table 2 3 for the pin assignments 3 3 2 THINNET BNC INTERFACE The ThinNet connector and cable shown in Figure 3 4 connects to the ThinNet interface on the RISC Router Expandable The connector is the male end and is identified by the rotating lock mechanism The connector and cable must conform to the IEEE 802 3 10BASE 2 specification Figure 3 3 MAU Inte...

Page 18: ...ork port on the RISC Router Expandable is configured to support RS 449 communications The RS 449 WAN connector and cable shown in Figure 3 6 connects to the RS 449 WAN connector on the RISC Router Expandable This connector has a spring clip on each side that must be pinched for the two connectors to attach This port can be configured to support RS 232 EIA 530 and V 35 communications See Table 2 1 ...

Page 19: ... THE CONTROL PORT To view the network management software of the RISC Router Expandable you must attach a VT100 compatible ASCII terminal to the RS 232 port The software provides the user interface to all the configurable parameters of the RISC Router Expandable Set your terminal to match the following RS 232 interface defaults 9600 baud one stop bit no parity 1 Locate theRS 232 interface on the l...

Page 20: ...thernet connector The BNC interface has a built in terminator The terminator switch terminates the BNC segment 1 Attach a male BNC connector to the female BNC interface on the RISC Router Expandable 2 Twist the locking barrel on the male connector clockwise to secure the connection to the interface 3 Locate the terminator on the RISC Bridge E Expansion Card It is located directly below the BNC int...

Page 21: ...Expansion Card see Figure 3 8 This interface is a 10BASE5 connector that has a built in transceiver for a direct connect to a workstation 1 Attach a female AUI connector to th MAU interface on the RISC Router Expandable 2 Slide the locking clip on the AUI connector to secure the connection RS 232 Interface BNC Interface BNC Terminator ...

Page 22: ...IA 530 or V 35 Each interace has jumper settings for the interface type Follow these steps 1 Remove the cover of the RISC Router Expandable Refer to Chapter 4 2 Locate the jumpers on the motherboard See Figure 3 9 Figure 3 9 Jumper Settings on the Motherboard Front of LR5000 PROM Card Expansion Cards Slots 8 WAN Ports Back of LR5000 W1 W2 W3 W4 W5 W6 W7 W8 RS 422 RS 232 Jumper Setting RS 422 Jumpe...

Page 23: ...jumper position on the pins The W numbers appear upside down on the motherboard WAN Port 1 RS 422 jumpers on pins W5 W6 W7 and W8 are set to the two pins to the right WAN Port 1 RS 423 232 jumpers on pins W5 W6 W7 and W8 are set to the two pins on the left WAN Port 2 RS 422 jumpers on pins W1 W2 W3 and W4 are set to the two pins on the right WAN Port 2 RS 422 232 jumpers on pins W1 W2 W3 and W4 ar...

Page 24: ... Locate the two WAN interfaces on the back panel of the RISC Router Expandable The interfaces are labeled WAN 1 and WAN 2 2 Connect a 37 pin female RS 449 connector to either WAN interface The connector has clamps on each side that must be pinched to attach to the interface Figure 3 12 WAN Port Location on the RISC Router Expandable WAN 2 WAN 2 WAN 1 ...

Page 25: ...ave installed the network cables attach the AC plug to the RISC Router Expandable Follow these steps 1 Attach the AC plug to the back of the RISC Router Expandable Be sure the power is OFF and the other end of the power cable is unplugged from the wall socket Refer to Section 2 3 for the location of the AC plug Chapter 1 lists the power requirements 2 Plug the AC power cord into a wall socket rate...

Page 26: ...cord from the back panel of the RISC Router Expandable High voltage may be present when you remove the front bezel CAUTION Be sure to secure proper grounding for the RISC Router Expandable when you install a PROM card Electrostatic discharge can destroy the card 1 Power down your RISC Router Expandable 2 Remove the power cord from the back panel of the unit 3 Remove the front bezel from the RISC R...

Page 27: ...OM card connects with the gold contacts on the motherboard 7 Secure the new PROM card Hold the back of the RISC Router Expandable and press the PROM card until it is completely seated 8 Turn the quarter turn locking screws counter clockwise to secure the PROM card 9 Re install the bezel by pressing it back onto the four ball studs on the front panel of the RISC Router Expandable 10 Plu the power c...

Page 28: ...y be present when you remove the front bezel CAUTION Be sure to secure proper grounding for the RISC Router Expandable when you install a PROM card Electrostatic discharge can destroy the card 1 Power down the RISC Router Expandable and remove the power cord from the back panel of the unit 2 Remove the front bezel from the RISC Router Expandable See Figure 4 3 3 Loosen the four cover mount screws ...

Page 29: ...er clockwise on the bottom of the expansion filler plate NOTE You may need a flat blade screwdriver to loosen thumbscrews 7 Remove the filler plate from the next available slot Each unoccupied slot in RISC Router Expandable has a protective filler plate that must be removed before you install an expansion card See Figure 4 5 Figure 4 4 Card Holder Bracket Figure 4 5 Removing a Filler Bracket Fille...

Page 30: ...ard Press firmly on the board until it is properly seated 9 Tighten the thumbscrew clockwise on the bottom of the expansion card 10 Secure the card holder bracket 11 Slide the top cover back onto the unit and secure the four cover mount screws Figure 4 6 Installing the Expansion Card Expansion Card ...

Page 31: ...is attached tp the WAN connector onthe back panel of the RISC Router Expandable for WAN Operation d Verify that the WAN jumpers are correctly configured for the interface you are using on the WAN port of the RISC Router Expandable e Is the FAULT LED on f BNC only Check the terminator switches on the back panel of the RISC Router Expandable Check for problems with your network a Verify that the int...

Page 32: ...1000 Park Drive Lawrence PA 15055 1018 724 746 5500 Fax 724 746 0746 Copyright 1993 Black Box Corporation All rights reserved ...

Reviews: