58
SERVLINK™
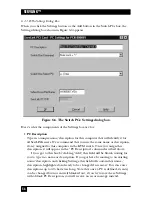
Command previously discussed. Then you would press and release [g] to select
the port, and finally press and release [Enter] to finish the command—which
is the “g - Enter” sequence you should select here.
Similarly, if you are setting up the CPU on port 15 in a regular ServSwitch
or compatible system, you should have selected “Left Ctrl” as the Switch Box
Command above; now choose the “15 - Enter” Select PC sequence here.
If the sequence needed for the PC you’re setting up isn’t in this list, you’ll
need to define it with the Create Keyboard Macro option (see
Section 6.4
).
•
Video Driver File Name
This is the name of the “video driver”—actually a preferences file—that the
ServLINK will use to interpret this PC’s video output. The first time you access
this PC, the ServLINK will autodetect a group of default video settings for it,
and generate this file. These settings will probably need finer manual
adjustment; as you make and save such adjustments, the ServLINK will store
them in this driver for future use.
Under normal circumstances, you will not need to specify a different driver
for a PC. See
Section 6.3
and your on-line help for more details.
•
ServLINK PC ID#
This is the unique number that the ServLINK will use to keep track of this PC.
This field will be grayed out because the ID number is automatically generated
and maintained by the ServLINK and cannot be changed. (About the only
time you will need to refer to this number is when you are examining the
ServLINK’s Event Logs, in which all of the system’s computers are referred to
by their number. See
Section 6.2.9
.)
•
OK
Click this button to save any changes you’ve made and return to the
Switch PCs box.
•
Cancel
Click this button to abort any changes you’ve made and return to the Switch
PCs box.
•
Help
Click this button to get on-line help for this box.
Summary of Contents for ServLink ACR3500A
Page 111: ...NOTES ...
Page 112: ...NOTES ...
Page 113: ...NOTES ...
Page 114: ...NOTES ...
Page 115: ...NOTES ...

