IMPORTANT SAFETY INSTRUCTIONS
1.
READ ALL INSTRUCTIONS CAREFULLY BEFORE USE. If you do not understand these instructions, need
clarification or further explanation, please call our toll free answer line for assistance at 1-800-304-1316
Monday through Friday 8:00 a.m. until 5:00 p.m. CST.
2.
Do not load wagon with more than 2000 lbs. (908 kg)
3.
Do not allow children to use the wagon unsupervised. This wagon is not a toy.
4.
Always distribute payload evenly over surface of bed.
5.
Do not load any items on top of the fence. Lower fence when objects are to be loaded onto the wagon.
6.
If any parts become damaged, broken or misplaced, do not use the wagon until
replacement parts can be obtained.
7.
Do not operate or use on objects that can cause damage to the pneumatic tires or tubes.
Do not inflate tires more than 35 psi.
8.
SAVE THESE INSTRUCTIONS.
ASSEMBLY INSTRUCTIONS
Your Monster Wagon requires assembly. Account for all parts and hardware before beginning assembly. If any parts are
missing, damaged or if you have questions or need additional instructions DO NOT RETURN THIS
PRODUCT TO THE RETAILER, call the manufacturer at 1-800-304-1316.
Tools required for assembly: Metric Socket Set, Wrenches and pliers.
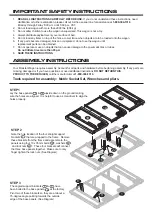
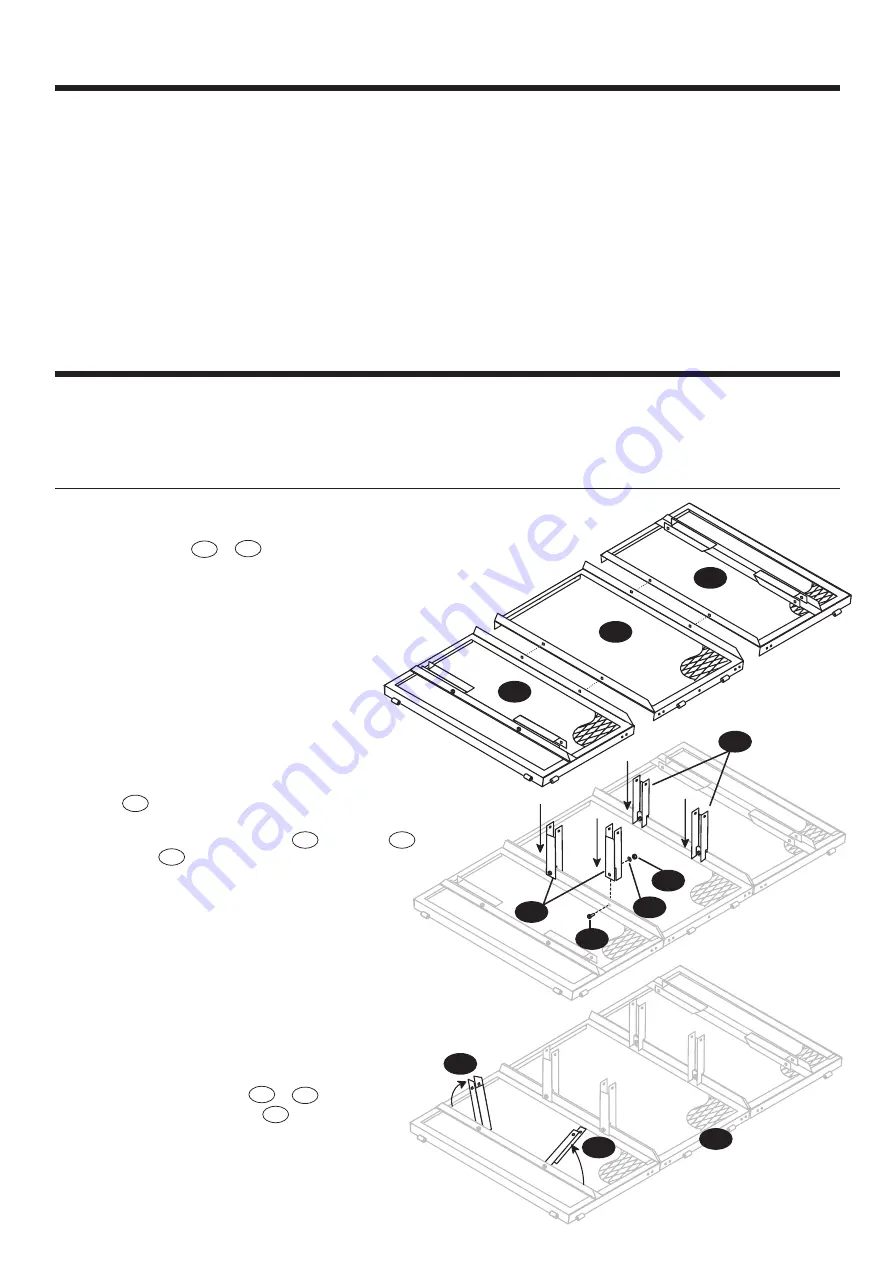
STEP 2
Note the hole location of the four straight support
brackets that are wrapped to the frame. Remove
these brackets from the frame and assemble to the
panels using four 10 x 35mm bolts , washers
and lock nuts . These four brackets will connect
the three base panels together. Make sure to only
finger tighten the lock nuts. (See Diagram)
STEP 1
Lay the base panels & upside down on the ground making
sure the holes are aligned. It is helpful to use a screwdriver to align the
holes properly.
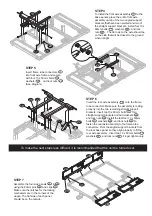
STEP 3
The angled support brackets & have
been bolted to the base panels at the factory.
Pivot two of these brackets so they are at about a
75-degree angle pointing towards the outside
edge of the base panels. (See Diagram)
1B
1A
1A
1B
7
7
16
26
22
7
16
26
22
8
9
1B
1
9
8
1B

