Use
1. Place the appliance on a flat, stable surface.
2. Put the ingredients into the required jug.
3. If using the food processor fit the the lid (Y) onto the jug
(S) by turning it clockwise.
4. If using the blender push the lid (B) and filler cap (A)
onto the jug (C).
5. If using the grinder or mincer seal the jug by fitting the
required blade holder (N or Q) and with the seal (E) and
secure by turning anti-clockwise.
Note
: When using the blender or mincer, the correct lid must
be fitted.
6. Place the jug onto the food processor body (I).
7. Secure the jug by turning it anti clockwise.
8. Connect it to the electrical supply and select the
required speed using the rotary switch.
The following settings are available:-
P = Pulse Operation
O = Power Off
1 = Low Speed
2 = High Speed
The appliance should be disconnected from the mains
supply before removing the jug.
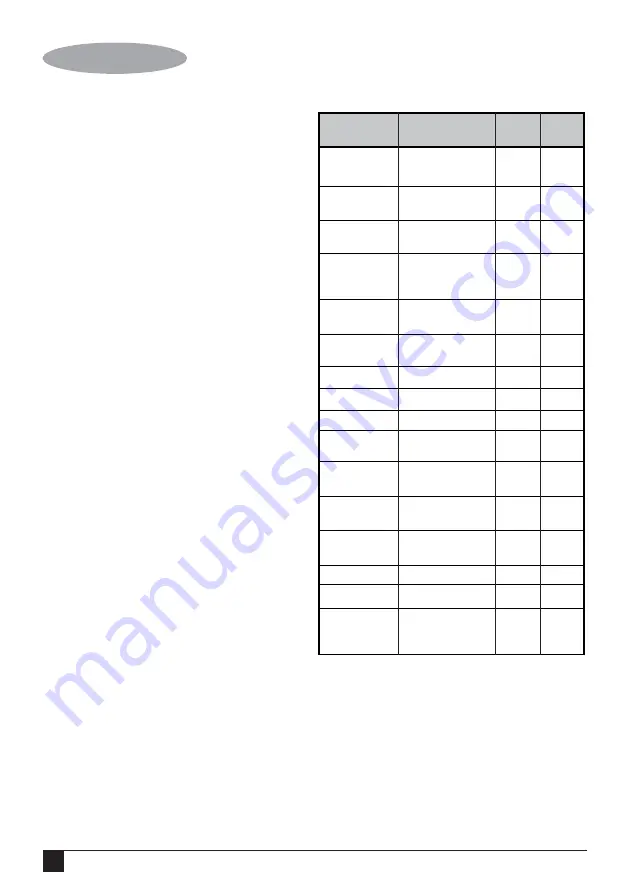
Recommendations when food processing
*1 Use the Chopping blade (W)
*2 Use the kneading blade (V)
*3 Use the grating disc (X)
*4 Use the Emulsifier (U)
Note
: The food processor functions should not be run for
longer than 1 minute. After a continuous run of 1 minute, the
blender should be allowed to cool down for at least 2 minutes
before further use.
Warning
: Pulse mode should not be operated more than 10
sec at a time.
Function
Types of food
Speed
Time
Chopping *1
Vegetables and
Pulse
15 sec
fruits
or 2
Chopping *1
Meat, cheese
1
20 sec
and chocolate
Blending *1
Soups and thick
1
20 sec
drinks
Pureeing *1
Cooked
1 10-15 sec
vegetables and
soft fruits
Mixing *1
Pastry and
2
40 sec
scones
Mashing *1
Cooked potatoes
2
60 sec
and baby food
Kneading *2
Bread dough
1
20 sec
Folding in *2
Mousse batter
1
15 sec
Creaming *2
Cake batter
1
30 sec
Slicing *3
Vegetables and
1 or 2
5 sec
fruits
Slicing *3
Potatoes and
1
5 sec
cheese
Shredding *3g
Vegetables and
1 or 2
5 sec
fruits
Grating *3
Cheese and
1
5 sec
chocolate
Whisking *4
Eggs
2
1-2 min
Whipping *4
Cream
2
1-2 min
Emulsifying *4
Light batters
2
1-2 min
for omlettes,
pancakes etc
6
ENGLISH
(Original instructions)
Summary of Contents for KR40-B5
Page 1: ...KR40 B5 KR41 B5 KR42 B5 KR43 B5 www blackanddecker ae AR FR EN...
Page 2: ...2 ENGLISH Original instructions E H I J C D G F B A K L E N M O Q P R...
Page 3: ...Z Y X W V U T S 3 ENGLISH Original instructions...
Page 18: ...EN 60335 2 14 A B C D E F G H I J K L M N O P Q R S T U V W X Y Z 1 18...
Page 19: ...Black Decker 7 KR43 B5 7 KR43 B5 KR40 B5 KR41 B5 KR42 B5 19...
Page 20: ......
Page 22: ......
Page 23: ......


