background image

5

ENGLISH

(Original instructions)

Before first use

•  Remove all packaging from the appliance.
•  Clean the appliance before first use.
•  Check that all parts are complete and not damaged.• 

Choose the appropriate attachment to perform your 

desired task:

•  The blender attachment is suitable for blending fruits or 

vegetables and crushing ice.

Warning! 

The blades are sharp, handle with great care and 

ensure that you unplug the appliance from power outlet before 

assembling and removing parts.

Blender operation

1.  The unit will be in OFF condition when the control knob 

at “OFF”.

2.  Rotate the knob from “MIN” to towards “MAX” to set at 

desired speed for blending the food.

3.  Rotate knob to “ON” position and press the “Pulse” 

button to reach the high speed immediately. Unit speed 

will be back to zero automatically when button is 

released.

4.  Rotate control knob to “ON” position and press the 

“Smoothie” button and ingredients in the blender cup will 

be processed automatically to attain Smoothie effect. 

After processing, the machine will be stopped 

automatically.

5.  Rotate control knob to “ON” position and press the “Ice 

Crush” button and ice cubes in the blender cup will be 

crushed automatically. After crushing, the machine will 

be stopped automatically.

How to use the appliance

1.  Place the main body onto the stable & dry surface.
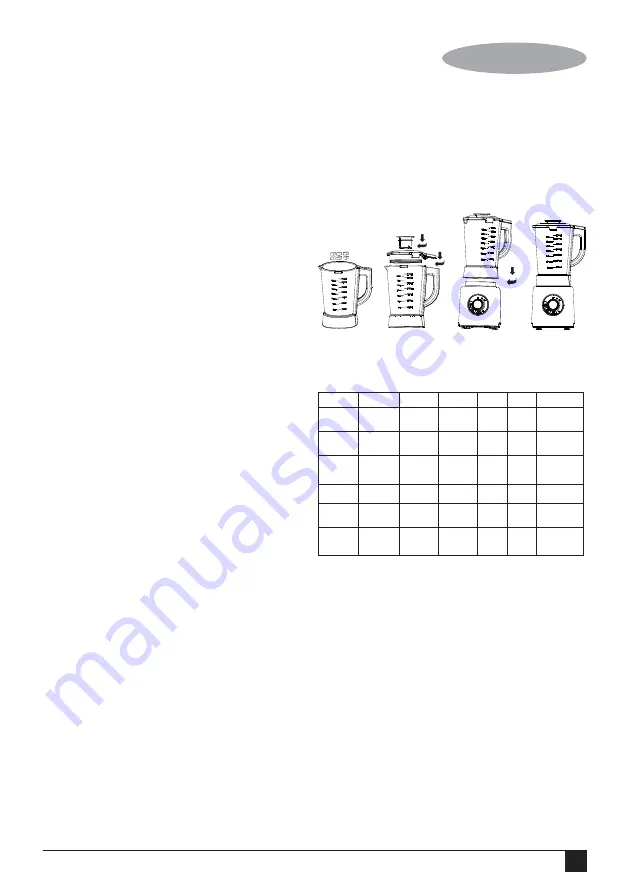
2.  Clean the blender jar well. Cut the fruit into 15*15*15mm 

and put those into the jar with some water (Do not 

exceed the maximum capacity). See picture 1.

3.  Assemble the jar cover and measuring cup as in picture 2.
4.  Place the assembled jar into the main body as shown in 

picture 3 and picture 4. 

5.  Rotate the switch to speed OFF and plug the unit.
6.  Choose the related speed to start the unit with running 

time 1-2 minutes then rotate back to speed OFF. 

Standard operation period ≤ 2 minutes.

7.  Unlock the jar from the base and then open the lid. Pour 

the drink into cups.

8.  Disconnect the plug then clean and dry the blender jar 

after using.

Notes

Please rotate the switch to off before using
Please rotate the switch to ON and then operate the 3 buttons 

(pulse / smoothie and ice crush)
Do not operate the unit over 2 minutes

Food table

Blender jar disassembly and blade 

installation:

1.  Place the blender cup with mouth facing down on a flat 

table and then turn the blade holder clockwise to remove 

it as shown in picture 5

2.  The blade seal ring could be removed from the blade 

holder, as shown in picture 5

For installation, please put the seal ring into the blade holder, 

and then rotate the holder counterclockwise into the blender 

cup.

Caution:

 Beware the blade is sharp.

Picture 1

Picture 2

Picture 3

Picture 4

Food item 

Quantity  Water(ml)  Mode 

Speed  Time  Remark

Apple 

650 G 

1050ML 

Knob(ON)  MAX 

1 mins  Remove 


apple core

Grape 

650 G 

1050ML 

Knob(ON)  MAX 

1 mins  Remove  


seeds

Orange 

650 G 

1050ML 

Knob(ON)  MAX 

1 mins  Remove  


peel, seeds   


and pith

Carrot 

650 G 

1050ML 

Knob(ON)  MAX 

1 mins  Remove  


seeds

Crushed ice   350 G 

1350ML 

Smoothie  AUTO  AUTO  Ice cube size  

sand 


20*20*20mm  


Crushed  

200 G 

Ice Crush  AUTO  AUTO  Ice cube size 

dry ice 


20*20*20mm

Summary of Contents for PB100-B5

Page 1: ...www blackanddecker ae AR FR EN PB100 B5 PB120 B5 ...

Page 2: ...2 ENGLISH Original instructions 5 7 1 2 4 3 6 8 9 ...

Page 3: ...om the power supply Disconnect the appliance from the power supply when not in use before fitting or removing parts and before cleaning This appliance is not intended to be operated by means of an external timer or separate remote control system The outer surface of the blender may become hot when in use Allow moving parts to come to a stop before removing any cover Allow moving parts to come to a ...

Page 4: ...that may affect its operation Do not use the appliance if any part is damaged or defective Have any damaged or defective parts repaired or replaced by an authorised repair agent Before use check the power supply cord for signs of damage ageing and wear Do not use the appliance if the power supply cord or mains plug is damaged or defective If the power supply cord or mains plug is damaged or defect...

Page 5: ...eed the maximum capacity See picture 1 3 Assemble the jar cover and measuring cup as in picture 2 4 Place the assembled jar into the main body as shown in picture 3 and picture 4 5 Rotate the switch to speed OFF and plug the unit 6 Choose the related speed to start the unit with running time 1 2 minutes then rotate back to speed OFF Standard operation period 2 minutes 7 Unlock the jar from the bas...

Page 6: ...the environment Separate collection This product must not be disposed of with normal household waste Should you find one day that your BLACK DECKER product needs replacement or if it is of no further use to you do not dispose of it with other household waste Make this product available for separate collection BLACK DECKER provides a facility for recycling BLACK DECKER products once they have reache...

Page 7: ...ustomer unless The product has been used for trade professional or hire purposes The product has been subjected to misuse or neglect The product has sustained damage through foreign objects substances or accidents Repairs have been attempted by persons other than authorised repair agents or BLACK DECKER service staff To claim on the warranty you will need to submit proof of purchase to the seller ...

Page 8: ...magé pendant l utilisation débranchez immédiatement l appareil Ne touchez pas le cordon d alimentation avant de le débrancher Débranchez l appareil avant le montage démontage et le nettoyage des pièces Cet appareil n a pas été conçu pour fonctionner au moyen d une minuterie externe ou d un système de télécommande séparé La surface extérieure du mixeur peut devenir très chaude durant l utilisation ...

Page 9: ...terrupteurs ne sont pas endommagés et toutes les autres conditions qui peuvent affecter son fonctionnement N utilisez pas l appareil si une pièce est endommagée ou défectueuse Faites réparer ou remplacer les pièces endommagées ou défectueuses par un agent de service agréé Avant l utilisation vérifiez que le cordon d alimentation ne présente pas de signes de dommages de vieillissement et d usure N u...

Page 10: ... sur le bouton Glace pilée pour piler automatiquement les glaçons dans la cruche du mixeur Après le pilage l appareil s arrête automatiquement Comment utiliser cet appareil 1 Placez le corps principal sur une surface stable et sèche 2 Nettoyez bien la cruche du mixeur Coupez les fruits en cubes de 15 x 15 x 15 mm et mettez les dans la cruche avec un peu d eau ne dépassez pas la capacité maximale V...

Page 11: ...érifiez que la cruche de mixage est éteinte avant de la retirer du support Accessoires de mixage Versez un peu d eau savonneuse chaude dans la cruche 4 tournez le bouton de commande 6 sur 1 et utilisez l appareil pendant quelques secondes Démontez la cruche du bloc moteur et rincez la sous l eau courante puis détachez la lame de mixage de la cruche et le doseur du couvercle Finalement rincez la cru...

Page 12: ...e la date d achat la garantie de BLACK DECKER permet le remplacement de pièces défectueuses la réparation ou l échange de produits soumis à une usure normale afin de garantir un minimum d inconvénients pour le client sauf si le produit a été utilisé à des fins commerciales professionnelles ou de location le produit a été utilisé de manière inadéquate ou avec négligence le produit a subi des dommages...

Page 13: ... VGôZCG èàæŸG Ωnóîà ùoj ɪgE G hCG ΩGóîà S G Aƒ ùd èàæŸG Vô àj çOGƒM hCG á LQÉN OGƒe hCG ΩÉ ùLCG áé àf à d èàæŸG Vô àj AÓch ÒZ UÉî TCG á SGƒH èàæŸG ìÓ UEG ádhÉfi ô o Œ ácöûd HÉàdG áfÉ üdG jôa hCG øjóªà ŸG áfÉ üdG BLACK DECKER π ch hCG FÉÑ d AGöûdG π dO Ëó J EG êÉà ƒ S ɪ dÉH áÑdÉ ª d óªà ŸG áfÉ üdG π ch ɵe øe ëàdG æµÁ óªà ŸG áfÉ üdG BLACK DECKER ÖàµÃ É üJ G á SGƒH à æŸ ÜôbC G π dódG Gòg QƒcòŸG Gƒ...

Page 14: ...îàdGΩóYΩõ j π üØæŸG ª G ájOÉ dGá dõæŸG UÉÿGBLACK DECKERèàæe GóÑà SGΩÉjC GøeΩƒj ΩõdGPEG πH iôNC Gá dõæŸGáeɪ dG e æe ü îàJÓa eóîà ùJó J GPEGhCG H π üØæŸG ªé dèàæŸGGògáMÉJEGøeócCÉJ äÉéàæeôjhóJIOÉYE aôeBLACK DECKERácöTôaƒJ ΩóYhÉgôªYájÉ f EGÉ dƒ UhOôéÃBLACK DECKER ògøeIOÉØà SÓd ÉkfÉ áeóÿG ògËó Jºàjh πª dÉ à MÓ U ƒ S òdGhóªà eáfÉ Uπ ch CG EGèàæŸGIOÉYEG Lôj áeóÿG ÉæYáHÉ fäÉéàæŸG ªL QhóH ƒàj É üJ G ÓNøeó...

Page 15: ... EGÉgQOCGºK FÉbO Éà bO ÜGöûdGÖ U AÉ dGíàaGºKIóYÉ dGøeAÉYƒdGπØbíàaG 7 ÜGƒcC G ΩGóîà S Gó H ØØLh ÓÿGAÉYh fh ùHÉ dGπ üaG 8 äÉ MÓe ΩGóîà S GπÑbπ ûàdG É jEG Vh ÑædG QGQRCGáKÓãdGπ TºKπ ûàdGAóH Vh YìÉàØŸGôjhóJ Lôoj è ãdG TôLh Pƒª ùdGh Úà bOøeÌcC IGOC Gπ ûJ ΩÉ dG ádhÉW IôØ ûdGh ÓÿG AÉYh µØJ Ö cÎdG ôjhóàHºbºKáë ùeádhÉW YπØ SCÓd àeó eh ÓÿG܃c V 1 í VƒeƒgɪcIôØ ûdGádGRE áYÉ ùdGÜQÉ Y ÉŒG IôØ ûdGπeÉM 5IQƒ üdG ...

Page 16: ...ûŸG J ÒZ AGõLCG ájCG GóÑà SG hCG ádGREG Ék e hÉ π dódG Gòg AÉHô µdG ôWÉfl øe áeÓ ùdG CG øe kɪFGO VQC ÉH èàæŸG Gòg π UƒJ Öéj ÚÑŸG ܃ ŸG âdƒØ d πKÉ AÉHô µdG Qó üe âdƒa RÉ G Y CG ôŒ AÉHô µdG áëàØd kÉÑ SÉæe ùHÉ dG ƒµj CG Öéj e ùHÉ dG µe Ωóîà ùJ ùHÉ dG Y ƒf CG øe äÓjó J ΩGóîà SGh ùHÉ dG πjó J ΩóY 1 áÄØdG VQC ÉH á üàŸG Iõ LC G á Hô µdG äÉeó üdG ôWÉfl øe óëj áÑ SÉæŸG AÉHô µdG äÉëàa hCG ùHÉ dG hCG ùdG ôª ...

Page 17: ...óÑà SG hCG AGõLC G Ö côJ hCG LQÉN âbDƒe jôW øY π ûà d ü üfl ÒZ RÉ G Gòg ó H øY ºµëà d π üØæe ΩÉ f ΩGóîà S G AÉæKCG Óî d LQÉÿG í ùdG IQGôM áLQO ØJôJ ób AÉ Z CG ádGREG πÑb bƒàJ ácôëàŸG AGõLC G O ÜGÎb G πÑb bƒàJ ácôëàŸG AGõLC G O ΩGóîà S G AÉæKCG IóMƒdG á HÉàe Öéj øµÁ å M ÓÿG øNÉ S πFÉ S Ö U ádÉM Qò G ñƒJ ÅLÉØŸG ÒîÑàdG AGôL RÉ G êQÉN OôW ÉkªFGO ô àfG QòëH É e πeÉ J ájÉ d IOÉM àdG äGôØ T EG äGôØ ûdG E...

Page 18: ...nidal St Amr Ibn Elaas Road 0021861 9094183 nissrine hajj aces com lb Benghazi Libya P O Box 18182 Salmany ext 103 LIBYA North Africa Trading P O Box 348 7 October 00218061 3383994 nissrine hajj aces com lb El Ghoul Brothers Street 11 Benghazi LIBYA North Africa Trading AlBarniq Dewalt Center 00218021 3606430 nagte ly gmail com El Ghoul Brothers Mokhazin elsukar St ElFallah Tripoli nagte dpt gmail...

Page 19: ......

Page 20: ...100 B5 WARRANTY REGISTRATION CARD YOUR NAME VOTRE NOM YOUR ADDRESS VOTRE ADRESSE POSTCODE CODE POSTAL DATE OF PURCHASE JOUR D ACHAT DEALER S NAME ADDRESS NOM ET ADRESSE DU VENDEUR ù ß r F M u Ê d e d b Í U a A d ß r Ë M u Ê U z l ...

Reviews: